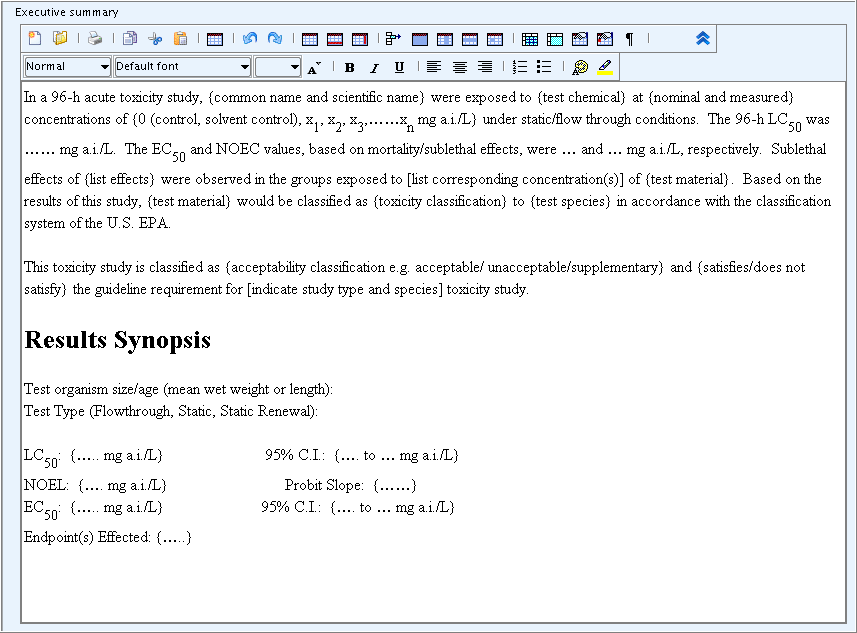
Introduction
IUCLID sections 4 to 11 are also called "Endpoint sections". In this context, an endpoint is meant as an information requirement or data point with regard to the physico-chemical properties of the substance, environmental fate and behaviour, ecotoxicological information, toxicological information and specific information (e.g. residues in food and feedingstuffs) according to a given regulatory programme, e.g. the standard information requirements set out in the EU REACH Annexes VI to XI.
A IUCLID Endpoint section provides the container for storing "endpoint study" data, e.g. a study on vapour pressure to be entered in section 4.6 Vapour pressure or a study on repeated dose toxicity (oral) to be entered in section 7.5.1 Repeated dose toxicity: oral. The term "study" has a rather generic meaning in that it refers to any experimental study, but also to an estimation or prediction method including (Q)SAR, read-across, weight of evidence evaluation, data waiving or any other type of information being relevant for a given information requirement. For more information see chapter B.4.2.2 Summaries of study reports and other information.
The collection of endpoint-related information in IUCLID is based on summarising descriptions of full study reports. These study summaries can be very condensed or very detailed. However, a study summary should provide sufficient information to make an assessment of the relevance of the study. Very detailed study summaries are also termed "robust study summaries", if they address all relevant study items (see chapter B.4.2.2.3.1 Definition of key studies, supporting studies, robust study summaries).
In IUCLID, study summaries are managed using Endpoint study records, which are templates with predefined fields and freetext prompts intended to help the user summarise a study (see chapter D.4.7.1 What is an Endpoint study record?). Each Endpoint study record of sections 4 to 10 is structured into the following main parts:
Administrative data
Data source
Material and methods
Results and discussion
Overall remarks, attachments
Applicant's summary and conclusions
Under these headings certain data entry fields are subsumed which are common to all Endpoint study records, in addition to endpoint-specific data entry fields. Because many fields are only relevant for robust study summaries, a system of detail levels has been implemented in IUCLID. This allows displaying either only the basic fields or all fields (see chapter D.4.7.6 Switching between display type "basic fields" (detail level 1) and "all fields" (detail level 2)).
Almost all IUCLID Endpoint study records are modelled on the so-called OECD harmonised templates, which are standard formats for reporting endpoint study summaries related to any type of a chemical (e.g. pesticides, biocides, industrial chemicals) (see chapter D.4.7.1 What is an Endpoint study record?).
IUCLID does not prescribe how detailed the study summaries should be recorded. The fields provided should be considered as a maximum degree of detail. Older study reports or literature sources often do not provide the details for which many fields prompt for on a robust study summary level. On the other hand, more recently conducted studies and any new studies can be summarised in a very detailed manner. Refer to the relevant guidance for the respective chemical programme on how detailed studies need to be summarised. In the case of existing IUCLID 4 datasets prepared in the context of the OECD High Production Volume Chemicals Programme, EU Risk Assessment or for other purposes, which will be used for EU REACH, a pragmatic approach may have to be considered to avoid unnecessary additional work for adjusting these datasets to the new format in IUCLID 5.
Note
Sections 11 Guidance on safe use, 12 Literature search and 13 Assessment Reports are not used for recording endpoint study summaries, but are also related to endpoint information.
Step-by-step guide
The following step-by-step guides are illustrated by screenshots based on fictitious sample data.
Creating an Endpoint study record
Open the Substance dataset as instructed in C.4.1 Entering/editing data in sections 1 to 3.
Verify if the view mode "REACH Registration 1 - 10 tonnes, standard requirements" is selected (see chapter C.4.1 Entering/editing data in sections 1 to 3).
Click the Plus symbol in front of section 4 Physical and chemical properties to display all subsumed subsections.
Right-click section 4.2 Melting point/freezing point and from the menu displayed, click the New Endpoint study record command.
A new record appears indicated by a green bullet
 . A default record name is generated and displayed
both in the section tree pane and the record titlebar. This record name
consists of the section title followed by a dot and a consecutive
number, e.g. "Melting point/freezing point.001", as shown in the
following screenshot.
. A default record name is generated and displayed
both in the section tree pane and the record titlebar. This record name
consists of the section title followed by a dot and a consecutive
number, e.g. "Melting point/freezing point.001", as shown in the
following screenshot.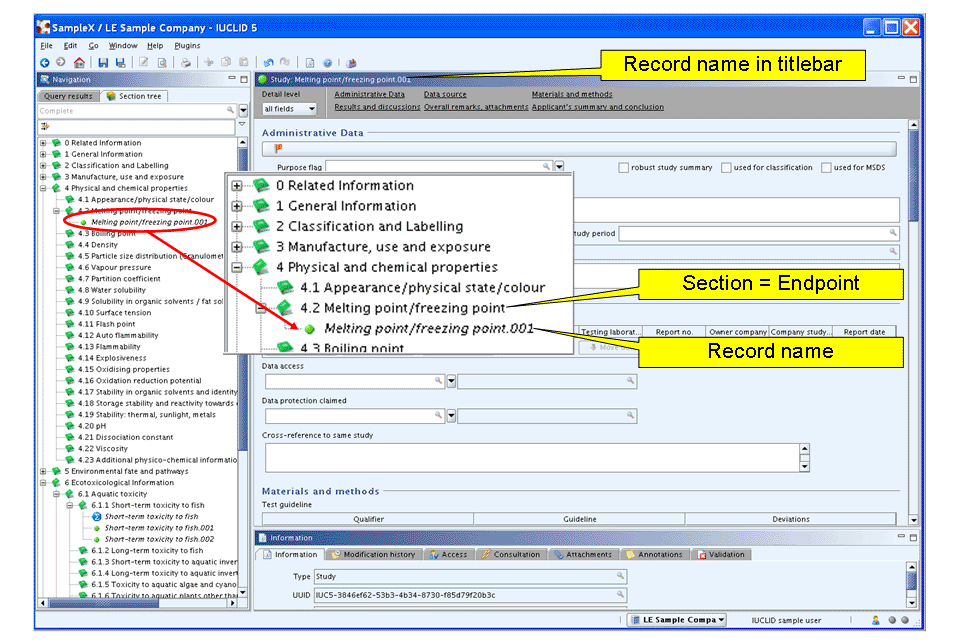
Renaming an Endpoint study record
Select the record in the section tree pane and either press the F2 key or right-click the record and from the menu displayed, click the Rename command.
Edit the record name as appropriate and then click OK.
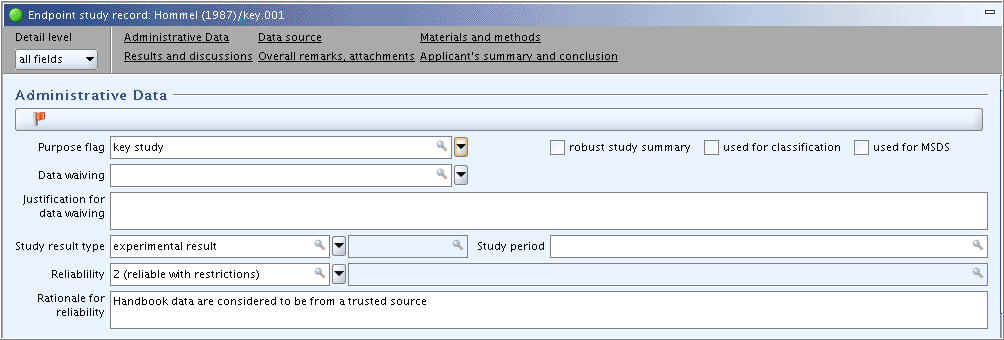
Tip
It can be useful to add additional information or even replace the default record name by information that gives an overview of the value of that record on the fly. Example: "Hommel (1987)/key.001" (indicates the Author and Year and that the record contains a key study). For more information see chapter D.4.7.3 Renaming an Endpoint Study Record.
Entering handbook data for section 4.2 Melting point/freezing point
This use case includes the entry of (limited) handbook data. It is assumed that the data are from a trusted source and can therefore be used as key study. (Note: Refer to the relevant guidance document for the regulatory programme as to whether handbook data are accepted to cover endpoints for physico-chemical properties.)
The newly created record in section 4.2 Melting point/freezing point should be open and displayed in the Data entry window. If not, double-click the record in the Section tree.
Tip
Any newly created record will automatically be in the Edit mode. When you re-open a record, you need to click the Edit button
 on the toolbar.
Part "Administrative Data": complete the appropriate fields as shown in the following screenshot:
Part "Data Source": In field block
Reference, click the Add button and in the dialogue opened, select the Reference type and enter the bibliographic reference information as shown in the following screenshot. Other fields in this part are not applicable.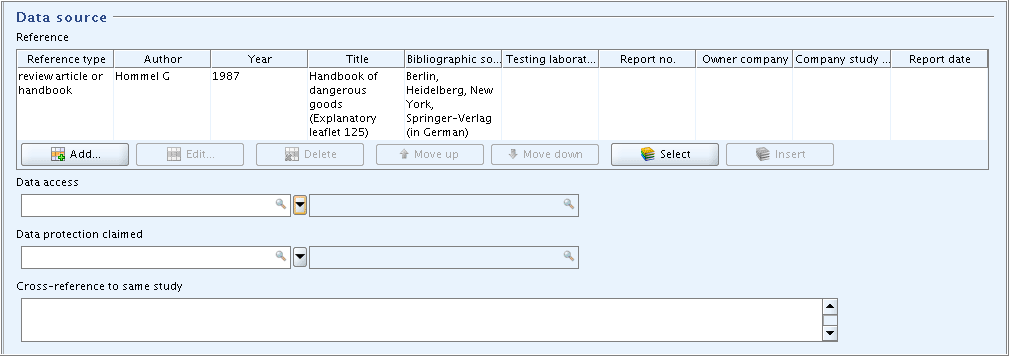
Part "Materials and methods": The only field that can be completed in this example is the field
GLP compliance.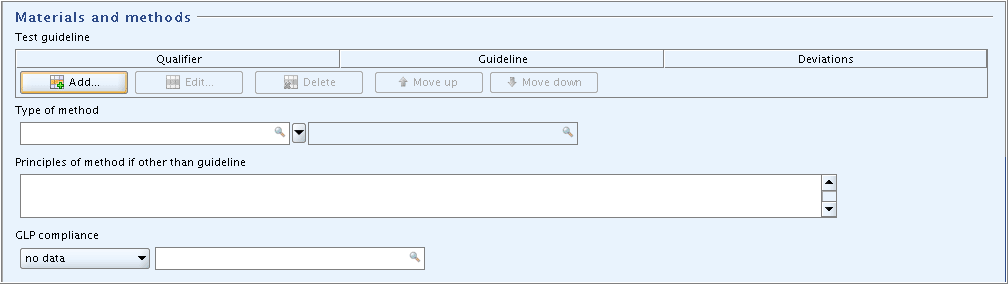
Part "Results and discussions": In field block
Melting /
      freezing point
, click the Add button and in the dialogue opened, enter the freezing point in degree Centigrade. If required, repeat this procedure and enter the corresponding value in kelvin.
If you continue creating another Endpoint study record, a dialogue will ask you to save the modified data. Confirm by clicking the Save button.
Important
If you discontinue working with IUCLID for a longer time (i.e. more than two hours), it is recommended to click the Save
 button on the toolbar to make sure that the
data entered are saved. Otherwise a session timeout might occur
causing IUCLID to stall. The data could then not be saved
anymore.
button on the toolbar to make sure that the
data entered are saved. Otherwise a session timeout might occur
causing IUCLID to stall. The data could then not be saved
anymore.
Entering the basic data of a study in section 6.1.1 Short-term toxicity to fish
This use case includes the entry of the basic data of a study in an Endpoint study record. It is assumed that only limited information is available from a publication and and executive summary of a study report. But the study report itself is not available yet. This use case is intended to demonstrate the Detail level switch, how to use basic fields only, launching the online help, handle a comprehensive drop-down list, use a Freetext template and the Undo function.
Create a new Endpoint study record in section 6.1.1 Short-term toxicity to fish.
Rename the record to "Dorgerloh (1992)"
Click the Detail level button below the record title bar and from the menu displayed, select "basic fields".
Note
As described in chapter D.4.7.1 What is an Endpoint study record?, IUCLID allows displaying either the basic fields only or all fields, i.e. including additional fields, which are normally only relevant for robust study summaries. The field labels of any additional fields are set in blue colour, while the label of all basic fields is black.
Part "Administrative Data": In field
Study result
      type
, select "experimental study". In fieldStudy period, enter "1991" as assumingly indicated in the publication. Other fields are left empty for the time being.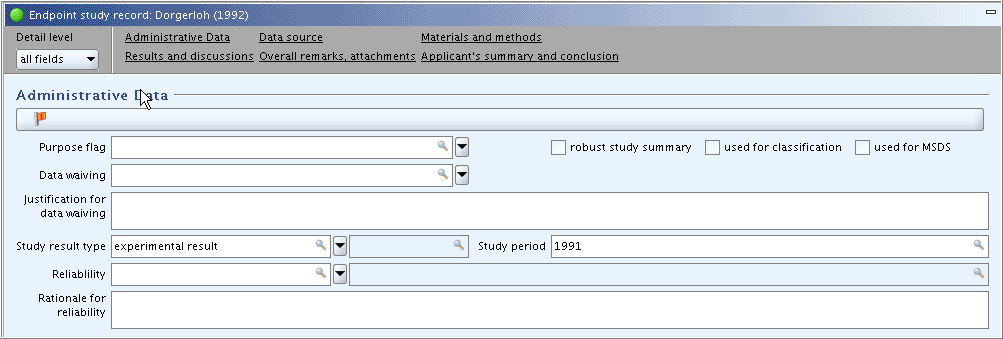
Part "Data Source":
In field block
Reference, enter the two references shown in the screenshot:Launch the context-sensitive online help from within any field via the F1 key or by clicking the Help button
 on the toolbar.
Customise the size of the Help window as appropriate (If you need to look up online help for fields frequently, it can be useful to position both the Help window and the IUCLID screen in such a way that both windows are visible without having to switch back and forth. However, the context-sensitive help for each field has to be explicitly evoked by pressing the F1 key or clicking the Help button
.)Enter the bibliographic data as appropriate.
In field
Data access, select the item "data published".

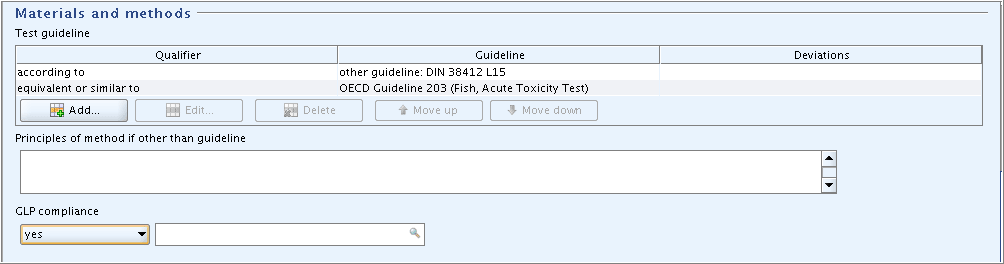
Part "Materials and methods":
Enter the guideline given in the data source: Select "according to" in the field
Qualifier. Select "other guideline" in the fieldGuideline, because the guideline used is not listed in the picklist, and enter "DIN 38412 L15" in the associated text field.Indicate that this guideline is equivalent to OECD Guideline 203: Repeat this procedure, but select the appropriate items from the picklists as shown in the screenshot below.
Select "yes" in the field
GLP
          compliance
.
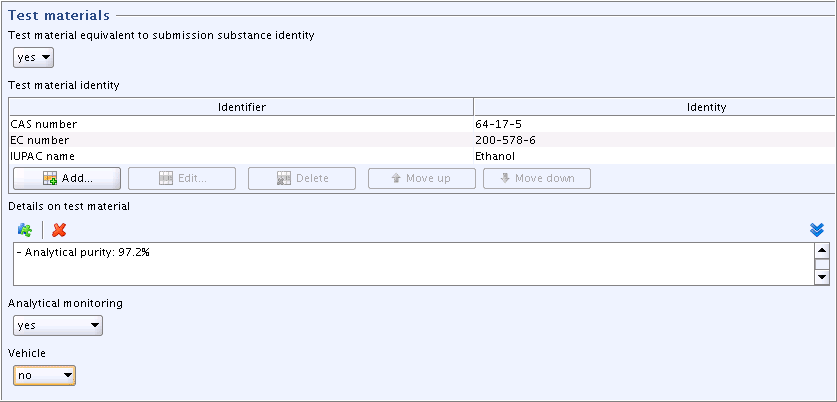
Part "Test materials":
Fields related to the identity of the test material are filled automatically based on the Reference substance assigned to the Substance dataset (see chapter C.3 Creating a dataset for a Substance and assigning a Reference substance). You can add any additional identifiers.
Note
If the study was conducted with another than the submission substance (i.e. as identified by the Reference substance) and used as read-across, you would have to update these fields accordingly.
Field
Details on test material: Click the puzzle-like icon below the field label. In the Freetext
templates dialogue box that opens, edit the Freetext template provided
in such a way that only the item "- Analytical purity:" is kept,
while all other items are deleted. Specify as shown in the
screenshot below.
below the field label. In the Freetext
templates dialogue box that opens, edit the Freetext template provided
in such a way that only the item "- Analytical purity:" is kept,
while all other items are deleted. Specify as shown in the
screenshot below.Complete the fields
Analytical monitoring("yes") andVehicle("no").
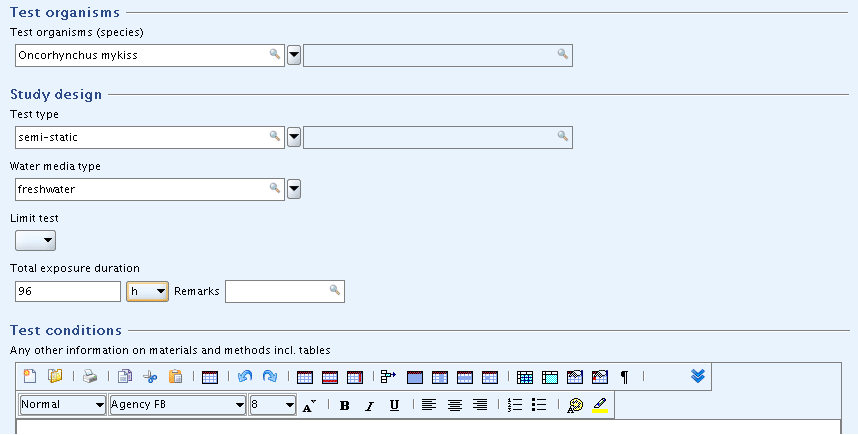
Parts "Test organisms", "Study design" and "Test conditions": Enter the basic data as shown in the screenshot below.
Tip
In case of very comprehensive picklists provided in a drop-down combo box, you can find the desired item quickly by using either of the following methods:
Click the drop-down arrow and in the picklist that opens, click into the Find pane
 and enter an adequate part of the item. For
example, "my" will immediately find any item that contains this
string, e.g. "Oncorhynchus mykiss". You need not use wildcards (*)
and such on the-fly queries are not case-sensitive.
and enter an adequate part of the item. For
example, "my" will immediately find any item that contains this
string, e.g. "Oncorhynchus mykiss". You need not use wildcards (*)
and such on the-fly queries are not case-sensitive.Just start typing the item of your choice in the list field. The autofill function of IUCLID will display the first entry in the list starting with the letter(s) you enter. For example, typing "O" or "o" will extend to "Oncorhynchus gorbuscha". When you then click the drop-down arrow, the first entry in the list starting with that/these letter(s) will be displayed directly and you can find the desired item (e.g. "Oncorhynchus mykiss") right away.
Part "Results and discussions": In the field block
Effect
      concentrations
, click the Add button and in the dialogue opened, enter the LC50 value and the parameters shown in the following screenshot: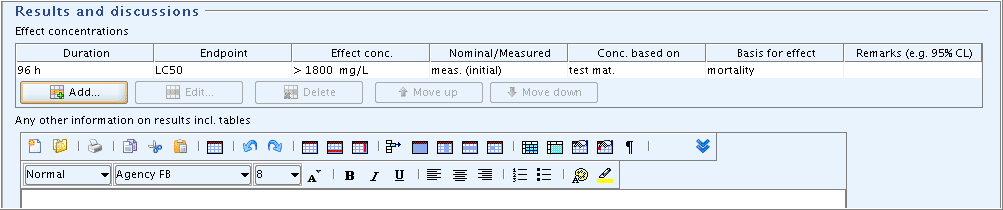
Part "Overall remarks, attachments": Nothing to add for this sample study.
Part "Applicant's summary and conclusion": In field
Validity criteria fulfilled, select "yes" and add a brief explanation in the related text field.Tip
In print-outs, the supplementary text field related to the list field is not separated by any delimiter. This might cause confusing text combinations. It is therefore recommended to include any supplementary text in parentheses to get it set aside from the list item. This is not required if the picklist item end with a colon as for "other:".
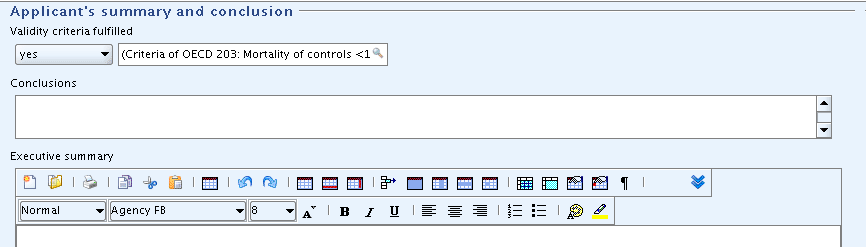
Test the Undo function: Delete the entry in field
Validity criteria fulfilledby selecting the blank item. Then click the Undo button on the toolbar. The previous picklist item will
be re-entered, but not the related text field.
on the toolbar. The previous picklist item will
be re-entered, but not the related text field.Note
Using the Undo command, the most recent edit operations can be undone in most cases. There are a few exceptions to this rule as demonstrated with the example above.
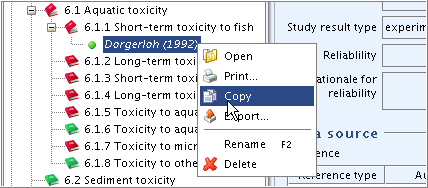
Copying an Endpoint study record
Use case: To demonstrate the Copy function it is assumed that the Endpoint study record prepared in the sample above shall be expanded to a robust study summary, while the first draft record shall be stored. Proceed as follows:
Right-click the record "Dorgerloh (1992)" in the section tree pane and from the menu displayed, click the Copy command.
The clipboard manager is opened and the copied record is displayed.
Select and highlight the copied record in the clipboard and click the Paste selected items
 button. The record will then appear in the
section tree under the same name as the orginal one.
button. The record will then appear in the
section tree under the same name as the orginal one.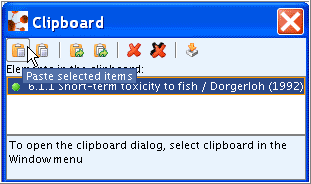
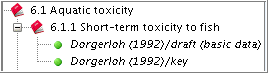
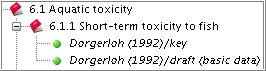
Rename one record to "Dorgerloh (1992)/draft (basic data)" and the other one to "Dorgerloh (1992)/key".
Ordering Endpoint study records
Use case: Reorder records in the section tree to position the record designated as "key study" first (useful in case of many records per Endpoint section). Proceed as follows:
Right-click the section title 6.1.1 Short-term toxicity to fish and from the menu displayed, click the Order records command.
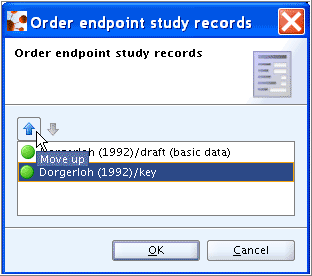
In the dialogue box, highlight the record designated as "key study", click the Move up arrow to position it first and then click OK.
The key study then appears as first record.
Quickly finding specific Endpoint study records in the section tree
Use case: Especially if a section contains a large number of Endpoint study records, the query / filter method should be used to quickly filter for specific records.
To query and find a record
Click into the Find or Filter pane
below the title bar of the section tree
pane.Enter an adequate part of the record name and all records containing this search string in their names will be filtered out and displayed immediately. For example, "Dor" (without quotation marks) will select records starting with this string. "Dor*key" will find the record "Dorgerloh (1992)/key".
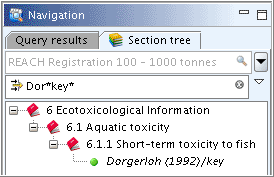
Tip
Use wildcards (*) for any characters preceding or following a search string.
Entering additional data for a robust study summary in section 6.1.1 Short-term toxicity to fish
Use case: It is assumed that the full study report is now available and can be used to prepare a robust study summary. This use case is intended to demonstrate the Detail level "all fields", the Navigation links to the main parts of an Endpoint study record, the use of comprehensive Freetext templates, sorting of items in repeatable blocks of fields, using a rich text field and uploading a predefined table, and other edit functions.
Find the record "Dorgerloh (1992)/key" in the section tree and double-click it to open it.
Click the Edit button
on the toolbar to allow editing of the
record.Click the Detail level button below the record title bar and from the menu displayed, select "all fields".
Part "Administrative Data": Complete the field
Purpose
      flag
, select the checkbox for "robust study summary" and specify the study period in the corresponding field as shown in the following screenshot. (Note: FieldsReliabilityandRationale for reliabilitywill be completed later, when the study has been evaluated and the robust study summary is completed.)
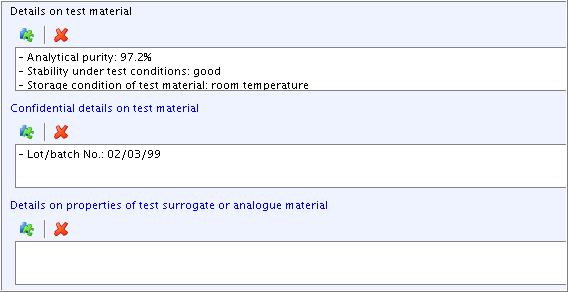
Part "Test materials":
Add additional information in field
Details on test
          material
. Click the Freetext template icon below the field label. In the Freetext
templates dialogue box that opens, edit the Freetext template provided
in such a way that only the needed items are kept, while all other
items are deleted. Specify as shown in the screenshot below.Field
Confidential details on test
          material
: Select the item "- Lot/batch No.:" from the Freetext template and add data as shown in the screenshot below. (Note: Any information that can be claimed confidential (e.g. composition, impurities, lot/batch no.) should be included in this field, because this will allow to filter out such data from any print-out or export file.)Field
Details on properties of test surrogate or
          analogue material
: Leave this field empty, because it is only relevant in case of read-across from another substance, e.g. an analogue or surrogate.
Part "Test organisms", field
Details on test
      organisms
: Select and edit the Freetext template as shown in the following screenshot.Tip
Click the Unfold button
 on the upper right of the field to expand the
field or the Fold button
to minimise the display area.
on the upper right of the field to expand the
field or the Fold button
to minimise the display area.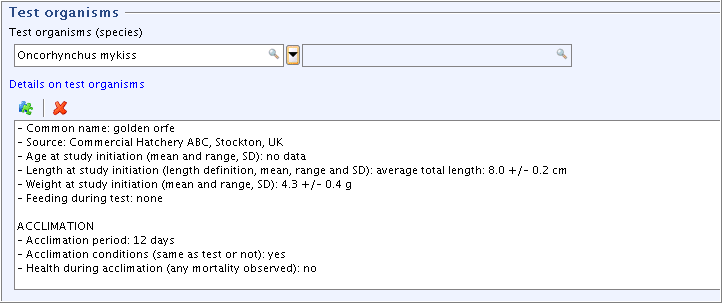
Part "Test conditions": Complete the fields
Hardness,Test temperature,pH,Dissolved oxygen, andNominal and measured concentrationsas shown in the following screenshot.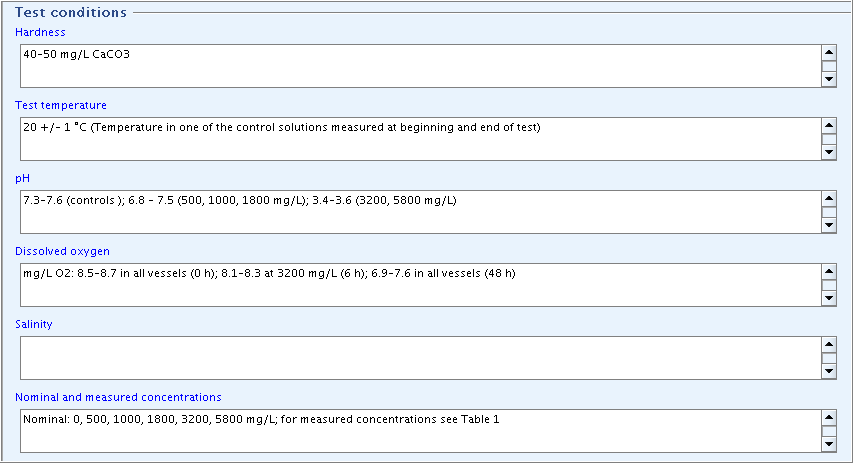
Part "Test conditions" (cont'd), field
Details on test
      conditions
: Select and edit the Freetext template as shown in the following screenshot.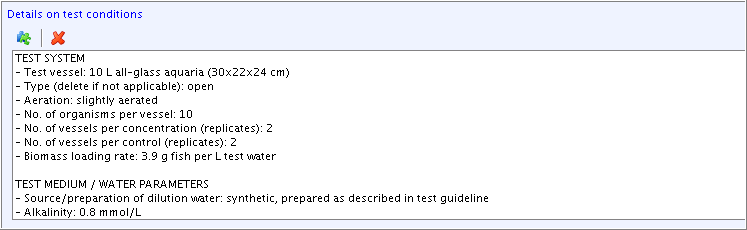
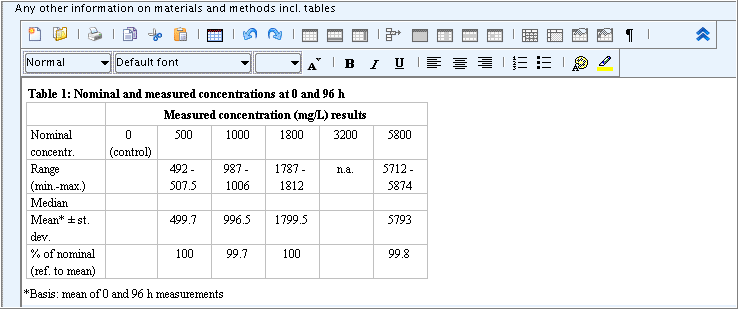
Field
Any other information on materials and methods
      incl. tables
: Upload a predefined or other available table into this rich text field as follows:Click the Open file button
 on the toolbar of the rich text
editor.
on the toolbar of the rich text
editor.From the Open dialogue box displayed, select the file you wish to upload into the field, and then click the Open button.
Edit the table as appropriate.
Part "Results and discussions": Add additional effect concentration data in the field block
Effect
      concentrations
and details in the fieldDetails on resultsas shown in the following screenshot: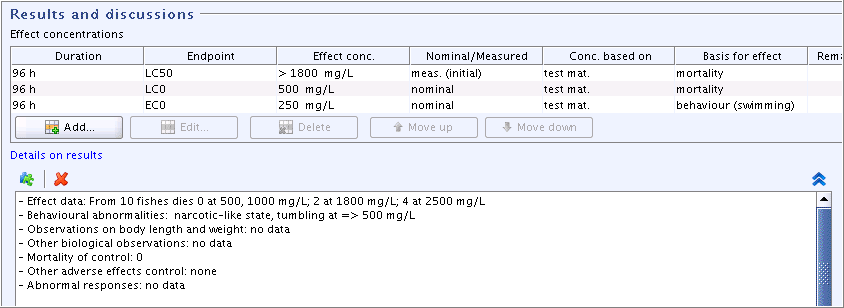
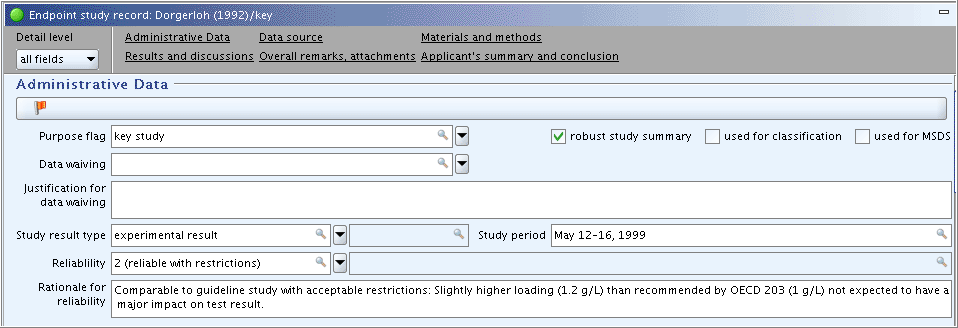
Part "Administrative Data": The fields
ReliabilityandRationale for reliabilitystill need to be completed based on the inherent quality of the test report or publication and hence, the adequacy of data. Proceed as follows:Click the link "Administrative data" in the navigation bar just below the title bar to jump directly to that part.
Tip
Using the links on the navigation bar is particularly helpful in case of very comprehensive Endpoint study records or if you prefer to start editing or viewing with a particular part, e.g. "Results and discussion".
Complete the fields
ReliabilityandRationale for reliabilityas shown in the following screenshot.Click the link "Applicant's summary and conclusions" to jump to that part and proceed.
Part "Applicant's summary and conclusion":