When you start IUCLID for the first time, after installing it on your computer, a First steps wizard will come up, which guides you through the different steps involved to setting up your application so that you can use it immediately. If the IUCLID application and your user account have been set up by your administrator, you can skip this chapter. Any user-related settings can also be made using the features described in chapter D.16 Manage Users, Role, Preferences etc., although for some of them SuperUser rights are required (see chapter D.16.2.1 Difference between SuperUser and "SuperUser" attribute).
Important
This wizard helps to define a user account, which is a prerequisite to work with the application. This is not possible when logging in with the SuperUser account that is provided as administrator account by default.
Before running this wizard, make sure that at least the Legal entity information of your Company/organisation is stored on your computer in the form of a IUCLID export file (for more information, see chapter D.9.2.1 Creating an "official" Legal entity).
Following information can also be uploaded at a later stage, but it is strongly recommended to have the following files stored on your PC already when you run this wizard:
EC Inventory (for details, see chapter D.12 Inventory (View EC Inventory related information)
Inventory of Reference substances (for details, see chapter D.11 Reference substance (Create and update Reference substance related information))
Note
If you want to launch the wizard manually, log in as "SuperUser" and from the File menu select the Administrative tools and Initialise commands.
To set up your IUCLID application for the first time and create a user account suitable for every day work and to assure that the installation was performed correctly, follow these steps:
Start IUCLID by clicking the respective icon on your desktop

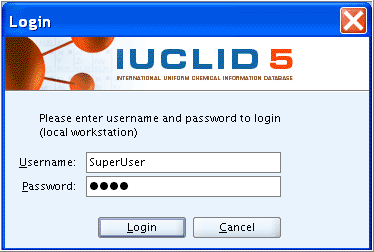
When starting the application for the first time, the only user available is the administrator, named "SuperUser". Log in as administrator by entering the following (case-sensitive!) names:
Username: SuperUser
Password: root
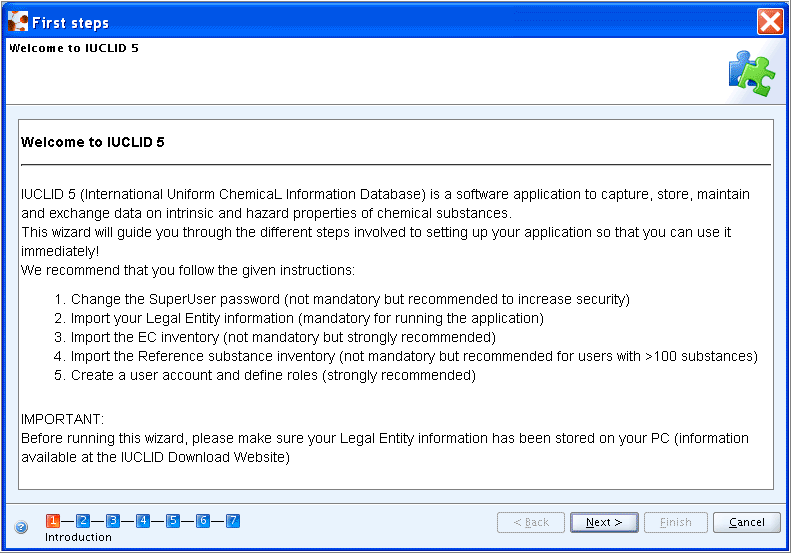
The First steps wizard comes up with general information in Step 1. Click the Next button
Step 2: If you have not changed the default password of the SuperUser to a more secure password, the traffic light in the wizard screen will be yellow. Select the
Change SuperUser
      password
checkbox, type the old password "root" and then type the new password. Click the Next button.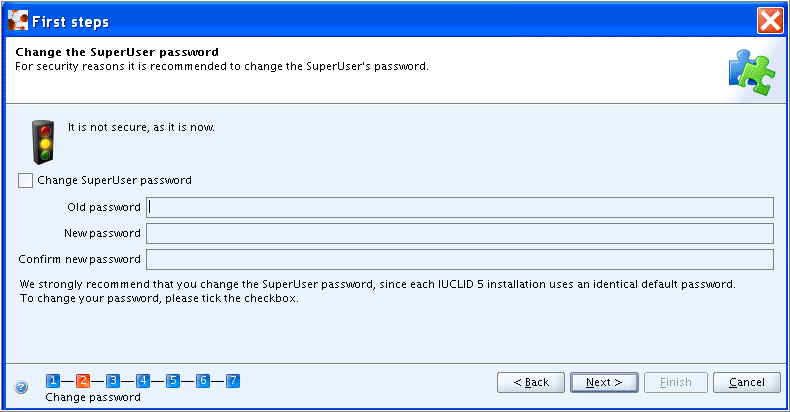
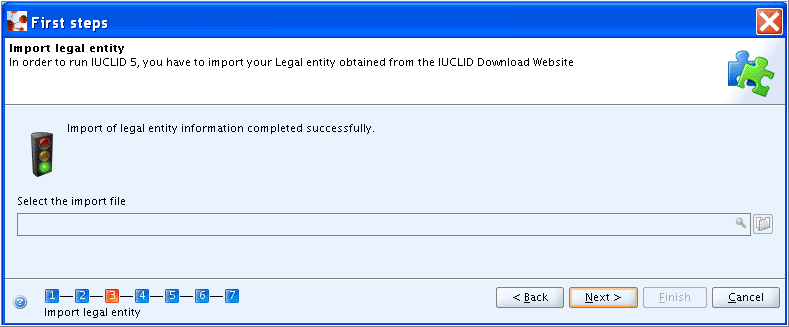
Step 3: Select the import file for the Legal entity (see introductory remarks above) and then click the Next button. The Legal entity will be imported immediately.
Important
Note that you have to import at least one Legal entity in order to succeed with this wizard. If you have no Legal entity in the IUCLID system, the traffic light in the wizard screen will be red. The First steps wizard will be automatically launched when you log in IUCLID, until a Legal entity has been successfully imported.
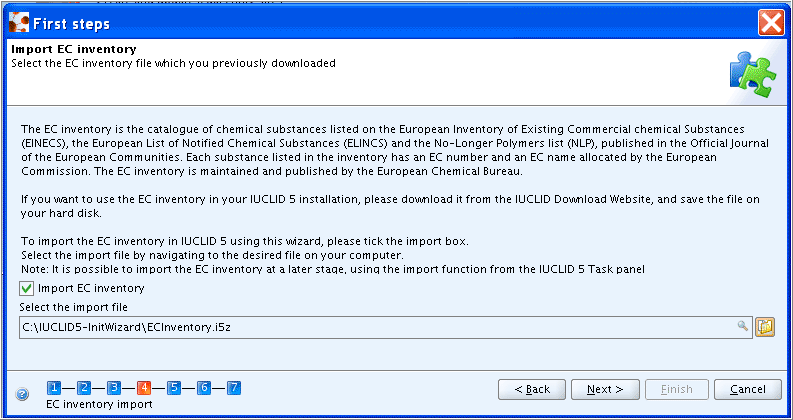
Step 4: Select the file for the EC inventory (see introductory remarks above). The EC Inventory will not be imported immediately. The import will start at the end of the First steps wizard. Depending on your machine speed and the size of the inventory, this import may take some time, i.e. up to half an hour.
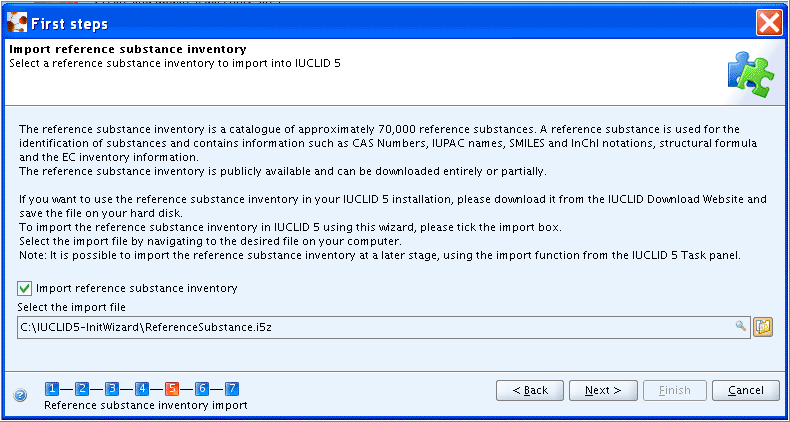
Step 5: Select the file for the Reference substance inventory (see introductory remarks above). The Reference substance inventory will not be imported immediately. The import will start at the end of the first steps wizard together with the EC Inventory import. Depending on your machine speed and the size of the inventory, this bulk operation may take a very long time. The Reference substance inventory itself may take up to several hours for import!
Note
If you do not wish to import the complete Reference substances inventory into your IUCLID system, individual Reference substances files are available for download at the IUCLID web site.
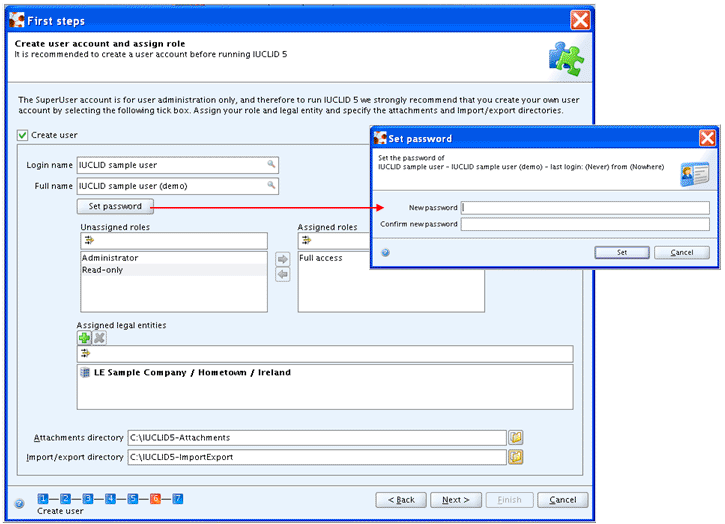
Step 6: Create a new user account and assign a role to this user, which defines the user's access rights to the data. It is necessary to create a new user as working with the SuperUser is not supported.
Select the
Create usercheckbox.Fill in all fields. The user needs a
Login
          name
for identification during login. TheFull nameis used for proper user identification. TheAssigned roleis needed to administrate the access permissions (in a newly installed IUCLID 5 the roles "Administrator", "Full access" and "Read-only" are provided by default).Enter a
Login name, as it should be used for identification during login, and theFull nameused for proper user identification.Optionally, click Set password and define a password.
Click and highlight a role in the list of unassigned roles and assign it to the user by clicking the Right arrow. Assigning a Role is needed to administrate the access permissions (in a newly installed IUCLID, the roles "Administrator", "Full access" and "Read-only" are available by default).
Tip
It is recommended to create a User with the "Administrator" Role regardless of whether a stand alone or a distributed version of IUCLID is set up. Once a User has been created, the IUCLID Administrator (in case of a distributed version) can define different other User(s) and assign different Role(s) to them (see chapter D.16.1 Principles of administration tools for user settings).
Assign a Legal entity (normally the Legal entity imported in the third step of this wizard) by clicking the green plus button and performing a search for the desired Legal entity. In the Query field
Legal entity name, enter the name of the desired Legal entity or an asterisk (*) as wildcard and click the Search button. In the Query results list, click the desired entry and then click the Assign button.Optionally, select default attachment and import/export directories. These settings can be made at a later stage as described in chapter D.16.5 Feature "User Preferences": How to set User Preferences.
Click the Next button
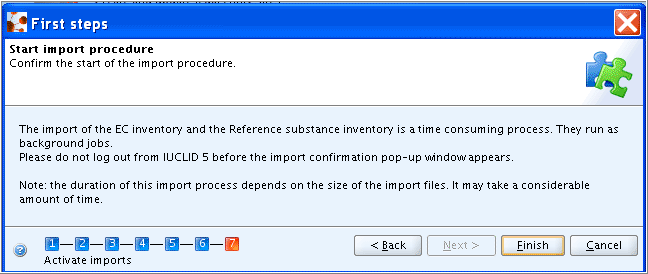
Step 7: If you have selected an EC Inventory and/or Reference substances inventory file(s) during the wizard steps, you can now run the imports. Click the Execute imports button. Note again that these imports may take up to several hours, depending on your machine speed and the amount of data you are importing.
Then click the Finish button. If you have launched any imports, you will now have to wait until the imports are completed. Afterwards, you should log out and then log in again as a user for the newly defined account (remember: working as SuperUser is not supported).