Each input field on the user interface is controlled by a data type setting. The data type determines the format for display and input. It also serves as a way of validating data entry. For example, data type Numeric allows entry of numeric numbers only. Depending on the settings behind, data entry may be further limited to whole numbers or positive numbers only.
In this chapter, the data types available in IUCLID user interfaces are described in the quick overview below with cross-references (links) to the more detailed presentations, which are illustrated with representative examples.
Note
The description of data types in this manual is more end user-oriented. Detailed technical definitions are included in documentations of the xml exchange format, which are available on the web as specified in chapter A.4.2 Download sites on the web.
Quick overview of IUCLID field's data types
Following data types are available in IUCLID:
List: Provides a list of items from which you can select or "pick" one option. There are four different types of list fields. See detailed description of this data type together with examples in chapter D.4.5.1 List fields.
Numeric: Allows entry of numeric characters only. See detailed description of this data type together with examples in chapter D.4.5.2 Numeric fields.
Text: Enables you to enter free text. Only plain text can be entered including letters, numbers and symbols in the character set selected. Four types of text fields are available in IUCLID, i.e. Text (single-line) field (255 characters, no line breaks), Text (multi-line) field (2000 characters, line breaks allowed), Text area (32000 characters, line breaks allowed) and Text template (same as Text area, but additional option for uploading predefined text). See detailed description of these data types together with examples in chapter D.4.5.3 Text fields.
Rich text area: This is a large text area where you can specify fonts, colours, bullets, and other text attributes. You can also insert and edit (predefined) tables. Since the rich text format is based on the HTML format, text and or tables prepared in this format can be cut and pasted into a IUCLID rich text field. See detailed description of this data type together with examples in chapter D.4.5.4 Rich text (HTML) areas.
Fields arranged in (repeatable) blocks: A block of fields consists of several subfields. The entire block can be repeatable. In many instances, such blocks of fields are displayed in a table-view format. See detailed description with examples in chapter D.4.5.5 Fields arranged in blocks.
Attached document: Allows to upload any file containing e.g. a PDF, image or wordprocessing document, which is then attached to the record or dataset. See detailed instructions on how to use this data type in chapter D.4.5.6 Attached document features.
Flag: Fields used for flagging a record for a specific purpose (e.g. "key study") are in principle list fields and thus, not based on another data type. However, because of their specific use for filtering data, flags are described separately in this manual. See detailed description of the use of flags together with examples in chapter D.4.7.7.1 Administrative data under .
Date: Allows entry of a date in a controlled format. See the detailed description of this data type together with examples in chapter D.4.5.8 Date fields.
List fields provide a list of items from which you can select or
"pick" one option. Such lists are also called picklists
in this manual. In the list fields of IUCLID only one of the presented
options can be chosen from a drop-down list or combo box. In some cases,
picklist selection of options yes or
no is done by checking a checkbox or leaving it cleared,
respectively. Based on whether a list field allows also entering additional
free text, four different types are distinguished, which can be handled as
follows:
List (closed)
In a closed list field, the picklist contains only distinct items from which to choose. There are three display types:
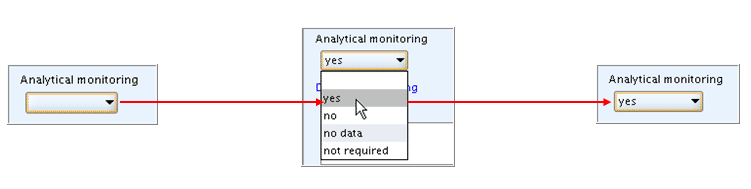
Drop-down list box: This is a closed version of a list box indicated by an arrow and shaded data entry field.
To handle a drop-down list box
Click in the field.
In the picklist that opens, click the item of your choice, as shown in the following screenshot:
Note
Drop-down list boxes are used for lists containing a limited number of items with short length of text. All items are visible and there is no need to scroll or query.
If you erroneously completed a list field that should be left empty, open the list box again and choose the blank item provided on top of each picklist.
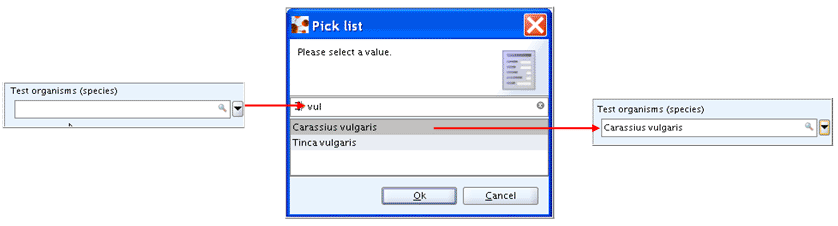
Drop-down combo box: This is a text box with an arrow next to it. The text field is clear white and not shaded (if in the Edit mode).
To handle a drop-down combo box either
Start typing the item of your choice. The autofill function of IUCLID will display the first entry in the list starting with the letter(s) you enter. For example, typing "C" or "c" in the field
Test organisms (species)will extend to "Carassius auratus"; typing "Carassius v" will extend to "Carassius vulgaris". In comprehensive lists, it can also be useful to just type the first letter(s) of an item and then click the drop-down arrow. The first entry in the list starting with that/these letter(s) will be displayed directly.or
Click the arrow next to the list field.
In the picklist that opens, click the item of your choice. If not all items are displayed, you have following options:
Option 1: Use the scroll arrow to scroll the list
Option 2: Use the very powerful query function to find the desired item:
Click into the Find pane
 below the title bar of the combo
box.
below the title bar of the combo
box.Enter the item or an adequate part of it.
Tip
Queries are not case-sensitive and you need not enter wildcards (*). Just type any part of the string (i.e. text). For example, "vul" will immediately find any item that contains this string, as shown in following screenshot:
Checkbox: Clicking in this square box selects or clears the box to turn on or off an option. This would correspond to the selection of picklist items "yes" and blank (empty field) in a list field, respectively. Examples are shown in the following screenshot:

List (closed+remarks)
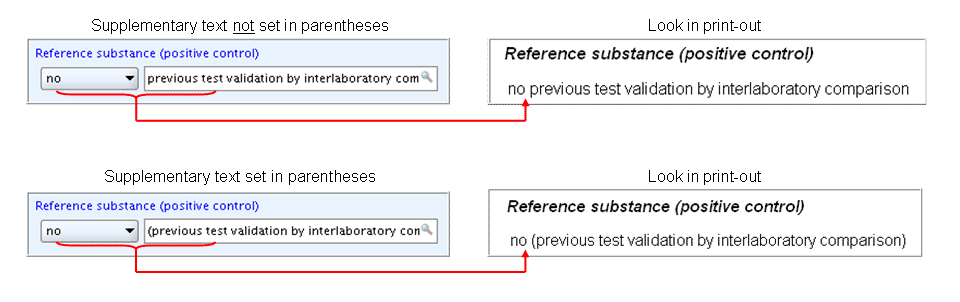
A field of type List (closed+remarks) provides a supplementary remarks field next to the drop-down list in which you can enter any free text. This remarks field is active as soon as you select an item from the picklist as shown in the following screenshot examples:
Example 1:  Example 2:
The text field associated with the list field is of type Text (single-line). See chapter D.4.5.3.1 Single-line text fields on how to use this field type.
Tip
With regard to print-outs, it is recommended to include any supplementary text in parentheses to get it set aside from the list item, unless the picklist item ends with a colon. Otherwise you may get confusing text combinations in the print-out as shown in following screenshots:
List (open)
In an open list field, the picklist offers the option to chose
other: or phrase: (any phrase ending
with a colon, e.g. other guideline: or ASTM
method, other:) in case none of the predefined items applies. A
Text (single-line) field is then activated next to the
list field in which you can enter any free text. The difference compared to
type List (closed+remarks) is that the text field is
only active if a distinct item (with an ending colon) is chosen from the
picklist, but otherwise locked (shaded look).
The functionality of the list field is the same as described above for the use of drop-down lists for type List (closed).
List (open+remarks)
A field of type List (open+remarks) offers the
option to chose other: or phrase:, as
described for the type List (open), but provides the
remarks field also for any other item chosen from the drop-down list.
The functionality of the list field is the same as described above for the use of drop-down lists for the type List (closed); the use of the remarks field is equivalent to that outlined for the type List (closed+remarks), with the following exception: The text field is active for any item chosen from the picklist.
Tip
The use of the different list field types is self-intuitive and guided by the design of the fields in the data entry screen:
Drop-down list or drop-down combo box with no additional text field next to it means you can only select an item from the picklist.
Drop-down list or drop-down combo box with additional text field next to it means you can add free text related to the item chosen, if the text field is not shaded, but appears in plain white.
Where this option is provided, supplementary remarks can be useful in explaining the indication given by the picklist item chosen directly next to it. As to the kind of supplementary remarks expected to be entered (if any) refer to the context-sensitive online Help that comes up when you press the F1 key or click the Help button on the toolbar.
Numeric fields allow entry of numeric characters only. Depending on the format settings whole and decimal, positive and negative numbers are allowed. In general, the format controlling data entry in numeric fields is not very restrictive, but some controls are used as follows:
In most numeric fields, entry of decimal fractions is possible (e.g. "0.443"), the number of digits that can be placed to the right of the decimal point being limited. When you enter more than the maximum digits allowed, the exceeding digits are cleared and the number is rounded appropriately. For example, "0.44368" would be rounded to "0.44" if the maximum number of digits allowed is two. By the same logic, "0.0044" would be rounded to "0". See the Tip below on how to avoid inappropriate rounding.
In numeric fields that allow decimal numbers, the decimal separator is a point by default. When you enter a decimal comma instead of a point erroneously, the number entered is cut at the comma and only the digits before are included in the field. See the Tip below on how to change the default setting to decimal comma.
In most numeric fields, entry of negative numbers is allowed.
In a few numeric fields, only whole numbers are allowed. When you enter a decimal number erroneously, the number is rounded to a whole number. For example, "2.5" would be rounded to "2".
In numeric fields, it is not possible to enter any designator for specifying an exponential number as it used to be possible in IUCLID 4 (e.g. entry of "2E-6" was transformed to "0.000006".)
Tip
Please note the following hints:
Whether a field is a numeric field can be seen by the missing magnifying glass symbol, which is available in each single-line text field, but not in any numeric field.
The correct entry of numeric values is controlled by IUCLID only to a limited extent. Use care when entering a number as you would do for entering any other data.
Watch whether the number is changed as soon as you save the data entry, i.e. when you either close a dialogue box or click in another field.
When entering non-numeric characters after a number, the number only will be kept on saving the field entry, while entering text in front of a number will result in an error message on the very left bottom line:
 ; the field will be left empty.
Use appropriate units to avoid difficult to read decimal numbers or rounded values. For example, instead of entering "0.00034 mg/L" enter "0.34 µg/L" or "340 ng/L".
If you are used to the decimal comma, you can change the settings in feature User preferences - Decimal separator accordingly, as instructed in chapter D.16 Manage Users, Role, Preferences etc.. However, it is highly recommended to use the decimal point throughout any text fields when entering decimal numbers, if the text is written in English, because the Decimal separator setting only affects numeric fields.
The following screenshots show examples of numeric fields:

Text fields enable you to enter free text. However, only plain text can be entered including letters, numbers and symbols in the character set selected. No formatting such as setting in bold or underline is allowed. Except for single-line fields, insertion of line breaks is possible.
Text fields are used in cases where no specific control of data entry is required or possible. For example, there are text fields in IUCLID which primarily prompt for numeric data (e.g. number of animals per sex per dose). Using text fields instead of numeric fields has the advantage that several numbers and explanations thereon can be included in one field (e.g. "10 (male); 8 (female)").
Four types of text fields are available in IUCLID, which can be handled as described in the following subchapters:
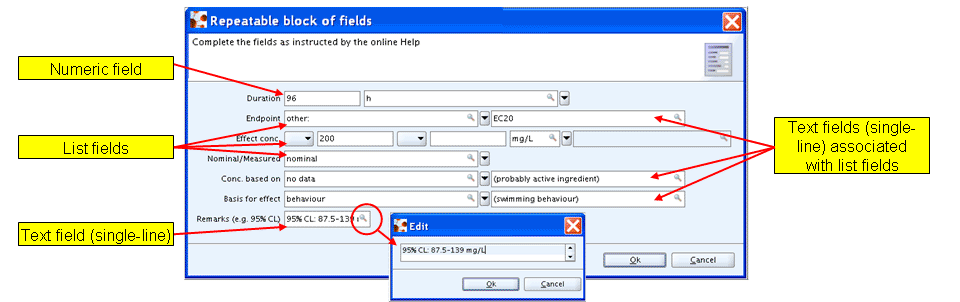
Single-line text fields are limited to a maximum of 255 characters and do not allow to insert line breaks, that is, text entered cannot be broken explicitly and no empty lines can be added to structure the text. This field type is normally used in cases where only brief text is expected to be entered. Typical single-line fields are:
Text fields associated with list fields (see also chapter D.4.5.1 List fields)
Text fields in (repeatable) blocks of fields
Examples of single-line text fields are shown in the screenshot of a repeatable block of fields below:
Tip
Larger text can be opened and edited more easily using the editor which opens when you click the magnifying glass symbol as shown in above screenshot.
Although you cannot influence the text flow, automatic word wrapping is done in print-outs, i.e. all text is split in such a way that it fits within the defined margins.
Multi-line text fields are limited to a maximum of 2000 characters. They appear in the form of text boxes on the data entry screen displaying up to three lines. Line breaks can be inserted, which can make long text easier to read. Instead of opening an editor window, long text can be scrolled using the scrollbar to the right of the text field. An example is shown in the following screenshot:

Text areas allow for entering long text, i.e. up to 32,000 characters, with line breaks, but no other formatting. The functionality and look in the data entry screen are the same as described for multi-line text fields.
Tip
Scrolling through the text is the only possibility provided for viewing or editing long text. When you want to view the entire text in a larger area, you may consider preparing or editing the text using a text editor software and then copy it into the text area. If you use any word processing software instead of a plain text editor, be aware of special signs and symbols that may be lost or transformed when pasting the text into a IUCLID field.
In the Endpoint sections 4 to 11 and in the Annotation records for these sections, the data type
Freetext template is available, which is in principle
the same as Text area, but additionally allows to
upload so-called Freetext templates chosen from a
drop-down list. These are predefined texts consisting of headings and
subheadings which are intended to serve as prompts for the type of
information expected. Fields providing one or more Freetext templates are
indicated by a puzzle-like icon  below the field label.
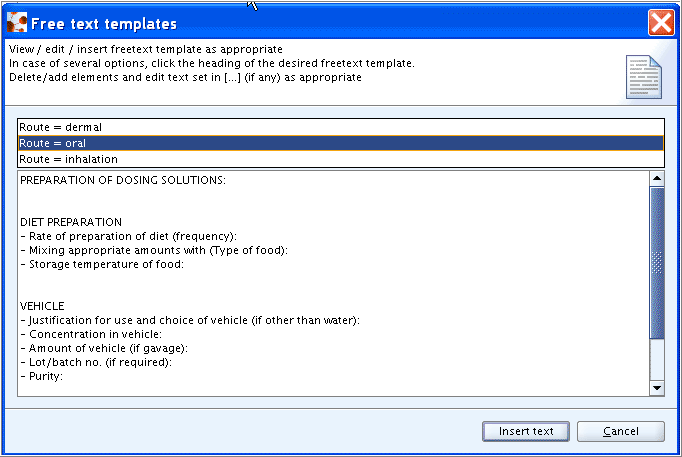
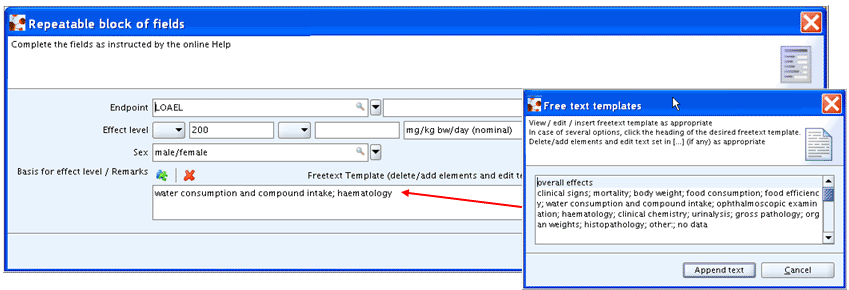
An example of a Freetext template field and a Freetext template is shown in the following screenshots:

The concept of Freetext templates applied in IUCLID is completely modeled on the guidelines given in the OECD harmonised templates (see chapter D.4.7.1 What is an Endpoint Study Record?). It follows the needs of a relatively high degree of complexity in so-called robust study summaries (see chapter B.4.2.2.3 Key study / robust study summary approach). The Pros and Cons of free text templates are as follows:
Freetext templates help reduce the number of distinct input fields considering the already high number of fields in many endpoint study records.
Freetext templates help standardising the entry of additional information for which no distinct input fields are available, where requested by the regulatory programme.
Freetext templates provide on the other hand a great deal of flexibility as their use is completely optional and flexible in such a way that the predefined items provided as quasi fields can be adopted, modified or deleted as appropriate. In general, the prompts provided with the freeetext templates comprise a maximum of detail. Their use is not prescriptive by IUCLID, but may be requested depending on the regulatory programme.
Freetext templates can also be supplemented with additional structured elements (i.e. (sub)headings) if necessary.
Different Freetext templates are available from a drop-down list in cases where different study types are covered by one endpoint section. For example, for field
Details on exposureof section 7.7 Carcinogenicity, a freetext template each is provided for oral, inhalation and dermal exposure, as shown in the screenshot above.The design of Freetext templates as plain free text, which is not controlled as in distinct input fields, implies on the other hand that a standardised and harmonised data entry cannot be guaranteed.
Note
In general, common sense should be used when using the freetext templates provided in IUCLID. In cases where no or only sparse information is available from a study report or other source, it may not be sensible trying to adopt a comprehensive Freetext template and fill in "no data" after each prompt. However, it can be useful to paste all items for which data can be given and delete those predefined items that cannot be specified.
Nevertheless, it should be emphasised that the guidance provided for the relevant regulatory programmes should be consulted as to what extent the completion of the full Freetext templates is considered mandatory. See also part in chapter D.4.7.1 What is an Endpoint study record?.
In the following, instructions are given showing how to handle Freetext templates. In principle, you can edit a Freetext template either before or after uploading it into the corresponding field. Another option to be considered is to pre-edit a template by deleting those items that are not needed, upload it into the field and then enter the data.
Click the puzzle-like icon
below the field label.In the Freetext templates dialogue box that opens, check if there are more than an option provided as can be seen by a template indicator pane occurring right below the help text area (see the screenshot below). In case of only one option no such pane is provided. Otherwise click the desired Freetext template to display it.
Edit the template as appropriate, i.e. delete elements not needed, add additional ones if necessary and fill in the data prompted for. Some templates provide not only prompts, but also predefined default data which you can use at your discretion (e.g. "- External examinations: Yes: [all per litter / half per litter / #? per litter] / No / No data"). In these cases, edit any text set in square brackets [...] as appropriate and/or delete default information that does not apply (e.g. delete " / No / No data" if "Yes" is true.)
Click the Append text button to upload the template into the field.
To upload a Freetext template and edit it subsequently, follow the same procedure, but skip step 3 and edit the template after upload.
To expand a Freetext template field in order to view more text or collapse it thereafter
Click the Unfold button
 on the upper right of the field to expand the
field or the Fold button
to minimise the display area.
on the upper right of the field to expand the
field or the Fold button
to minimise the display area.
Tip
You can combine the upload option with manual text entry as to your needs. For instance, you can enter any introductory text in the field and then upload a Freetext template. You can also repeatedly upload several templates in a row. This may be useful when different test conditions require separate description
In the Endpoint sections 4 to 11 and in all Annotation records, the data type Rich text area is provided for selected fields. It allows to specify fonts, colours, bullets, and other text attributes. You can also insert and edit (predefined) tables. Since the rich text format is based on the HTML format, text and or tables prepared in this format can be copied into a IUCLID rich text field.
Caution
Do not overload any rich text area fields with too many formatted elements. Be aware that the storage capacity for each of these fields is limited to 256 KB of HTML code including text. Excessive formatting (e.g. bold, italics, colours, different fonts, underlining, complex tables) will produce a lot of (invisible) styling HTML code, which may reduce the capacity left for entering the actual text.
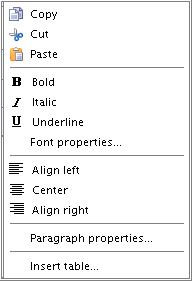
The rich text editor underlying this data type is based on Sferyx JSyndrome HTMLEditor Applet Edition (http://www.sferyx.com) licensed to the European Commission. This editor is a HTML / XHTML Editor featuring full WYSIWYG ("What You See Is What You Get"). It includes all the necessary features to create a formatted HTML document that is integrated in the rich text area. The available features can be selected from the toolbar right below the field label. The symbols are similar to those common for word processing programmes and are self-intuitive. In addition, following commands can be selected from the menu appearing when right-clicking into the rich text area:
Following features are provided in the Rich text areas of IUCLID:
Font style (plain, italic, bold)
Font size, family and foreground colour
Extended Font chooser for adding underline, strikethrough, superscript, subscript font attributes
Tables design and properties: background colour, background picture, size, alignment, border etc.
Insert table rows, insert table columns, split and merge table cells
Copy, paste of all document elements
Full Drag & Drop of formatted content directly into the edited document from external applications such as Word, Excel, Front Page etc.
Bulleted and numbered lists
Heading selection for titles etc.
Paragraph alignment: left, right, centered
Full undo/redo support
Open, save HTML/XHTML files
Printing support
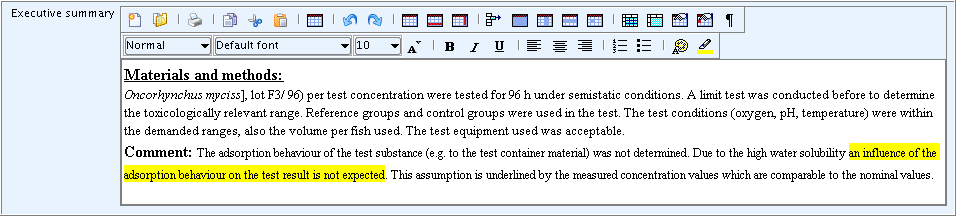
The following screenshot shows an example of a rich text field to which formatted text from a word processing document was pasted including characters set in bold, underline, italics and highlight colour:
The Open / Save HTML/XHTML files features of the rich text editor allow to
upload any document saved in the HTML format. This is particularly useful
for uploading predefined tables in the fields Any other information
on materials and methods incl. tables and Any other
information on materials and methods incl. tables.
To upload a table into the rich text field
Click the Open file button
 on the toolbar of the rich text editor.
From the Open dialogue box displayed, select the file you wish to open, i.e. upload into the field, and then click the Open button.
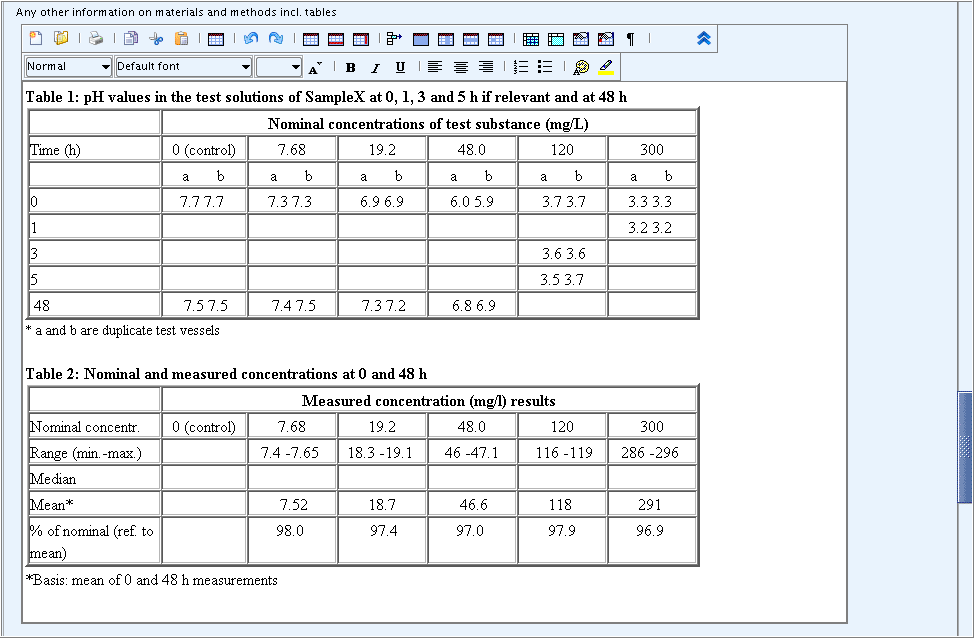
The screenshot below shows examples of two predefined tables which were uploaded or copied into the rich text field and then completed.
Tip
One rich text area is available for each main part of an endpoint study record, i.e. Material and methods, Results and discussion, Overall remarks and attachments, Applicant's summary and conclusions, Executive summary. Often it is necessary to insert more than one table in any of these rich text areas. However, the upload (open) file feature only supports to upload one single document. Loading another document will overwrite the previous one or any other text already entered in the rich text area.
There are two possible workarounds to overcome this shortcoming:
Upload the first table into the rich text area, mark it and click the Cut to clipboard button on the toolbar of the rich text editor. Then, upload the next table, position the mouse pointer to the place where you want to re-insert the first table and click the Paste from clipboard button. If you need a third table to be inserted, mark the complete area, cut the existing tables, upload a new table and paste the other tables from the clipboard.
Particularly if more than two tables are to be inserted in one rich text area it may be easier to insert all predefined tables in one wordprocessing document (do not use the Open command, but the Insert File command from the menu bar of your word processor), complete the tables as appropriate and copy & paste them, or save the document as html file and then upload it into the rich text area.
A block of fields consists of related fields that are grouped together. A simple block of fields can consist of a numeric field plus a list field for selecting the unit of measurement, which are grouped under one label, as shown in the following screenshot:

In the following, the different types of blocks of fields as used in IUCLID are described.
Grouping these fields to a block is necessary for technical reasons in order to assign one label to several fields and to handle related fields such as the numeric and list field in the example above. The user normally does not see any difference compared to single fields that are not grouped to a block.
Apart from this type of non-repeatable blocks of fields, which is only occasionally used in Endpoint study records, there are many repeatable blocks of fields available and many of them are displayed in a table-view format.
Numeric range fields typically comprise the following subfields:
Qualifier (lower value): The first qualifier field provides a list with following operators: >, >=, and ca. No "equal to" sign (=) is provided. Instead, this is indicated by no operator being selected, i.e. the qualifier field is simply left empty.Numeric field (lower value): The first numeric field is for entering a single numeric value.Qualifier (upper value): The second qualifier field provides a list with following operators: <, <=, and ca. No "equal to" sign (=) is provided. Instead, this is indicated by no operator being selected, i.e. the qualifier field is simply left empty.Numeric field (upper value): The second numeric field is also for entering a single numeric value.Unit field: The Unit field is a list field prompting for entering the unit of measurement. In the case of an open list field, an associated text field follows next to it, where you can specify any "other:" item. Some numeric fields come without a Unit field if the unit is either indicated in the field label or if the value is dimensionless.
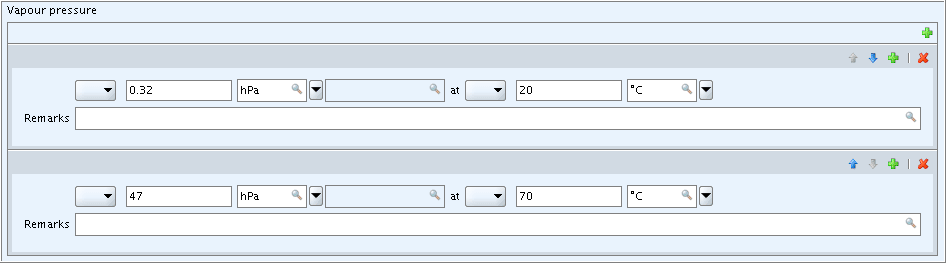
The following screenshot shows an example of numeric range fields
together with the picklists for the lower and upper
Qualifier fields:

Numeric range fields provide enough flexibility to enter either a single numeric value (and the unit) only, or a single value preceded by an operator or two numeric values, preceded by operator(s) or none. The different picklists provided in the lower and upper Qualifier fields and the underlying control rules ensure that no illogical numeric ranges can be entered. Following conventions apply:
In the lower Qualifier and Numeric field, enter a numeric value preceded either by no operator, ">", ">=" or "ca." (e.g. "20", ">20", ">=20", "20")
In the upper Qualifier and Numeric field, enter a numeric value only
if either a lower value is already entered to specify a numeric range
or
if the upper value is preceded by either operator "<" or "<=".
Caution
No numeric value can be entered in the lower Numeric field, if either operator "<" or <=" is to be preceded. Instead, such values have to be entered in the upper Qualifier and Numeric field as determined by the differing Qualifier picklists.
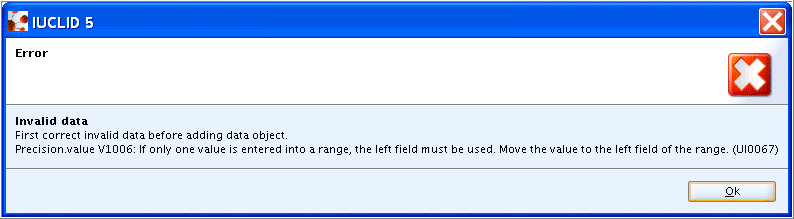
No numeric value can be entered in the upper Numeric field, if the lower Numeric field is left empty. On erroneous entry, the numeric fields would turn red and following error message would occur:
Grouping the fields to a non-repeatable block is sometimes necessary for technical reasons, e.g, in order to assign one label to several fields and to handle related fields such as a numeric and an associated Unit field. The user normally does not see any difference compared to single fields that are not grouped. Non-repeatable blocks of fields are only occasionally used in data entry screens of IUCLID sections. An example is shown in following screenshot:

The main reason for using blocks of fields is when a set of grouped fields needs to be repeatable in order to allow recording data on different parameters, test runs or any other differing test conditions. There are many repeatable blocks of fields available in data entry screens of IUCLID sections. Three different types are available:
Repeatable blocks of fields in normal view
Repeatable blocks of fields in table-view format
Repeatable blocks of fields within a repeatable block fields (in sections 1 to 3 only)
Note
In the Endpoint sections 4 to 13, repeatability of fields or blocks of fields within a repeatable block fields is not possible for technical reasons.
A normal block of fields, if empty, is indicated by a green plus
symbol  to the very right of the closed box as shown in
following screenshot:
to the very right of the closed box as shown in
following screenshot:

Clicking the symbol opens the block of fields for data entry as
shown in the following screenshot:

Clicking the symbol repeatedly adds additional blocks as shown in
following screenshot:
Use the other buttons to the right to
move a block of fields up
 or down
  , thus re-ordering them;
delete (
 ) a block of fields.
As stated above, no subfield within a block can be repeated itself.
This is why in cases where more than one parameter may have to be indicated,
a text or Freetext template field is provided instead of a list field as
shown in the following screenshot example taken from block Effect
levels of section 7.5.1 Repeated dose toxicity:
oral:
Blocks of fields displayed in table-view format have a better look on
the user interface and provide a better overview in less space than the
normal type of field blocks. Regarding the functionality the only difference
is that the so-called modal window has to be opended by clicking the
Add or Edit button on the toolbar of the table. This is
nothing else than the normal block of fields described above. So data entry
is done in this child window, while operating the block records, i.e. moving
up/down, adding or deleting, are to be done on the table-view level. The
following screenshot shows three entries of effect levels in block
Effect
  levels
of section 7.5.1 Repeated dose
toxicity: oral including the last example from D.4.5.5.3.1 Normal block of fields:

Tip
You can minimise or maximise any column by hovering the mouse over the vertical line between two columns titles. When the pointer changes to a double-headed arrow, click and drag the line to the left or right. However, this adjustment will be reset as soon as you close the record, i.e. open another record or log-out.
Right-clicking in the table opens a menu from which you can chose either of following commands:
Print table: To print the table to the printer selected.
Copy table: To copy the table into the clipboard of your operating system (e.g. MS Windows), from which you can paste it (Ctrl+V) into another application, e.g. a wordprocessing document. Note that it is not possible to copy a table to another endpoint study record.
Only in the so-called static sections 1 to 3 (see chapter B.5.2.1 Static sections) repeatable fields or blocks of fields nested within a repeatable block of fields are possible. An example taken from section 3.5 Identified uses and exposure scenarios is shown in the following screenshot:

The Attached document feature allows to upload any file containing e.g. a PDF document, image or wordprocessing document, which is then attached to the record or dataset. This feature is available from:
Tab Attachments on the Information window below the Data entry window. See also chapter D.4.9.5 Tab "Attachments".
Fields
Attached background materialandAttached full study reportin Endpoint study records of sections 4 to 10.
It is highly recommended to attach documents only if they add important information to the record and if this information cannot easily be entered in the available data entry fields. This can for instance be the case for figures and graphics or complicated tables. As to whether it is appropriate to attach any study summaries prepared using wordprocessing or PDF templates, depends on the guidance given for the respective regulatory programme.
Important
Any attached document will not be integrated in a print-out or Dossier. Instead it has to be opened or printed using the respective programme such as a wordprocessor, image or PDF viewer. It is therefore recommended to include, in the section or data entry field, an appropriate reference to any attached document and to use self-explanatory file names as far as possible.
Because of some differences between the Attached document feature in sections 0 to 3, sections 4 to 10 and sections 11 to 13, guidance is given for each of these types as follows:
Attaching documents in sections 0 to 3
In sections 0 to 3, the Attached document feature is available from Tab Attachments on the Information window below the data entry screen. Because these sections are handled as one single record, all documents attached from within any of the subsections are stored in one single Information record. It is therefore recommended to indicate the subsection number in the file names of attached documents. For example, a document could be named 3_5_ExposureScenario1.PDF, when it is attached from within section 3.5 Identified uses and exposure scenarios.
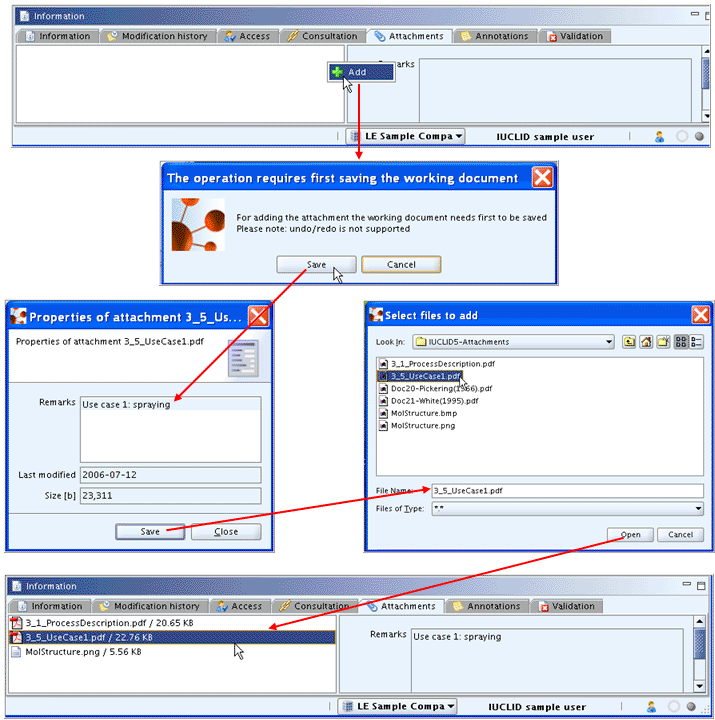
To attach a document in sections 0 to 3, follow these steps which are also illustrated by the screenshots below:
Click the Attachments Tab of the Information window below the Data entry window (maximise this window if necessary).
Right-click in the left pane below the tabs and from the menu displayed, click the Add
command.Confirm the operation by clicking the Save button.
In the dialogue appearing, enter appropriate remarks that specify the attached document in addition to the file name. Then click the Save button.
In the Select files to add dialogue, select the desired file and click the Open button to upload the file.
The uploaded file is displayed in the left pane of Tab Attachments; in the right pane, the remarks entered for this document are shown.
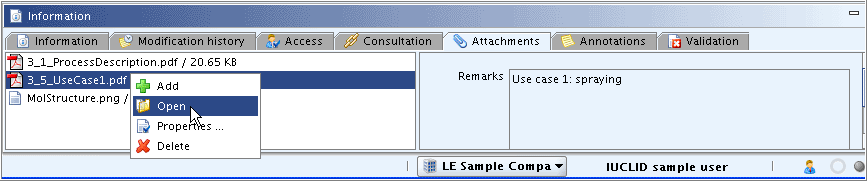
The following commands are provided by right-clicking any file in the left pane, as shown in the screenshot below:
Add
for attaching a document as described
aboveOpen
 for opening an attached document with an
appropriate programme (e.g. wordprocessor, PDF viewer)
for opening an attached document with an
appropriate programme (e.g. wordprocessor, PDF viewer)Properties
 for opening the properties information showing
the fields
for opening the properties information showing
the fields Remarks,Last modifiedandSize.Delete
for deleting an attached document
Attaching documents in sections 4 to 10
In the Endpoint sections 4 to 10, documents can only be attached to Endpoint study records, but not to Endpoint summary records. The following fields are provided in each Endpoint study record:
Field
Attached background materialfor attaching documents containing information that cannot be described properly in any of the available data entry fields or inserted in rich text editor fields, particularly figures and graphs.Field
Attached full study reportfor attaching full study report(s).
Important
The distinction between fields Attached background
material and Attached full study report
offers the option to handle attachments as to your needs when making a
data export. For instance, you can exclude attached full study reports,
which can be very important with regard to disk capacity and for
confidentiality reasons.
Although the Add command provided in the Tab Attachments on the Information window can also be used, it is highly recommended to attach any documents from within the two special fields because of the following reasons:
The management of attached documents is not consistent in the Attachments Tab and the specific fields.
Attaching documents from within the Attachments Tab would result in following pitfalls:
The attached document would not appear in the field
Attached background material.Hence, no distinctions could be made anymore between the types "Attached background material" and "Attached full study report".
To attach a document in an Endpoint study record of sections 4 to 10
Click the Add
command either in the table Attached background materialorAttached full study report.In the dialogue appearing, enter appropriate remarks that specify the attached document in addition to the file name. Then click the Paperclip button
 .
.Confirm the operation by clicking the Save button.
In the Select files to add dialogue, select the desired file and click the Open button to upload the file.
In the Properties dialogue appearing then, enter remarks and click the Save button.
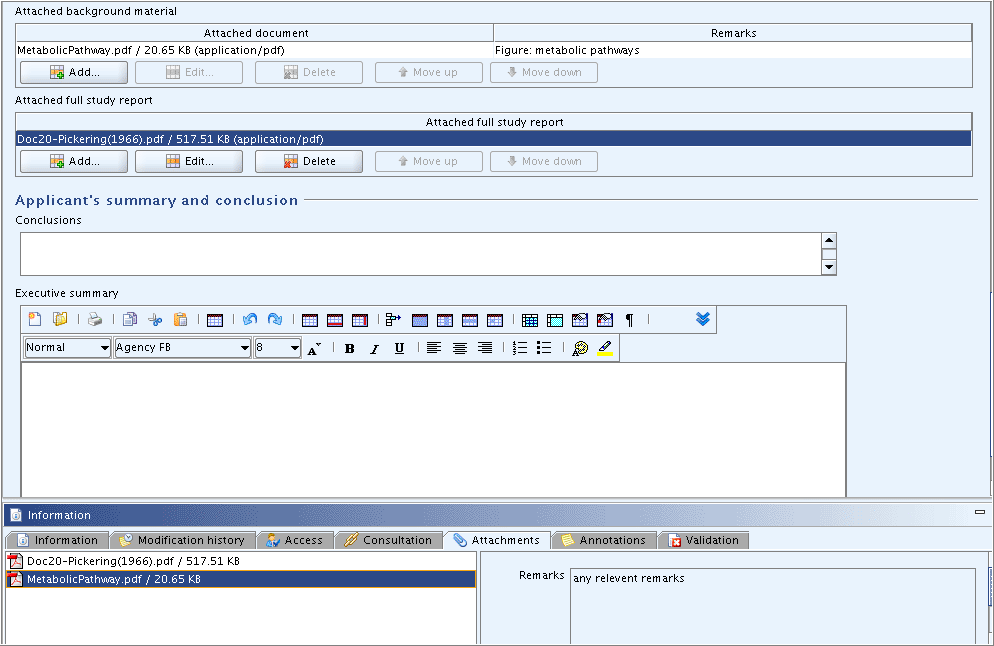
The uploaded file is displayed in the respective table of attached documents, together with the remarks entered in the first
Remarksfield.
The different steps are illustrated in the following screenshot:

Tip
The first Remarks field is displayed in column
Remarks of the table of attached documents, while the second
Remarks field is displayed in the Remarks pane on the
Attachments Tab. This can be misleading,
as shown in the screenshot below. It should therefore be considered to
enter identical text in both Remarks fields.
Attaching documents in sections 11 to 13
In the Endpoint sections 4 to 10, no special fields for attached
documents are provided, except for section 13 Assessment
Reports, where a non-repeatable field
Document is provided for attaching an assessment report.
Irrespective of this field, the Attachments
Tab can be used for attaching any documents, as described for sections 0 to 3.
Fields used for flagging a record for a specific purpose are in principle list fields and thus, not based on another data type. However, because of their specific use for filtering data, flags are described separately in this manual.
A flag or a combination of different flags can be used to mark a record for the purpose of using it for the chemical safety assessment or for excluding it from a report (print-out), Dossier or export file. For example if there are three studies for a particular endpoint it will be possible to flag or mark one for a particular use "purpose = key study". Where an endpoint may require judgment or a weight of evidence approach (e.g. for a number of sub-acute toxicity studies), there will be the possibility to fill out an extra Endpoint study record for including the weight of evidence rationale, which can be flagged accordingly. Or records flagged as "CBI (confidential business information)" could be excluded from any outputs and distribution to other bodies.
A flag field can either be a normal list field or be designed as
checkbox, where the picklist selection of options yes or
no is done by checking the checkbox or leaving it
cleared, respectively. The following flag fields are available in
IUCLID:
Confidentiality flag: This flag field is for indicating either one of the following reasons of confidentiality: (i) CBI (confidential business information); (ii) IP (intellectual property); (iii) no PA (not public available). The field is available from the Set flags dialogue box, combined with the fieldRegulatory purposeflag. This dialogue box is provided for all kinds of IUCLID elements, thus allowing to mark them accordingly, i.e. Legal entity, Legal entity site, Substance, Mixture, Template, Category, Dossier, Reference substance, and last but not least each data entry screen (i.e. record) provided in a IUCLID dataset.Regulatory purposeflag: This field is displayed in the form of several checkboxes which are available from the Set flags dialogue box, combined with the fieldConfidentialityflag(see above). It is for indicating specific regulatory purpose(s) for which the data are intended to be used, e.g. EU: REACH, EU: BPD, etc.Purpose flag: This field only occurs in the Administrative data part of Endpoint study records in sections 4 to 10. It is used to indicate whether the Endpoint study record reflects a key study, supporting study or adds to a weight of evidence analysis if applicable.Robust study summaryflag: This field only occurs in the Administrative data part of Endpoint study records in sections 4 to 10. It is used to indicate that the Endpoint study record is very detailed and thus, considered a "robust study summary".Used for classificationflag: This field only occurs in the Administrative data part of Endpoint study records in sections 4 to 10. It can be used to indicate that the endpoint study record contains information that is used for classification.Used for MSDSflag: This field only occurs in the Administrative data part of Endpoint study records in sections 4 to 10. It can be used to indicate that the Endpoint study record contains information that is used for a Material Safety Data Sheet.Data waiving: This field only occurs in the Administrative data part of Endpoint study records in sections 4 to 10. It can be used to indicate that the non-submission of a particular study is considered justified, though normally required by the legislation, because the study is technically not feasible or for other reasons.Study result type: This field only occurs in the Administrative data part of Endpoint study records in sections 4 to 10. It is used to indicate the type of result, e.g. experimental result or estimated by calculation.Reliability: This field only occurs in the Administrative data part of Endpoint study records in sections 4 to 10. It is used to indicate the inherent quality of a test report or publication and hence, the adequacy of data, based on either of following codes: 1 (reliable without restriction), 2 (reliable with restrictions), 3 (not reliable) or 4 (not assignable).
Detailed instructions on how to use these flags are given in chapter D.4.7.7.1 Administrative data.
Allows entry of a date according to the international ISO-8601 Date Format YYYY-MM-DD, e.g. 2004-08-12 for August 12, 2004. There are only a few date fields in IUCLID data entry screens.
When you enter the date in another format, a tool tip comes up indicating the correct format as shown in the following screenshots:
Correct format:  Incorrect format and tool tip:
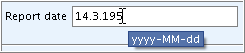
Caution
Make sure that the date has been entered correctly. If you use the correct date format, but make a typing mistake, IUCLID cannot control this and a wrong date may be entered without receiving a warning or error message. For example, entering "1950-02-31" is accepted, but changed automatically to "1950-03-03" based on the underlying algorithm.
A special case of a date field is the field Year,
where the format allowed is YYYY, e.g. "1950".