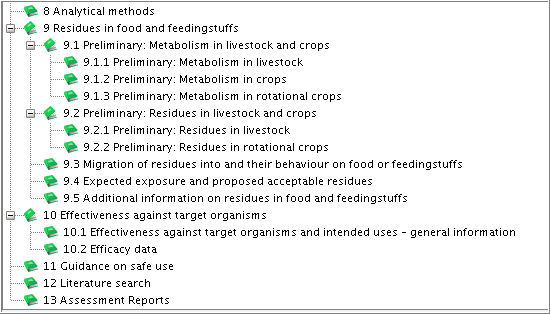
As further explained in the following subchapters, data entered in sections 4 to 13 are included in Endpoint study records. Sections 4 to 13 are therefore also termed "Endpoint sections", although in a strict sense sections 11 Guidance on safe use, 12 Literature search and 13 Assessment Reports address non-endpoint information.
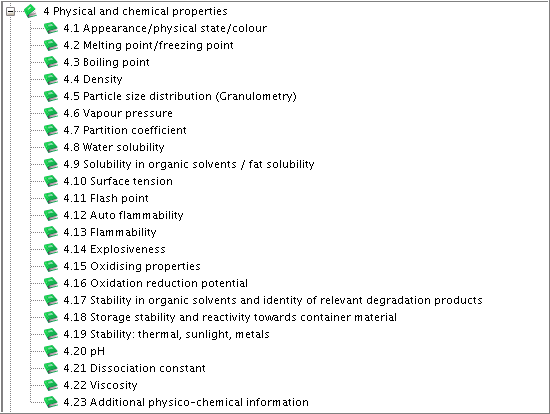
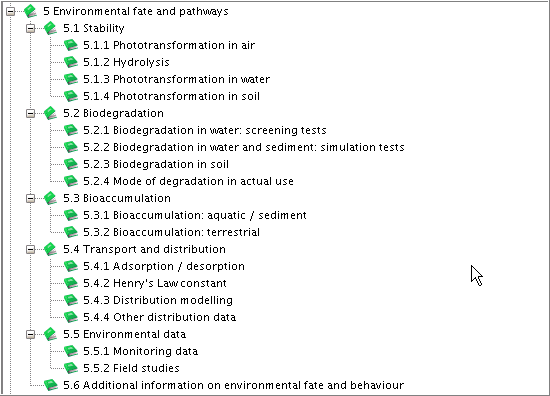
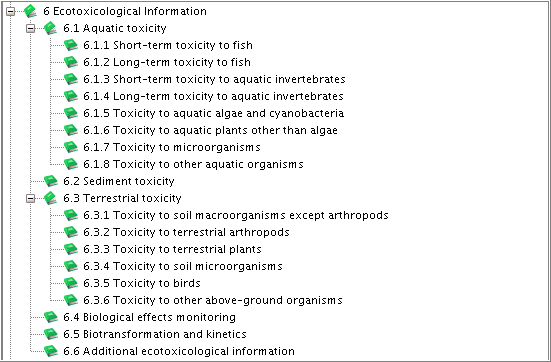
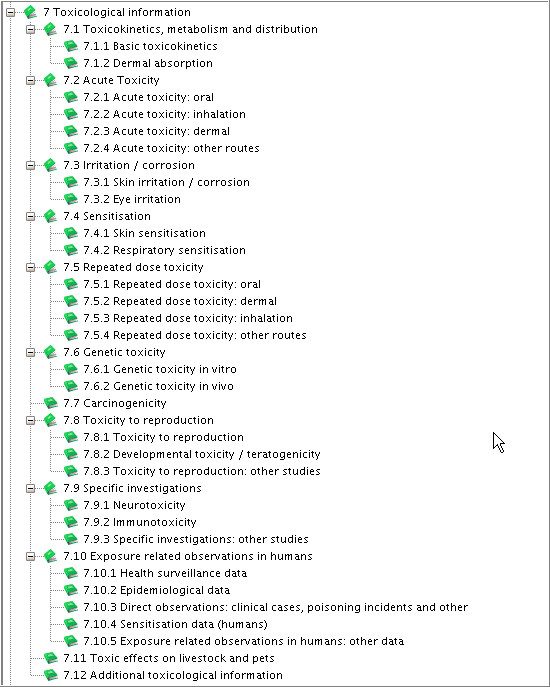
The following screenshots of the IUCLID section tree (in view mode "Complete") show IUCLID sections 4 to 13 including all available subsections. The section numbering is IUCLID-specific and not related to any regulatory programme. Chapter F. A Guide to Where to Enter Data Requirements in IUCLID 5 provides overview lists of the data requirements of different regulatory programmes vs. the corresponding IUCLID sections.
In this subchapter, the terms endpoints and endpoint studies as used in IUCLID are defined. Moreover, a short overview of the rationale behind IUCLID Endpoint study records, which are based on the so-called OECD harmonised templates, is given.
Endpoints (sections)
In IUCLID Substance datasets or Dossiers, the term "endpoint" is used in the following meaning: An endpoint is an information requirement or data point with regard to the physico-chemical properties of the substance, environmental fate and behaviour, ecotoxicological information, toxicological information and specific information (e.g. residues in food and feedingstuffs) according to a given chemical programme. For instance:
Standard information requirements set out in the EU REACH Annexes VI to XI
Data requirements on active substances and biocidal products as laid down in the Biocidal Products Directive 98/8/EC and specified in the TNsG on Data Requirements
SIDS elements specified in the OECD Manual for Investigation of HPV Chemicals
An endpoint generally corresponds to a (sub)section in IUCLID. Some IUCLID subsections are used to cover several endpoints or information requirements. For instance, section 7.6.1 Genetic toxicity: in vitro is for entering study summaries on different genotoxic endpoints, namely, gene mutation studies in bacteria, gene mutation studies in mammalian cells, and cytogenicity studies. In these cases, a field is provided for indicating the exact endpoint study type.
Caution
The term "endpoint" as used in the definition above, i.e. in the sense of data point, has a rather broad meaning . From a scientific point of view, an endpoint corresponds with or relates to an effect on organisms or the environment in general, e.g. carcinogenicity, biodegradation, aquatic toxicity. In a still narrower sense, the term endpoint is used in the sections on Ecotoxicological information and Toxicological information as the quantification of an observed effect obtained through statistics or other means of calculation for the expressed purpose of comparing equivalent effects (e.g. LC50, NOAEL).
Endpoint study
Whereas a IUCLID endpoint or section provides the container for storing data, an "endpoint study" provides the data to be entered in the available data entry fields of that section, e.g. a study on vapour pressure entered in section 4.6 Vapour pressure or a study on repeated dose toxicity (oral) entered in section 7.5.1 Repeated dose toxicity: oral. The term "study" has a rather generic meaning in that it refers to any experimental study, but also to an estimation or prediction method including (Q)SAR, read-across, weight of evidence evaluation, data waiving or any other type of information being relevant for a given information requirement. For more information see chapter B.4.2.2 Summaries of study reports and other information.
Endpoint study record
In a database such as IUCLID, a record is a collection of information which relates to a particular item, called (data entry) field. Hence, an Endpoint study record contains all the pieces of information related to one given endpoint study entered in the fields provided in the data entry window. In other words, an Endpoint Study Record provides a template with predefined fields and freetext prompts, which helps the user summarise a study, as further described below.
Each Endpoint study record of sections 4 to 10 is structured into the following main parts:
Admininstrative data
Data source
Material and methods
Results and discussion
Overall remarks, attachments
Applicant's summary and conclusions
Under these headings certain data entry fields are subsumed which are common to all Endpoint study records and are therefore called "generic" elements. In addition, endpoint-specific data entry fields are available, the number of which varying from none or only a few up to many, depending on the degree of structure required for a given Endpoint study record. For example, section 5.6 Additional information on environmental fate and behaviour provides only generic fields as no specific fields are needed here. On the other hand, many specific fields are available in section 7.5.1 Repeated dose toxicity: oral.
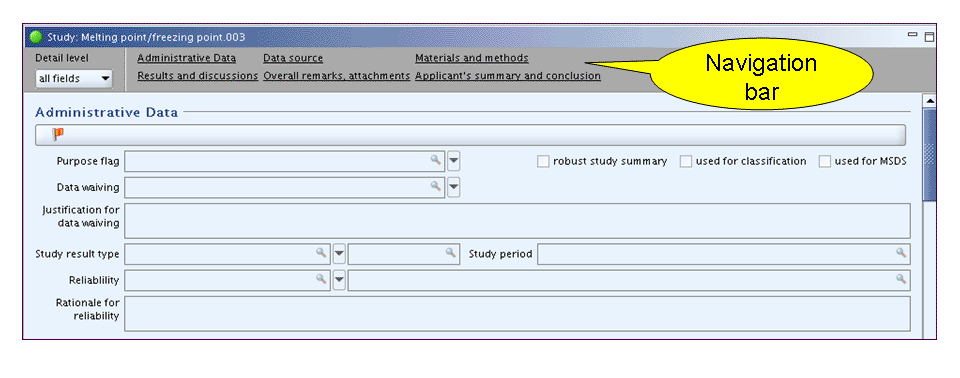
On top of each Endpoint study record a navigation bar is provided with links to the main parts of the record. This is particularly helpful in case of very comprehensive Endpoint study records. For detailed guidance on how to navigate within Endpoint study records see chapter D.4.7.5 Navigating within the data entry screen of an Endpoint study record.
Because many fields are only relevant for robust study summaries, a system of detail levels has been implemented in IUCLID. This allows to display either only the basic fields, which are considered relevant for all study summaries, or all fields, i.e. including a number of additional fields, which are normally only relevant for robust study summaries. For detailed guidance on how to switch between these two detail levels see chapter D.4.7.6 Switching between display type "basic fields" (detail level 1) and "all fields" (detail level 2).
Rationale behind IUCLID Endpoint Study Records - OECD harmonised templates
IUCLID is the first system to implement completely the so-called OECD harmonised templates in the Endpoint study records in sections 4 to 10. In the context of the OECD project on Harmonised Templates for reporting summary information from testing results on chemical safety, 87 templates were developed and published in March 2006. These documents, together with supplements and amendments, are available from OECD's public web site: http://www.oecd.org/document/13/0,2340,en_2649_34379_36206733_1_1_1_1,00.html.
On this web site, the OECD templates are described as follows:
An OECD harmonised template is a standard format for reporting a summary of the results of a test on a chemical to determine its properties or effects on human health and the environment (e.g. hydrolysis, skin irritation, repeat dose toxicity, etc.). These templates can be used for reporting summary results for testing on any type of a chemical (e.g. pesticides, biocides, industrial chemicals).
The templates are aimed at developers of database systems as they prescribe the formats by which such information can be entered into and maintained in database. By using these templates, governments and industry will easily be able to electronically exchange test study summary information. In order for information technology developers to build data entry screens and/or database systems based on the OECD Harmonised Templates which can generate data files that can be imported into other database systems, each template has to have a corresponding "XML schema" (i.e. a common electronic data export/import format).
The OECD harmonised templates are merely guides for structuring data entry/database management systems; they are no data entry screens, but presented in the form of MS EXCEL spreadsheets listing all of the data elements which could be relevant for a summary of a study as well as the format in which the information should be entered and stored electronically, together with field-specific help texts intended to guide end users.
As the templates are intended to serve as standard formats for summarising data contained in any study report or publication related to particular endpoints, including studies that were not conducted according to current guidelines, the templates are designed in a very flexible way. This includes:
structured elements (i.e. fields, picklist items, freetext prompts, predefined tables) some of which may not be relevant for specific study summaries;
picklists for specific test guidelines which contain the most often cited guidelines, some of which may not be relevant for a specific regulatory programme;
guidance notes (i.e. help texts) which explain what kind of data entry is expected in a given field, but do not necessarily indicate whether the corresponding data are requested by any test guideline. However, most templates are nevertheless obviously biased towards studies performed according to the OECD Test Guidelines, as these are the internationally agreed standard.
The degree of complexity used in these templates follows the needs of the key study / robust study summary approach described in chapter B.4.2.2.3 Key study / robust study summary approach. The fields provided should be considered as a maximum degree of detail. It is generally accepted that much less details are needed in case of non-robust study summaries. This is reflected by the system of detail level introduced in the OECD templates. The detail level is an indicator showing whether a field is considered basic information (Level 1) or additional information as required for robust study summaries (Level 2).
Note
The OECD harmonised templates are not prescriptive as to the order
of appearance of any data entry fields or how the fields are technically
implemented as long as this does not affect the harmonised and agreed upon
data exchange format. In IUCLID, the order of fields follows closely that
recommended in the OECD harmonised templates with only one exception:
fields Reliability and Rationale for
reliability are provided under Administrative Data in IUCLID,
whilst under APPLICANT´S SUMMARY AND CONCLUSION in the OECD
templates.
IUCLID per se also does not prescribe how detailed the study summaries should be recorded. The fields provided should be considered as a maximum degree of detail. Older study reports or literature sources often do not provide the details for which many fields prompt for on a robust study summary level. On the other hand, more recently conducted studies and any new studies can be summarised very detailed.
Refer to the relevant guidance for the respective chemical programme on how detailed studies need to be summarised. There may be regulatory programmes where the completion of all fields and of the full freetext templates is considered mandatory. This can particularly be true for biocides or plant protection products. In fact, a number of details have been incorporated in the templates in order to match the detail level in the templates developed by Health Canada's Pest Management Regulatory Agency (PMRA) and the NAFTA Technical Working Group on Pesticides (NAFTA TWG), established under the North American Free Trade Agreement. This includes also the option of uploading the executive summaries of the NAFTA templates in the form of predefined texts (see chapter D.4.7.7.6 Applicant's summary and conclusions).
In the case of existing IUCLID 4 datasets prepared in the context of the OECD High Production Volume Chemicals Programme, EU Risk Assessment or for other purposes, which will be used for EU REACH, a pragmatic approach may have to be considered to avoid unnecessary additional work for adjusting these datasets to the new format in IUCLID5. For instance, it may not be necessary to move all kinds of pieces of information to the various Freetext template fields foreseen now in IUCLID5, as long as the relevant information is provided. Detailed instructions on how to post-process migrated IUCLID4 datasets is given in chapter D.17 Migrate Date (migrate data from IUCLID 4 to IUCLID 5 format).
To create a new Endpoint study record
Select the desired section from the section tree as described in chapter D.4.3.4.2 Selecting a section from the section tree.
Right-click the section title and from the menu displayed, click the New Endpoint study record command.
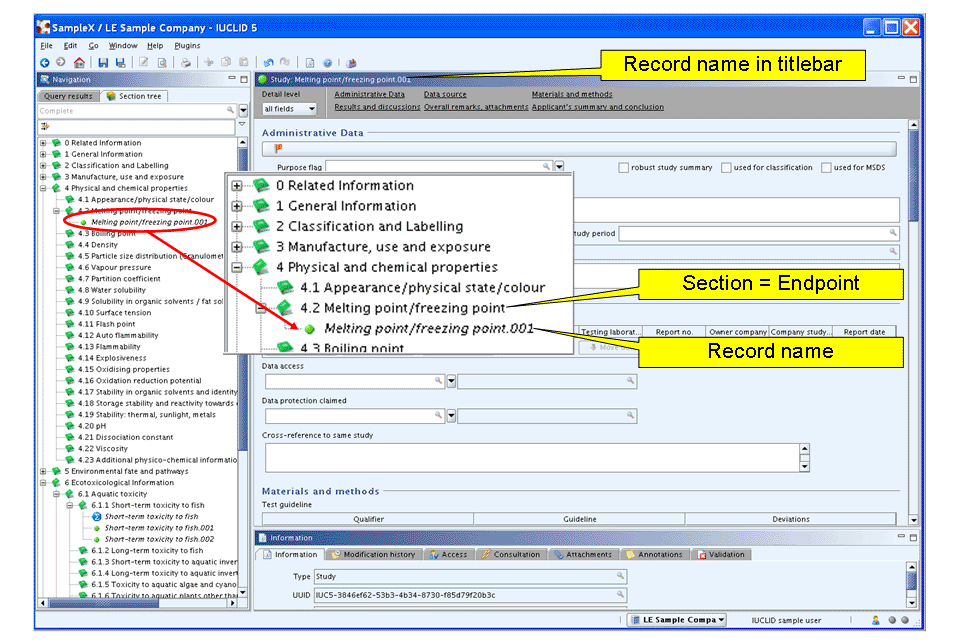
A new record appears under the respective section title indicated by a
green bullet  . A default record name is generated and displayed
both in the section tree pane and record titlebar. This record name consists
of the section title followed by a dot and a consecutive number, e.g.
"Melting point/freezing point.001", as shown in the screenshot below.
. A default record name is generated and displayed
both in the section tree pane and record titlebar. This record name consists
of the section title followed by a dot and a consecutive number, e.g.
"Melting point/freezing point.001", as shown in the screenshot below.
Record names are of advantage for easier finding and navigating to a record. Optionally you can rename records as appropriate, e.g. by adding a specific note. For more information see chapter D.4.7.3 Renaming an Endpoint study record.
To rename an Endpoint study record
Select the record in the section tree pane and either press the F2 key or right-click the record and from the menu displayed, click the Rename command.
Edit the record name as appropriate and then click OK.
For example, change the default name "Melting point/freezing point.001" to "Melting point/freezing point.001 (Patty 1967)".
Tip
You can tailor the record names to your needs. The default name is sufficient if there are only a few records per section. In the case of a great number or if you want to reorder the records (see D.4.7.8 Reordering Endpoint study records) it can be useful to add additional information or even replace the default name. Note that the default section title is actually obsolete, because in any selection list displayed in the different IUCLID dataset features (e.g. printing, exporting, Dossier creation) the respective Endpoint section is listed in a separate column anyway.
Particularly when an Endpoint study record from another Substance dataset is referenced, as described in chapter D.4.7.10 Referencing Endpoint study records to another Substance dataset, indication of the source Substance can add clarity.
Examples of potentially useful information in the record name are as follows:
Indication of the bibliographic reference, i.e. Author (or company name) and year, in case there are many records compiled in the same section. This makes it easier to find a given record, unless you navigate by record number only.
Precise specification of the information requirement in case several data points can be covered by the same section. For instance, in section 7.6.1 Genetic toxicity: in vitro, you can indicate the genotoxic endpoint, e.g. "001 gene mutation (bacteria)", "002 cytogenicity" or, if combined with bibliographic information, e.g. "001 Ames et al. 1998: gene mutation (bacteria)". Note that the default section title "Genetic toxicity in vitro" has been omitted in these examples.
Indication of key studies or reliability score, if helpful for quickly finding the corresponding records in the Section tree.
Indication of the source dataset, which can be a Substance or Template name, e.g. "90-80-2: Ames et al. 1998: gene mutation (bacteria)".
Any other relevant information that is useful in either navigating to a record or for marking a record.
Caution
When you reorder the records (see chapter D.4.7.8 Reordering Endpoint study records), the default order number in the record name is not changed. This can be confusing and you should consider deleting the default record numbers or adjust them in an appropriate way if they should be kept.
Note that the default record name including any number is independent of the so-called Universal Unique IDentifier (UUID), which is automatically created and displayed in read-only in the Information window below the Data entry window (see chapter D.4.9 How to use the information window).
To select and open an Endpoint study record, you have two options: Either navigate through the section tree until you find the desired record; this may be sufficient, if you have only a few records and know right away where to locate them. Or use the query / filter method, which is the method of choice when you know the record name or part of it.
Option 1: To browse through the section tree and open a record
Click the Plus symbol(s)
 in front of the hierarchical section titles on
the section tree pane in order to expand the subsections as appropriate
until the desired record is displayed.
in front of the hierarchical section titles on
the section tree pane in order to expand the subsections as appropriate
until the desired record is displayed.Either double-click the record or right-click it and from the menu displayed, click the Open command.
Option 2: To query and find a record and open it
Click into the Find or Filter pane
 below the title bar of the section tree
pane.
below the title bar of the section tree
pane.Enter the record name or an adequate part of it. Either double-click the record or right-click it and from the menu displayed, click the Open command.
The more unequivocal the entered text is, the better the search for the desired record can be narrowed down. Example queries for finding record "Melting point/freezing point.001 (Patty 1967)" (The quotation marks are not to be included in the query.):
"Melting point/freezing point.001 (Patty 1967)": complete record name, but too much typing work
"melting*001*": truncated search string using wildcards (*) is much faster.
"patty": will find and display all records containing this string in their names.
"melt*patty*": will further narrow above query only to record(s) containing string "patty" in section "Melting point/freezing point".
Tip
Queries are not case-sensitive: It does not matter whether you capitalise letters or not. In case of truncated queries, wildcards (*) are only required if the truncation is neither at the beginning nor at the end of the searched item, but in between. For example, search string "melt" or "001" will find all records whose names end or begin with these strings, respectively.
For detailed instructions on how to conduct queries in IUCLID see chapter D.15 Query and Search
To navigate within the data entry screen of an Endpoint study record you can either use the usual navigation buttons on the keyboard and the scroll bar or, for quick jumps to the main parts, use the navigation bar.
Navigating by keyboard buttons and scroll bar
To navigate through the Endpoint study record do one of the following:
Use the vertical scroll bar to the right
Use the scroll wheel of your mouse
Press the Page Down or Page Up key on the keyboard
Press the Down Arrow or Up Arrow key on the keyboard
Caution
The use of the navigation keystrokes only works if you are in the Edit mode and if you clicked into a field first. The proper functioning may also depend on your browser. For example, scrolling using the scroll wheel of the mouse may only work if the mouse pointer is somewhere to the right of the data entry screen and not hovering over data entry fields.
Navigating to main parts of an Endpoint study record
As described in chapter D.4.7.1 What is an Endpoint study record?, each Endpoint study record of sections 4 to 10 is structured into the following main parts:
Administrative data
Data source
Material and methods
Results and discussion
Overall remarks, attachments
Applicant's summary and conclusions
These headings are provided as links in the navigation bar just below the title bar of each Endpoint study record (see the screenshot below). They offer a quick way to navigate to the main parts of the record.
To navigate to a particular part of an Endpoint study record
Click the corresponding link (i.e. underlined heading) on the navigation bar.
The data entry screen changes and the heading of the main part selected appears at the top of the data entry screen now.
Tip
Using the links in the navigation bar is particularly helpful in case of very comprehensive Endpoint study records or if you prefer to start editing or viewing with a particular part, e.g. Results and discussion.
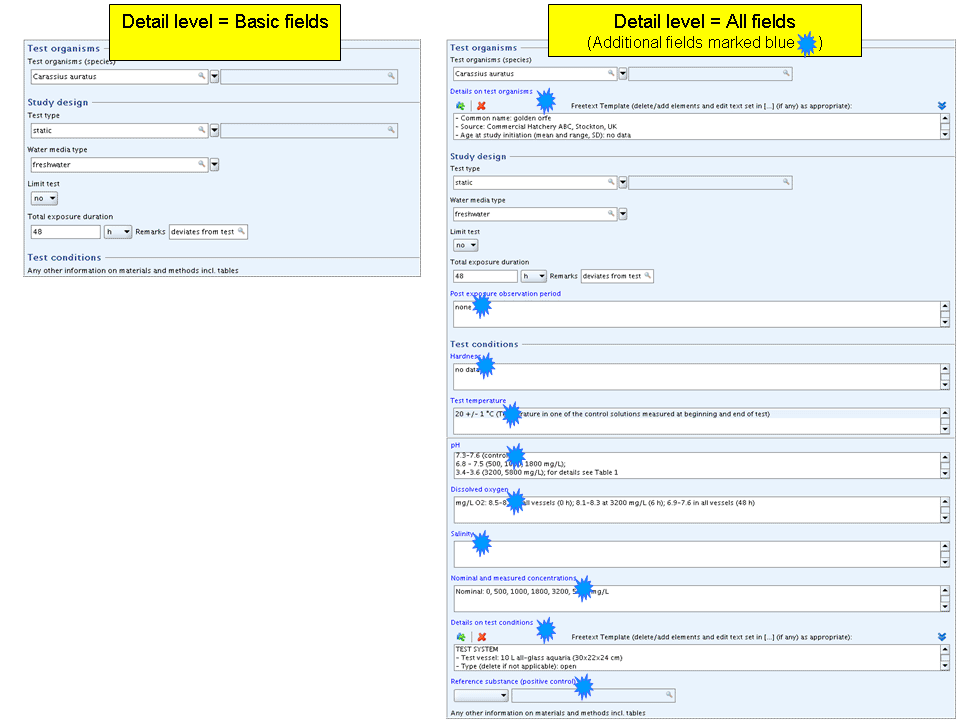
As described in chapter D.4.7.1 What is an Endpoint study record?, IUCLID allows to display either the basic fields only or all fields, i.e. including additional fields, which are normally only relevant for robust study summaries. A detail level indicator is shown to the left of the navigation bar indicating either "basic fields" or "all fields" as shown in the following screenshot:
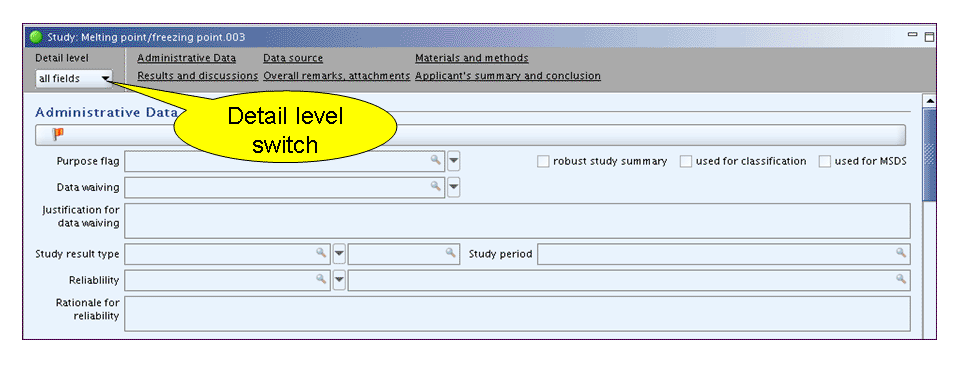
To switch between the two detail levels
Click the Detail level button and from the menu displayed, select the desired detail level.
The data entry screen then changes and the additional fields (if any) are either displayed (if detail level "all fields") or hidden (if detail level "basic fields"). The field labels of any additional fields are set in blue colour, while the label of all basic fields is black.
Tip
Switching to detail level "basic fields" is helpful:
if you enter or edit a non-robust study summary and need only the basis fields.
if you need to view only the most relevant fields and want to reduce the number of fields being displayed.
Switching to detail level "all fields" is required:
if you enter or edit a robust study summary.
if you enter or edit a non-robust study summary, but consider it appropriate to include some relevant data in one or more additional fields.
The following screenshots show an excerpt from the data entry screens of section 6.1.1 Short-term toxicity to fish. They are intended to demonstrate how "basic" the fields are that are available at detail level "Basic fields", while a considerable number of additional fields may be provided, depending on the Endpoint section, when switching to detail level "All fields":
In this subchapter general guidance is given on the purpose of all generic fields provided in almost each Endpoint study record of sections 4 to 10 and and the type of information expected to be entered. Guidance on endpoint-specific fields is available from the Online Help on pressing the F1 key or clicking the Help button on the toolbar. In addition, for each Endpoint section an overview of all data entry fields is given in chapter E. Specific Guidance on Content of IUCLID Sections.
For instructions on the different data types, see chapter D.4.5 What data types are available for input fields and how are they used?.
Note
The distinction between generic and endpoint-specific fields is rather artificial from a user's point of view. As regards the data types used and the handling of the fields you will not notice any difference. However, there are two major advantages of the generic fields approach:
Their use needs only be described once in this manual.
The user gets acquainted with these fields faster as they appear in almost every Endpoint study record.
Important
The instructions provided on the content of the data entry fields described below are to some extent oriented to the EU REACH legislation, but apply to other legislations, too. Nevertheless you should also consult any programme-specific guidance (e.g. OECD HPVC, Pesticides NAFTA or EU REACH) on the required information.
Under this main heading, fields are subsumed for identifying the purpose of the record (e.g. "key study"), the type of result (e.g. "experimental study"), data waiving indication (if any), reliability indication, and flags for specifying the regulatory purpose envisaged and/or any confidentiality restrictions. This kind of data characterises the relevance of a study summary and are therefore displayed at the top of each Endpoint study record.
The following screenshot shows an example of administrative data of a study summary:
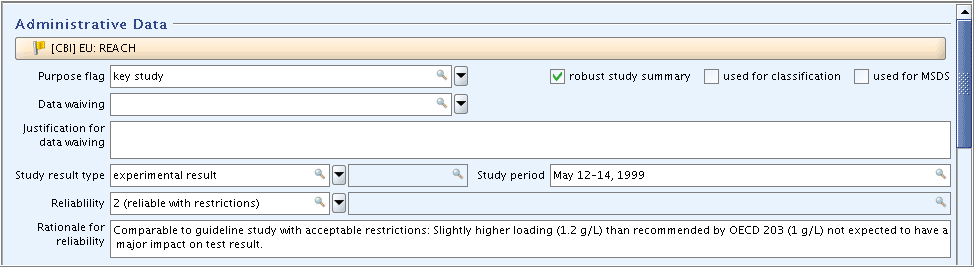
In the following, all fields of part "Administrative data" are described.
Confidentiality and regulatory purpose flags
As described in chapter D.4.5 What data types are available for input fields and how are they used?, flags are used to mark records for a specific purpose. By setting filter options, a subset of selected records can then be selected for subsequent operations such as exporting or printing.
In IUCLID, flags appear either as list fields or as check boxes, which are in principle list fields with picklist options yes / no.
Both the Confidentiality flag and
Regulatory purpose flag are accessible through the
following dialogue box:
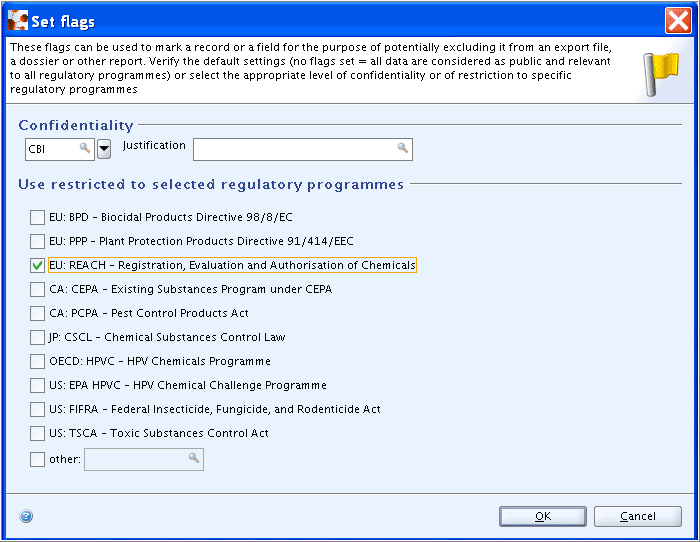
To set flags
Click the Flag indicator
 just below the heading "Administrative
data".
just below the heading "Administrative
data".In the Set flags dialogue box opened thereafter, select the flag(s) as appropriate.
Click OK to close the dialogue box. The flag(s) set are then displayed in the Flags indicator bar (read-only) and the Flags indicator changes colour from orange to yellow
 as shown in the following screenshot:

Specific guidance on the use of the flag fields combined in the Set flags dialogue box is as follows:
Confidentiality flag and Justification field
The confidentiality flag can be used to mark a record for the potential option of excluding it from a dossier, print-out or export file. An empty field means "non confidential" by default, i.e. data can be exchanged and can be made publicly available without limitations. In the field next to the confidentiality flag, you can enter any justification or relevant remarks.
If applicable set the respective flag for indicating either one of the following reasons of confidentiality: (i) CBI (confidential business information): The data must not be provided to other companies or disseminated to the public. (ii) IP (intellectual property): The data should only be provided to other companies when they are trusted (e.g. consortia or with letter of access); the data must not be disseminated to the public. (iii) no PA (not public available): The data can be provided to other companies, but must not be disseminated to the public. Consult any programme-specific guidance (e.g. OECD HPVC or EU REACH) on how to use this field. For instance, it may not be allowed to claim confidentiality for data on physico-chemical properties, environmental fate, ecotoxicity or toxicity. However, irrespective of the confidentiality flag confidential details on the test material used in the study can be treated confidential when entered in the field Confidential details on test material.
Caution
Note that confidentiality is not the same as data protection which regulates whether and under which conditions another applicant can use a study report for which data protection is granted.
Any remarks entered in field Justification are
not displayed in the Flags indicator, but only when you open the dialogue
box.
Regulatory purpose flags
Under the heading "Restriction of specific regulatory purposes" one or more checkboxes can be selected in order to indicate specific regulatory purpose(s) for which the data are intended to be used, e.g. EU: REACH, EU: BPD, etc. Later on, when you select records to be included in print outs, export files or dossiers, you can limit the selection to records flagged for specific regulation(s) only. For example, filtering for records flagged "EU: REACH" would only include any records flagged that way.
Note
Apart from the EU regulations BPD (Biocidal Products Directive 98/8/EC), PPP (Plant Protection Products Directive 91/414/EEC) and REACH (Registration, Evaluation and Authorisation of Chemicals) and the internationally operating OECD HPVC (High Production Volume Chemicals Programme), several national regulations in Canada, Japan and USA are listed in the flags dialogue box. This does not necessarily mean that IUCLID is or should be used for these regulations. However, it can be sensible to flag records also in this respect, if you use IUCLID as your general repository for study summaries.
This list is not comprehensive and may be expanded at a later stage. For any other specific regulation use checkbox "other:" and specify.
Purpose flag
This field can be used to indicate whether the record reflects a key study, supporting study or adds to a weight of evidence analysis if applicable. Assigning a flag may be required by the respective regulatory programme or otherwise be useful for filtering purposes:
Key study: In general, a key study is the study that has been identified as most suitable to describe an endpoint from the perspective of quality, completeness and representativity of data.
Supporting study: Any other adequate study that is considered supportive for the key study or key studies.
Weight of evidence: A record that contributes to a weight of evidence justification for the non-submission of a particular (adequate) study. The weight of evidence justification is normally endpoint-related, i.e. is based on all records flagged that way. However, a short reasoning for why a given record is flagged should be provided in field
Rationale for reliability incl. deficiencies.
See also guidance given in chapter B.4.2.2.3.1 Definition of key studies, supporting studies, robust study summaries.
Robust study summary flag
Set this flag if required by the respective regulatory programme or if otherwise useful as filter for printing or exporting records flagged as "Robust study summary" or in combination with other flags.
The term "Robust study summary" is actually used only to describe the technical content of a very detailed summary of an experimental study or of any other relevant information. It is a priori no synonym with the term "Key study", although a key study should usually be submitted in the form of a robust study summary. However, a robust study summary may also be useful for other adequate studies that are considered supportive of the key study or even for inadequate studies if they can be used for a weight-of-evidence analysis. Also for studies that are flawed, but indicate critical results, robust study summaries highlighting the weaknesses of the studies need to be elaborated.
See also guidance given in chapter B.4.2.2.3.1 Definition of key studies, supporting studies, robust study summaries.
Flag "Used for classification"
Set this flag if required by the respective regulatory programme or if otherwise useful as filter for printing or exporting records flagged as "Used for classification".
In some use cases it may be necessary to indicate those records that are used for the classification of that substance, e.g. according Directive 67/548/EEC. If not relevant, disregard this field.
Flag "Used for MSDS"
Set this flag if required by the respective regulatory programme or if otherwise useful as filter for printing or exporting records flagged as "MSDS information".
"MSDS" stands for Material Safety Data Sheet. In some use cases it may be necessary to indicate those records that are used for the compilation of MSDS information. If not relevant, disregard this field.
Data waiving and Justification for data waiving
If data waiving, i.e. the non-submission of a particular study that is
required by the legislation, is considered justified, select the appropriate
reason from the picklist of the field Data waiving
("study technically not feasible", "study scientifically unjustified",
"exposure considerations" or "other justification") and include a more
detailed reasoning in field Justification for data
waiving. Explain why no new study needs be conducted despite of a
lack of information that would fulfil the standard information requirements.
For instance, "Data waiving: exposure considerations" should be justified by
referring to exposure scenario analysis or other relevant
information.
If more than one reason can be indicated, create separate Endpoint Study Records for each.
Tip
It is recommended to sort a record containing data waiving information in such a way that it appears as first record of the respective section. It should also be noted that a data waiving record should stand for its own and not be mixed with other data such as existing study summaries. These should be summarised in separate Endpoint Study Records.
If a section covers more than one data requirement, complete the relevant fields to specify the data waiver. For instance, indicate species (e.g. rat) and test type (e.g. chronic) for repeated dose toxicity studies.
Important
Consult any programme-specific guidance (e.g. OECD HPVC or EU REACH) on how to use data waivers. For instance, Annex XI of EU REACH includes rules which allow variation of the standard information requirements that are established in Annexes VI to X. There are three different types of general rules for using a data waiver instead of conducting a study, i.e.:
When testing does not appear scientifically necessary;
When testing is technically not possible; and
Substance-tailored exposure-driven waiving/testing (used for Annexes VIII and X).
These rules are reflected by the picklist items provided for the
field Data waiving. Rule no. 1 may not only be used if
an obvious reason can be given for data waiving, e.g. no skin/eye
irritation study is required if the pH is less than 2 or greater than
11.5, but also for justifying following cases where testing may not appear
scientifically necessary and information from other sources can replace
the required data:
Use of (already) existing data;
Weight of evidence from other sources leading to the conclusion that a substance has or does not have a particular property;
Structure-actiivity relationship (SAR) from valid qualitative or quantitative models may indicate the presence or absence of a certain dangerous property;
Grouping of substances and read-across approach when predictions can be made from data for a Reference substance within the group by interpolation to other substances in the group.
Study result type
Select appropriate indication for type of result from the picklist, i.e. experimental result, experimental study planned, estimated by calculation, read-across based on grouping of substances (category approach), read-across from supporting substance (structural analogue or surrogate), (Q)SAR, other: (to be specified), no data.
In case of read-across, follow the instructions related to the
respective legislation as to whether the (robust) study summary of another
substance should be referenced or copied. If it is indicated that an
experimental study is planned (in some legislations also defined as
"undertaking of intended submission"), the submitter should provide the
basic data of the intended study in the respective fields as far as known
(e.g. Test type, Test guideline or
Principles of method if other than guideline,
Species etc.). The information provided should be
detailed enough to allow the Evaluator to make a decision on the testing
proposal. In addition to data entered in fields, you may attach further
details in field Attached background material.
Study period
In this text field, indicate the period during which the study was conducted if available, i.e. start and end date, using an unambiguous date format, e.g. "From 12 MAY 1999 to 15 AUG 2000" or "From May 12, 1999 to Aug. 15, 2000".
Note
For some toxicology endpoints the in-life period (i.e. the phase of
a study following treatment in which the test system is alive/growing) may
have to be specified in field Details on test animals and
environmental conditions in addition to the study period.
Reliability and Rationale for reliability incl. deficiencies
The term reliability defines the inherent quality of a test report or publication and hence, the adequacy of data.
In field Reliability, enter a reliability score as
judged at your discretion, i.e. 1 (reliable without restriction), 2
(reliable with restrictions), 3 (not reliable) or 4 (not assignable) . Leave
this field empty if this indicator is not applicable, e.g. if a record does
not include a study summary, but any other information. The "other:" option
may be selected if this scoring system is not used.
Study summaries that are intended for a submission for EU REACH, EU BPD or OECD HPVC should be evaluated by the applicant based on the scoring system introduced already in the former IUCLID versions, the rationale of which is described by Klimisch and coworkers (Klimisch H.-J., Andreae M. & Tillmann U. 1997. A systematic approach for evaluating the quality of experimental toxicological and ecotoxicological data. Reg. Toxicol. Pharmacol. 25: 1-5). This approach includes the following scores and proposals for short standard justifications:
1 (Reliable without restriction): Enter short freetext, for instance:
Guideline study (OECD, etc.)
Comparable to guideline study
Test procedure according to national standards (DIN, etc.)
2 (Reliable with restrictions): Enter short freetext, for instance:
Acceptable, well-documented publication/study report which meets basic scientific principles
Basic data given: comparable to guidelines/standards
Comparable to guideline study with acceptable restrictions
3 (Not reliable): Enter short freetext, for instance:
Method not validated
Documentation insufficient for assessment
Does not meet important criteria of today standard methods
Relevant methodological deficiencies
Unsuitable test system
4 (Not assignable): Enter short freetext, for instance:
Only short abstract available - Only secondary literature (review, tables, books, etc.)
Only short abstract available - Only secondary literature (review, tables, books, etc.)
Only short abstract available - Only secondary literature (review, tables, books, etc.)
In field Rationale for reliability incl.
deficiencies, describe the rationale for the reliability score
chosen considering the possible impact of deficiencies and/or implications
on test results. Above standard justifications may be sufficient in some
cases. In the context of the HPVC programmes a system of more refined
standard justifications has sometimes been used (based on Rosner G. 1994.
Validation of SDS: Standard justifications. Personal communication to
Fraunhofer Institute of Toxicology and Aerosol Research, Hannover, Germany).
These predefined phrases, also referred to as "extended Klimisch codes", may
provide more details, e.g. 2c: Comparable to guideline study with
limitations which do not impair the overall conclusion from the data; 2f:
Acceptable calculation method (for physico-chemical information only); 2g:
Data from handbook or collection of data (for physico-chemical information
only)). However, particularly if reliability scores 2 or 3 are assigned, it
is recommended to indicate more concrete arguments for defending a study or
indicating relevant deficiencies, e.g.
"Comparable to guideline study with acceptable restrictions: Slightly higher loading (1.2 g/L) than recommended by OECD 203 (1 g/L) not expected to have a major impact on test result."
"Relevant methodological deficiencies: no vehicle control used or not reported; considerably longer life-time in control group as compared to treatment groups"
It is also recommended to refrain from indicating any sub-codes (such as 2a, 2b, etc.) as these were developed for internal use and are not standardised.
Note
Another approach developed as part of the US EPA HPV Challenge Programme is based on initial screening criteria for data reliability. For example, if a vehicle was used, the study is checked for a vehicle control. In principle, methodological and/or reporting deficiencies are evaluated. The criteria used are in principle comparable to those applied in the Klimisch approach, although no overall reliability code is assigned.
Under this main heading, fields are subsumed for identifying the source of the information summarised in the record and, in case of company data, an indication whether the data are protected or accessible. In addition, for cases where the same study is recorded in another IUCLID section, a cross-reference to that section can be given.
The following screenshot shows an example of data source information:
Tip
Context-sensitive help texts are provided for each data entry field by pressing the F1 key from within a given field or clicking the Help icon on the menu bar. The use of the online Help texts is highly recommended (see chapter A.3 Online Help).
For detailed information on field's data types see D.4.5 What data types are available for input fields and how are they used?
In the following, all fields of part "Data source" are described.
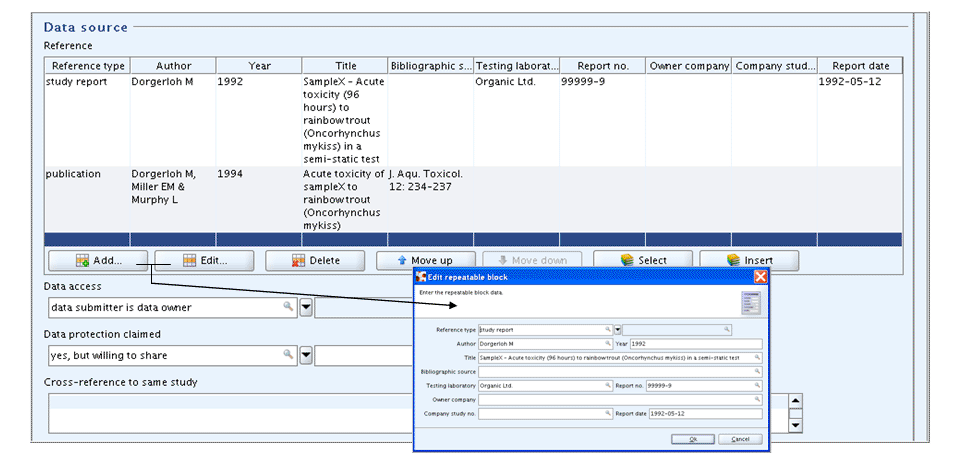
Reference
This is a repeatable block of fields displayed in table-view format. In the dialogue box that opens when you click the Add or Edit button, indicate the bibliographic reference of the study report or publication the study summary is based on. Always enter the primary reference in the first block of fields, if there are more than one reference to be cited. Copy this block of fields for specifying any other references related to this record (e.g. report of a preliminary study or other documentation). If results of a study report have been published, indicate the full citation of that publication(s) in addition to the reference of the original study, as shown in the screenshot example above.
For managing bibliographic references, the following functions are available:
Add button
 : Click to add a new reference. A dialogue box
opens for entering the bibliographic data described below.
: Click to add a new reference. A dialogue box
opens for entering the bibliographic data described below.Edit button
 : Click to open a reference. A dialogue box opens
for editing the bibliographic data described below.
: Click to open a reference. A dialogue box opens
for editing the bibliographic data described below.Delete button
 : Click to delete a reference.
Move up / Move down buttons
 /
/  : Click to move a reference up or down in the
table in the case of several references in order to position the primary
reference on top.
: Click to move a reference up or down in the
table in the case of several references in order to position the primary
reference on top.Select button
 : Click to select a reference from the inventory
of references stored in your local IUCLID installation described in
chapter D.13 Literature references.
: Click to select a reference from the inventory
of references stored in your local IUCLID installation described in
chapter D.13 Literature references.Insert button
: Click to copy the marked reference to the
inventory of references described in chapter D.13
Literature references.
From the dialogue box that opens when clicking the Add or Edit button, the following subfields are available:
Reference type: Indicate the type of reference, e.g. "Study report" or "Publication". Select "Other company data" to characterise any unpublished information from a company other than a study report. Select "Grey literature" for any other unpublished information or "other:" and specify.Author: For ease of sorting and searchability use the following convention: Surname, Initial (Example 1: White D, Ruehl KJ, Borman SA & Little J. Example 2: Hartley M & Murray W (avoid unnecessary full-stops, commas)). If no individuals are cited as authors, enter the name of company or organisation or "Anon." as appropriate. Note that the complete bibliographic reference may appear in this field after migration of unstructured data from existing databases (e.g. IUCLID 4).Year: Enter the year of study report or publication. For a study report this field should be completed to include it in any searches, regardless of whether the complete date is given in field "Report date".Title: Include the title of the report. For publications, include the title of the article of a journal or article/chapter of a book (e.g. handbook).Bibliographic source: Not relevant for any study report. For publications or any other literature source (grey literature) specify the following type of information: (i) Title of scientific journal or book (e.g. if handbook); (ii) Volume of journal; (iii) Editor, publisher, place of publication for books or articles in books; (iv) Pagination. Example 1 (journal): J. Agric. Food Chem. 38: 215-227 Example 2 (handbook): In: Lyman WJ (ed.) Handbook of chemical property estimation methods. Environmental behavior of organic compounds. McGraw-Hill Book Company 15.1-15.34, New York.Testing laboratory: Enter the name of the testing laboratory.Report no.: Specify the report number allocated by the testing laboratory. Note that any company-specific study number should be included in the respective field.Owner company: Enter the identity of the company who owns the data.Company study no.: Specify any company study no. if there is such a number and if it is different from the report no. of the testing laboratory. Otherwise leave field empty.Report date: Specify the complete date of the study report, e.g. "2005-05-12" for 12 May 2005. Note that subfield "Year" should be completed in any case for sorting and searching purposes.
Data access
This field indicates data access. Refer to the legislation as to whether there are provisions requiring that only companies who own data, or have access to data via a letter of access can use the data to support their applications whilst data are protected.
Select appropriate indication for data access from picklist, i.e. "data submitter is data owner", "data submitter has Letter of Access", "data no longer protected", "data published", "not applicable", "other:". Enter "not applicable" if the summary consists of information that is commonly accessible such as guidance on safe use.
Data protection claimed
Indicate as appropriate, i.e. "yes", "yes, but willing to share", "yes, but not willing to share". Note: "yes" should be selected only if "data submitter is data owner" or "data submitter has Letter of Access" is indicated in the preceding field. Options "yes, but willing to share" or "yes, but not willing to share" may be relevant for specific regulatory programmes (e.g. EU REACH) where the submitter is requested to indicate whether he is willing to share studies (e.g. with vertebrates).
In the supplementary remarks field, include an explanation as appropriate, i.e. justification for denial of sharing the corresponding study or refer to a document attached that provides justification (e.g. "for justification see attached document X").
Cross-reference to same study
A cross-reference can be included to indicate that the same study is recorded in another record. Indicate the respective IUCLID section and record name (if helpful) and enter relevant explanatory text. This may be useful if specific endpoints of a given study are described in another chapter (e.g. results on reproduction toxicity in case of a combined repeated dose / reproduction toxicity study) or if more than one experiment is described by the same study report, but included in separate records.
Check with the relevant guidance document whether all the methodology details must be repeated or whether a cross-reference to the same study in another chapter may be sufficient.
Note
Any cross-reference may become useless if a record is either printed or exchanged on its own or if it is copied and pasted in another dataset.
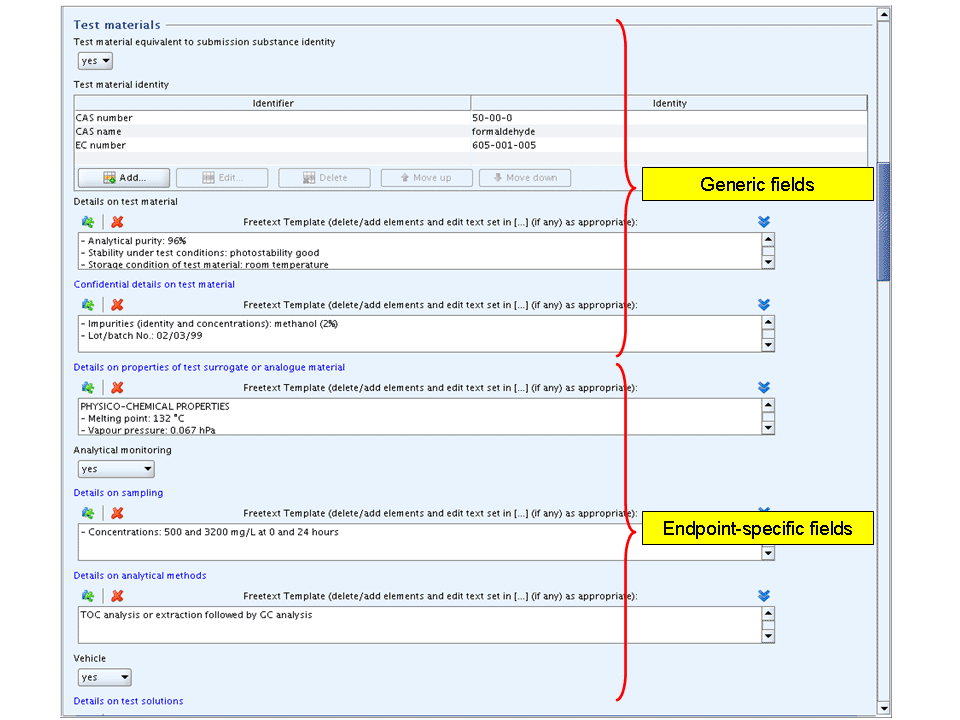
Under this main heading, fields are subsumed for characterising the materials and methods used. The generic fields (i.e. fields common to almost all sections) are described in detail as follows:
Generic fields
The Materials and methods part of most Endpoint study records starts with the following generic elements:
Test guidelinePrinciples of method if other than guidelineGLP complianceTest materials (subheading)
Test material equivalent to submission substance
      identity
Test material identityDetails on test materialConfidential details on test material
Example fields filled in with data from a fish toxicity study are shown in the following screenshot:
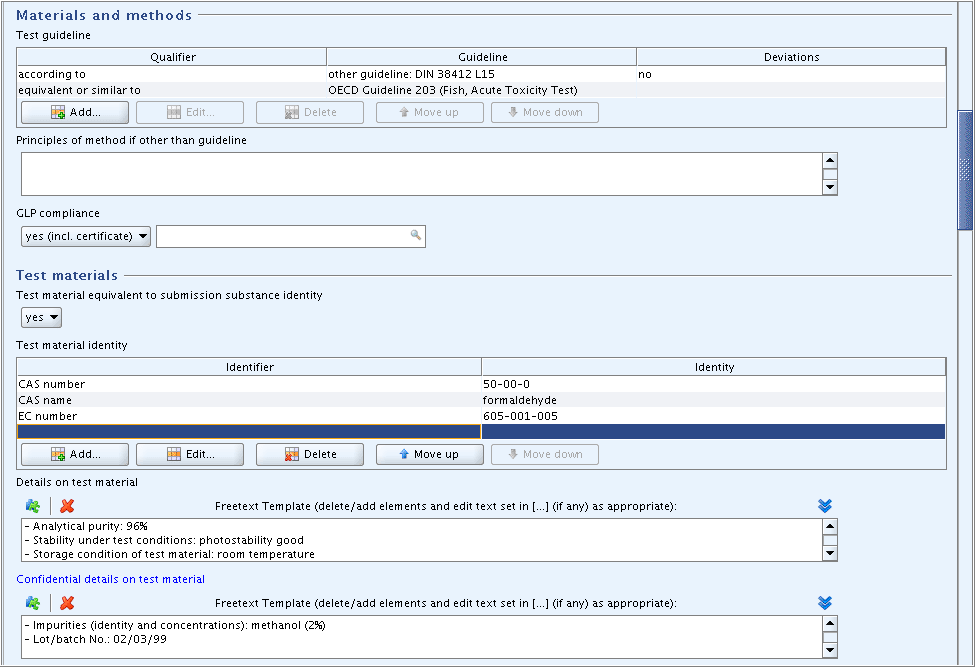
Test guideline
This is a repeatable block of fields displayed in table-view format. In the dialogue box that opens
when you click the Add or Edit button, indicate according to which test
guideline the study was conducted. If no test guideline was explicitly
followed, but the methodology used is equivalent or similar to a specific
guideline, you can indicate so in the Qualifier field
preceding the field Guideline. Copy this block of fields
for specifying more than one guideline (e.g. OECD guideline in addition to
national guidelines)., as shown in the screenshot example above.
The following subfields are available:
Qualifier: Select the appropriate qualifier, i.e."equivalent or similar to" (if no test guideline was explicitly followed, but the methodology is equivalent or similar to a specific guideline);
"no guideline followed" (if none of above qualifiers apply. If so, fill in field
Principles of method if other than guideline);"according to" (if a given test guideline was followed);
"no guideline available" (if so, fill in field
Principles of method if other than guideline);"no guideline required" (if so, fill in field
Principles of method if other than
          guideline
).
Guideline: Select the applicable test guideline, e.g. "OECD Guideline xxx". If the test guideline used is not listed, choose "other guideline:" and specify the test guideline in the related text field. In this text field, you can also enter any remarks as applicable, particularly:To include any other title of the test guideline draft used, a subtitle, another version or update number and the year of update (For instance, different titles and/or numbers may exist for a given EU test guideline.);
To indicate if a the study was performed prior to the adoption of the test guideline specified;
To indicate if the methodology used was based on an extension of the test guideline specified.
Deviations from guideline: If a test guideline is specified, indicate if there are any deviations from that test guideline. If "yes" is selected, only briefly state relevant deviations in the supplementary remarks field (e.g. "other species used"); details should be described in the respective fields of partMaterial and methods.
Note
The field block Test guideline is only for
recording specific test guidelines. If not listed in the picklist, you can
use option "other guideline:" and enter the guideline in the text field.
In order to assure that no other than guideline information is entered
here, no option "other:" is available. Make sure that you describe any
non-guideline method in the correct field, i.e. Principles of
method if other than guideline.
Principles of
    method if other than guideline
If no guideline was followed, include a description of the principles of the test protocol or estimated method used in the study. Details should be entered in appropriate distinct fields of part "Materials and methods". Also provide a justification for using this method if appropriate.
If an estimation method was used (to be indicated in field
Test result type) state the equation(s) and/or computer
software or other methods applied to calculate the value(s).
Examples of short descriptions are shown in following screenshots:


GLP compliance
Indicate whether the study was conducted following Good Laboratory Practice or not. Select "yes (incl. certificate)" if a GLP certificate of a test facility is available. Select "yes" if a GLP compliance statement is available, but no information on a GLP certificate. You can give an explanation in the supplementary remarks field, e.g. for explaining why GLP was not complied with or for specifying which (national) GLP was followed.
Test materials
Subheading only.
Test material equivalent to submission
  substance identity
This field is for indicating whether the identity of the test material used in the study is equivalent to that of the submission substance provided in section 1.1 Identification (see chapter D.4 Substance (create and update Substance related information). In IUCLID, "submission substance identity " is equivalent to that of the so-called Reference substance based on the identifiers of the substance only and irrespective of any additives or impurities.
By default, field Test material equivalent to submission
substance identity is automatically completed with "yes", when you
create a new Endpoint study record. However, you can edit this field and
change the default entry to "no". This may be necessary in the following use
cases:
No Reference substance was assigned to the dataset yet when an Endpoint study record was created. Hence, field
Test material
      equivalent to submission substance identity
was left empty.An Endpoint study record is copied to another Substance dataset and used for read-across. In this case the default indication "Test material equivalent to submission substance identity = yes" is not valid anymore. Since it is not adjusted automatically, you have to update this field accordingly.
If you enter "no" (i.e. test material is
not equivalent to Reference substance identity), you need to
identify the test material in the subsequent block of fields Test
material identity. In this case, also make sure that the
information entered in field Study result type is
consistent, i.e. adjust to "read-across from supporting substance
(structural analogue or surrogate)" or "read-across based on grouping of
substances (category approach)" as appropriate.
Note
The identity indicated in this field and the related field
Test material identity addresses the reference
substance assigned to the submission substance as described in chapter
D.4 Substance (create and update Substance related
information). The "Reference substance" is used as a reference in
naming the submission substance because it describes the identity of that
or those substance(s) that comprise its main constituent(s). Examples
are:
Diethyl peroxydicarbonate:
Reference substance = Diethyl peroxydicarbonate as listed in the EC inventory, with following identifiers: EC 238-707-3, CAS 14666-78-5, C6H10O6
Submission substance = e.g. Diethyl peroxydicarbonate, i.e. named after the Reference substance as the main constituent, but includes isododecane as stabilizing agent and, hence, an additive together with impurities which need to be specified. The typical concentration of diethyl peroxydicarbonate in this substance is 22% with an upper limit of 27%.
Mixture of 1,4-dimethylbenzene, 1,2-dimethylbenzene and 1,3-dimethylbenzene:
Reference substance = Mixture of 1,4-dimethylbenzene, 1,2-dimethylbenzene and 1,3-dimethylbenzene, with the following identifiers: EC 215-535-7, CAS 1330-20-7, C8H10
Submission substance = e.g. Mixture of 1,4-dimethylbenzene, 1,2-dimethylbenzene and 1,3-dimethylbenzene, i.e. named after the Reference substance as main constituents, but with identification of all these constituents, i.e. 1,4-dimethylbenzene (30-40%), 1,2-dimethylbenzene (25-35%), 1,3-dimethylbenzene (20-30%), and impurities (water, 5-12%).
Examples adapted from: European Commission (2006), Technical Guidance Document for identification and naming of substances in REACH (Draft). REACH implementation Project 3.10.
Test material identity
This is a repeatable block of fields displayed in table-view format. It is filled in automatically
with the identifiers of the Reference substance, if the preceding field
Test
    material equivalent to submission substance identity
was automatically set to "yes". If you need to edit the identifiers click
the Add or Edit button in order to open the dialogue box and indicate the
identity for one or more appropriate identifiers, e.g. CAS number, CAS name,
IUPAC name.
Caution
Once any identity information has been entered, it will not be
changed automatically even if you set the preceding field Test
material equivalent to submission substance identity from "yes"
to "no. The same holds true if the identity of the Reference substance is
changed explicitly in the dataset or implicitly when you copy a record to
another Substance dataset. In both cases, you have to update the
information in block Test material identity.
The following subfields are available:
Identifier: Select an appropriate identifier from drop-down list, e.g. "CAS number". Use "other:" and specify, if identity according to a standard identifier is not known or if an additional chemical name or number is provided.Identity: Enter the corresponding substance identity.
Note
No drop-down list is provided yet for selecting the relevant substance identity information.
Details on test material
Enter any details that could be relevant for evaluating this study summary or that are requested by the respective regulatory programme. Consult the programme-specific guidance (e.g. OECD HPVC or EU REACH) thereof.
The Freetext template provided for this field consists of prompts for the type of information expected, as explained as follows:
Name of test material (as cited in study report): only if different from any other identifiers provided in the preceding fields.
Molecular formula (if other than submission substance): specify
Molecular weight (if other than submission substance): specify
Smiles notation (if other than submission substance): provide if available
InChI (if other than submission substance): provide if available
Structural formula attached as image file (if other than submission substance): see Fig.: only if different from submission substance. Indicate Fig. no. if a file is attached in field "Attached document", e.g. state "see Fig. 1".
Substance type: indicate whether pure active substance, technical product, formulation or other.
Physical state: indicate "gas", "solid" or "liquid" only if different from submission substance or if substance can occur in different physical states.
Analytical purity: specify in % - Impurities (identity and concentrations): specify
Composition of the test material, percentage of components: specify if applicable
Isomers composition: specify if applicable
Purity test date: provide if available - Lot/batch No.: provide if available
Expiration date of the lot/batch: provide if available
Radiochemical purity (if radiolabelling): specify if applicable
Specific activity (if radiolabelling): specify if applicable
Locations of the label (if radiolabelling): specify if applicable
Expiration date of radiochemical substance (if radiolabelling): specify if applicable
Storage condition of test substance: specify if applicable
Stability under test conditions: indicate if available
Caution
Any information that can be claimed confidential (e.g. composition,
impurities) should be included in the subsequent field
Confidential details on test material. This will allow
to filter out the confidential data from any print-out or export
file.
Note
The items of this Freetext template reflect the maximum degree of detail. Unless these data are explicitly requested by the regulatory programme, you need only enter those details that are or could be relevant for evaluating this study summary. For detailed instructions on how to use this field type, see chapter D.4.5.3.4 Freetext templates.
Confidential details on test material
Enter any confidential information on the test material in this separate field. Use Freetext template and delete/add elements as appropriate. Consult the programme-specific guidance (e.g. OECD HPVC or EU REACH) thereof.
The Freetext template provided for this field consists of prompts for the type of information expected, as explained as follows:
Analytical purity: specify in %
Impurities (identity and concentrations): specify
Composition of the test material, percentage of components: specify if applicable
Purity test date: provide if available
Lot/batch No.: provide if available
Expiration date of the lot/batch: provide if available
Isomers composition: specify if applicable
Any other information on materials and methods incl. tables
This field is always positioned as last field of the Materials and methods part, i.e. after any endpoint-specific fields.
In this field, you can enter any information on materials and methods, for which no distinct field is available, or transfer free text from other databases. You can also open a rich text editor and create formatted text and tables or insert and edit any excerpt from a word processing or spreadsheet document, provided it was converted to the HTML format.
The following screenshot shows an example of formatted text, i.e. a predefined table which was edited after uploading it into the rich text area:
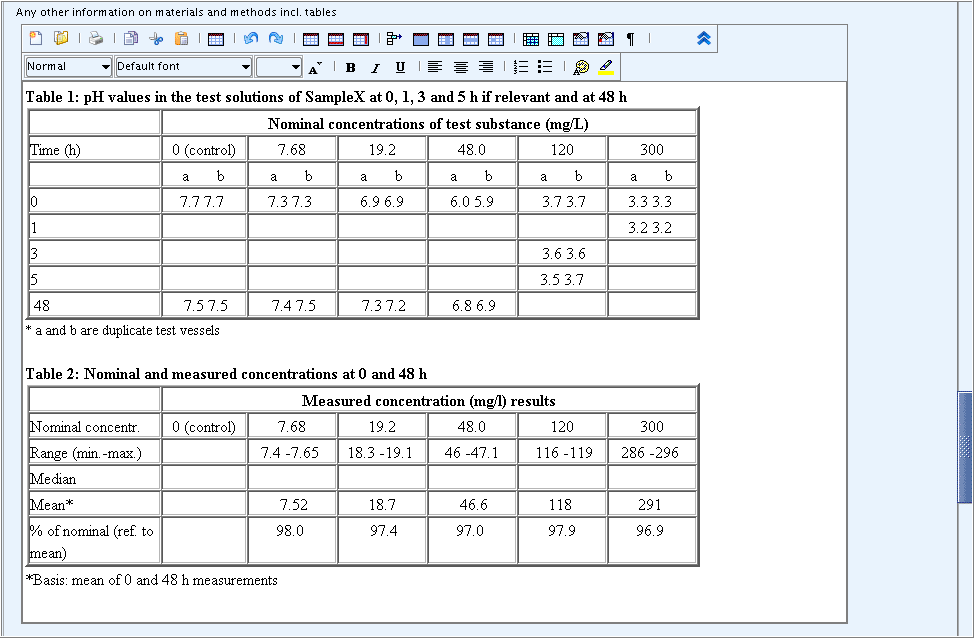
Note
One rich text editor field each is provided for the Materials and
methods and Results and discussions parts. In addition, the fields
Overall remarks and Executive
summary allow rich text entry. For detailed instructions on how
to use this field type, see chapter D.4.5.4 Rich text
(HTML) areas.
Endpoint-specific fields
In addition to above generic elements, endpoint-specific fields are
provided, the number of which varying from none or only a few up to many
depending on the degree of structure of a given Endpoint study record. The
following screenshot shows an excerpt from an Endpoint study record from
section 6.1.1 Short-term toxicity to fish, with the
generic fields under subheading Test materials, and some
of the endpoint-specific fields, all completed with specific data from a
sample study report:
Tip
Context-sensitive help texts are provided for each data entry field by pressing the F1 key from within any field or clicking the Help icon on the menu bar. The use of the online help texts is highly recommended.
General guidance on the content of the different IUCLID sections is given in chapter E. Specific Guidance on Content of IUCLID Sections.
For detailed information on field's data types see D.4.5 What data types are available for input fields and how are they used?.
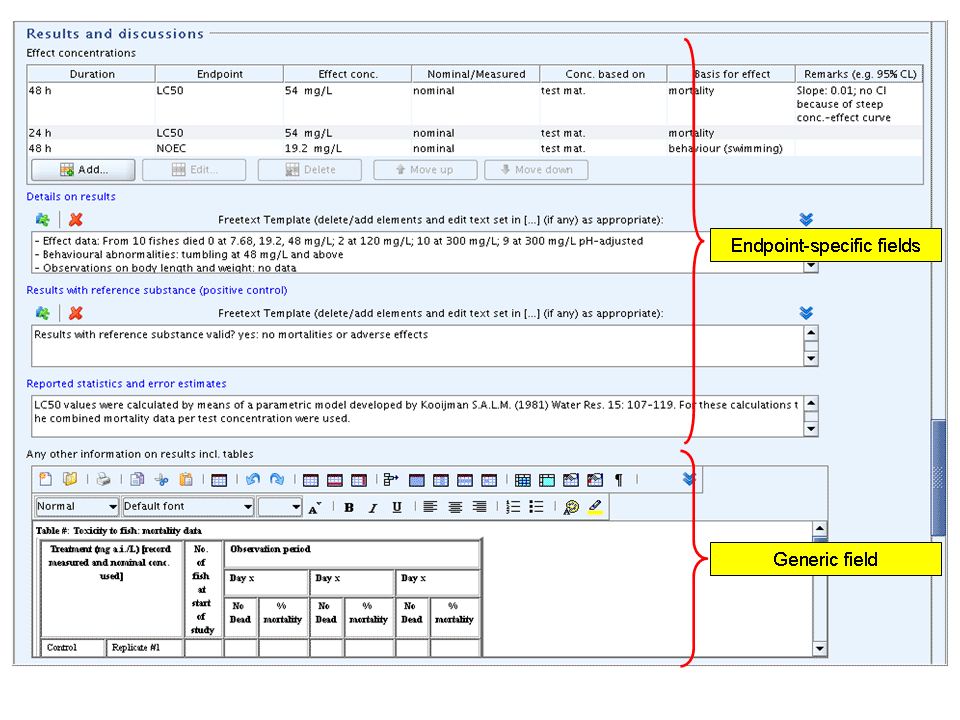
There is only one generic field provided in this part of each Endpoint Study Record:
Any other information on results incl. tables
This field is always positioned as last field of the Results and discussions part, i.e. after any endpoint-specific fields.
In this field, you can enter any other information on results, for which no distinct field is available. You can also open a rich text editor and create formatted text and tables or insert and edit any excerpt from a word processing or spreadsheet document, provided it was converted to the HTML format. For detailed instructions on how to use this field type, see chapter D.4.5.4 Rich text (HTML) areas.
The following screenshot shows a sample of part Results and
discussions with data from a short-term fish toxicity study, including a
predefined table in the rich text area Any other information on
materials and methods incl. tables:
Note
One rich text editor field each is provided for the Materials and
methods and Results and discussions parts. In addition, the fields
Overall remarks and Executive
summary allow rich text entry. For detailed instructions on how
to use this field type, see chapter D.4.5.4 Rich text
(HTML) areas.
In this part, three generic elements are provided for each endpoint study summary:
Overall remarks
In this field, you can enter any overall remarks, i.e. information that does not fit into any specific fields of the Endpoint study record. You can also open a rich text editor and create formatted text and tables or insert and edit any excerpt from a word processing or spreadsheet document, provided it was converted to the HTML format. For detailed instructions on how to use this field type, see chapter D.4.5.4 Rich text (HTML) areas.
Attached background material
This is a repeatable block of fields displayed in table-view format. In the dialogue box that opens when you click the Add or Edit button, select a file you wish to attach to the dataset. Copy this block of fields for attaching more than one file. For detailed instructions on how to use this field type, see chapter D.4.5.6 Attached document features.
Important
In principle this field can be used to attach any document. However, it is recommended to confine the number of attached documents and attach only information that cannot be described properly in any of the available data entry fields or inserted in rich text editor fields, particularly figures and graphs.
Do not attach the full study report in this field. If required, use
the field Attached full study report instead.
In the following screenshot, two documents have been attached:
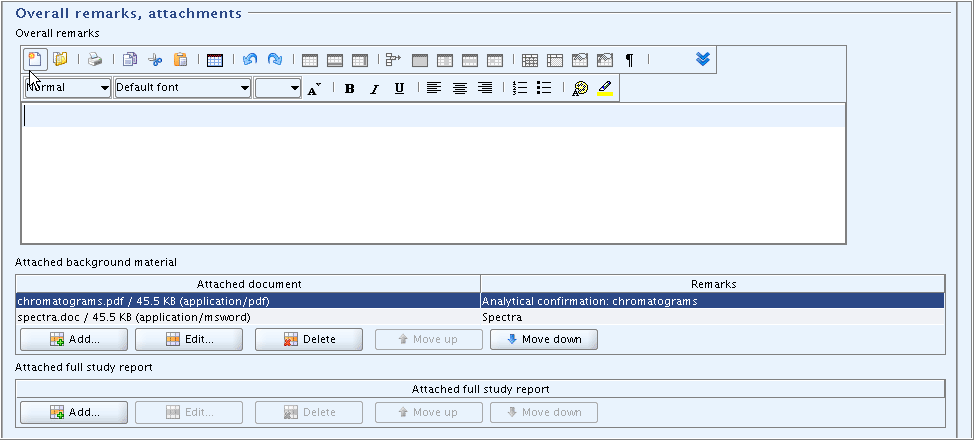
Attached full study report
This is a repeatable block of fields displayed in table-view format.
It offers the same features as described for field Attached
background material.
Important
Use this field only to attach full study report(s) if required. The
distinction between fields Attached background material
and Attached full study report offers the option to
handle attachments as to your needs when making a data export. That is,
you can exclude attached full study reports from export files. This can be
very important with regard to disk capacity and for confidentiality
reasons.
Under this heading, fields for concisely summarising the relevant aspects of the study recorded including the conclusions reached.
Generic fields
The following fields occur in each Endpoint study record:
Conclusions
Enter any conclusions if not given elsewhere. This field may be left empty if the relevant conclusions are provided in other fields designated for this purpose, i.e.:
ReliabilityandRationale for reliability incl. deficiencies: These fields are actually conclusion indicators, but are provided at the top of each record, i.e. under Administrative data because of their outstanding relevance.Validity criteria fulfilled: This field is provided as the first field of partApplicant's summary and conclusionsin Endpoint study records of a number of ecotoxicity sections. See the description below.Fields in
Results and discussionpart: Specific fields for recording effect levels provide conclusions in a strict sense.
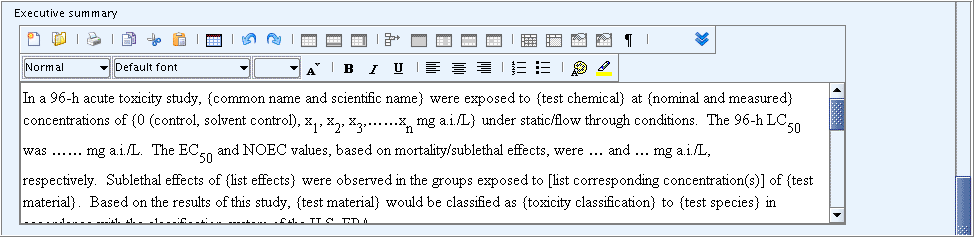
Executive
    summary
If required by the respective national/regional programme, briefly summarise the relevant aspects of the study including the conclusions reached. If a specific format is prescribed, upload the respective freetext template if available from the drop-down list or copy it from the corresponding document. Consult the programme-specific guidance (e.g. OECD HPVC or EU REACH) thereof.
This field provides a rich text editor for creating formatted text and tables, provided they are available in HTML format. This field is a rich text The following screenshot shows an example of formatted text, i.e. a predefined table which was edited after uploading it into the rich text area:
Note
Predefined and formatted executive summaries are provided for many IUCLID sections for upload into this rich text field. Currently only executive summaries from the PMRA/NAFTA templates are available. However, any other html documents can be created and stored on your computer disk. For uploading a document click the Open file menu button in the tool bar of this field. In the Open dialogue box which will be displayed then, select the file you wish to upload.
The following screenshot shows an example of a predefined executive summary for short-term fish toxicity as adopted from PMRA/NAFTA:
Note
For detailed instructions on how to use this field type, see chapter D.4.5.4 Rich text (HTML) areas.
Cross-reference to other study
A cross-reference to another study can be included if it is considered relevant in the interpretation of the test results, e.g. for supporting the conclusion that an effect observed was not substance-related. Indicate the respective chapter(s) and record name (if helpful) and enter relevant explanatory text.
Note
It should be noted that the overall appraisal of results from different studies is normally done in the hazard or risk assessment. Therefore, an Endpoint summary record should be used for this purpose (see chapter D.4.8 How to manage Endpoint summary records in sections 4 - 10). Any cross-reference to another study may also become useless if an Endpoint study record is either printed or exchanged on its own.
Endpoint-specific fields
As stated above, in Endpoint study records of a number of ecotoxicity
sections the following field is provided as first field of part
Applicant's summary and conclusions:
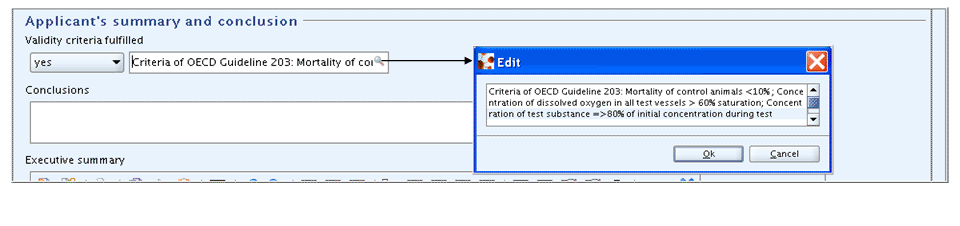
Validity criteria fulfilled
Indicate whether validity criteria given by the test guideline have
been fulfilled or not. Use supplementary remarks field for indicating the
criteria and entering remarks. Clearly indicate if the criteria used are not
consistent with those given by the test guideline. If so, give justification
in field Rationale for reliability incl. deficiencies as
to why this study summary is nevertheless considered reliable if
applicable.
The following screenshot shows an example how the validity criteria for short-term fish toxicity can be documented.
When you create new Endpoint study records or copy and paste records from another dataset, the records are consecutively added to the endpoint irrespective of their content or relevance. It is sensible to prioritise the records by ordering them in such a way that the most important ones, i.e. key studies, appear first. Any other order schemes may be useful, e.g. tests on ready biodegradability, followed by tests on inherent biodegradability or toxicity studies with the common species (e.g. rat), followed by the studies with other species.
To reorder Endpoint study records
Right-click the section title in the section tree pane and from the menu displayed, click the Order records command.
In the dialogue box displayed, move the Endpoint study records up or down as desired by clicking each record and then the Move up or Move down arrow. Then click OK.
Caution
When you reorder records, any default order number in the record name is not changed. This can be confusing and you should consider deleting the default record numbers or adjust them in an appropriate way if they should be kept. See instructions in chapter D.4.7.3 Renaming an Endpoint study record.
IUCLID provides a powerful clipboard manager which allows to copy and paste single or several Endpoint study records within the same dataset or to another dataset even for another substance. This can save time, e.g.
when you copy an Endpoint study record from Substance X to Substance Y because the recorded study summary is similar as that for Substance Y and requires only little editing.
when you copy partly prefilled Endpoint study records from a dataset that you use as a kind of template or where you store sample records.
when you copy an Endpoint study record from another Substance used for read-across.
Note
While you can easily manage single Endpoint study records with the clipboard manager, consider using the Template dataset feature for copying or inheriting Template records for several or all sections. For detailed instructions see chapter D.5 Template (create and update Template related information).
Caution
Be aware that the copying and pasting of many records can take a considerable time depending on your machine speed.
To copy one or several Endpoint study records into the clipboard
Right-click the record name in the section tree pane and from the menu displayed, click the Copy command.
The clipboard manager is opened and the copied record is displayed.
As appropriate, copy other records into the clipboard.
To copy all records of a dataset into the clipboard
Click the arrow next to the Find or Filter pane
to open a drop-down list box.Click the command Copy content to clipboard
 .
.The clipboard manager is opened and the copied records are displayed.
To paste Endpoint study record(s) into the target section
Navigate to the dataset where you wish to paste the record(s), unless it is the same dataset from which you copied the records.
Open the clipboard manager, if not displayed anymore, from the Window menu on the menu bar.
Select the record(s) you wish to paste. To select several records hold down the Ctrl key and click the desired records.
Click either the Paste selected items
 or Paste all items from
clipboard
or Paste all items from
clipboard  icon on the toolbar of the clipboard
manager.
icon on the toolbar of the clipboard
manager.Close the clipboard manager when copy & paste operations are finished.
Note
The Endpoint study records will be pasted to the right sections in the target dataset regardless which section you have opened or selected. For example, a record originating from section 6.1.1 Short-term toxicity to fish will always be pasted exactly in that section.
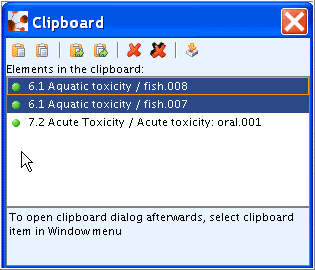
The following screenshot shows the clipboard manager with three copied Endpoint study records:
Tip
You can also copy record(s) into the clipboard by means of the
Import endpoints from file command
 provided on the toolbar of the clipboard manager.
This option is useful if you either have selected records stored on your
disk or make them available to another user. See also chapter D.14.4 Importing single Endpoint records using the
clipboard manager.
provided on the toolbar of the clipboard manager.
This option is useful if you either have selected records stored on your
disk or make them available to another user. See also chapter D.14.4 Importing single Endpoint records using the
clipboard manager.
For instructions on how to copy all records of a dataset using the Copy all to clipboard command see chapter D.4.10 Creating a copy of a Substance dataset.
IUCLID's clipboard manager allows to reference Endpoint study records to another Substance dataset. The referenced record originating from the source dataset is integrated, i.e. pasted in the target dataset, but is set read-only. This means, it can be viewed, but not edited. However, you can navigate to the original record, edit it if necessary and switch back to the other dataset. Be aware that the referenced Endpoint study record will not be adjusted to any changes in the original record automatically. It stays "frozen" until you click the Update referenced endpoint study button on top of the record as explained below.
You can also detach a referenced endpoint study from the source dataset. This means that the record will then become a normal record. See chapter D.4.7.11 Detaching a reference to another Substance dataset.
Referencing records can be useful, e.g.
when the European Chemicals Agency or Competent Authorities, in an evaluation dossier, refer to (robust) study summaries submitted by a registrant;
when an endpoint study for another Substance is referred to, which is used for read-across.
when an endpoint study for the same Substance is referred to, which however is being managed (i.e. updated) in another dataset serving as master dataset.
To reference one or several Endpoint study records, follow these steps:
In the source dataset, right-click the record name in the section tree pane and from the menu displayed, click the Copy command.
The clipboard manager is opened and the copied record is displayed.
As appropriate, copy other records into the clipboard.
The following screenshot shows the clipboard manager with three copied Endpoint study records:
To paste reference(s) to Endpoint study record(s) into the target section
Navigate to the dataset where you wish to paste the reference(s) to Endpoint study record(s).
Open the clipboard manager, if not displayed anymore, from the Windows menu on the menu bar.
Click the record(s) you wish to paste as reference(s). To select several records hold down the Ctrl key and click the desired records.
On the toolbar of the clipboard manager, click either icon Paste reference for selected items
 or Paste reference for all
items from clipboard
or Paste reference for all
items from clipboard  .
.A dialogue box comes up prompting for a remark to enter. Enter an appropriate remark and click OK.
Caution
It is highly recommended to enter a note that clearly shows the
purpose why the record is referenced, or any other relevant remarks. Be
aware that field Test material equivalent to submission substance
identity will not change automatically. This means, if "yes" is
indicated in that field, this can be misleading when the submission
substance identity of the target dataset is different from that of the
source dataset where the original record resides. You can only edit this
field when you detach the reference (see chapter D.4.7.11 Detaching a reference to another Substance
dataset). However, this is an irreversible operation.
So if you wish to keep the reference to the original record, you
should specify the test material identity already in the
Remarks field. See the example remark "Substance:
formaldehyde (read-across)" in the screenshot of a referenced Endpoint
Study Record below.
As stated above, referenced Endpoint study records are write-protected, i.e. they cannot be edited. In addition, there are two indicators informing you whether a record is a referenced one and to which original record it refers to:
Record name: A little up arrow is attached to the green bullet preceding the record name in the section tree (see below screenshot).
Original Endpoint study recordindicator: A new block appears in the data entry screen, which displays the following information (see the screenshot below):Reference: Indicates the name of the original Endpoint study record. Note the blue Go to arrow , which gets you to the original record as
described below.
, which gets you to the original record as
described below.UUID: The Universal Unique IDentifier of the original record is displayed below the fieldReference.Note
Irrespective of the referenced UUID, a UUID is assigned to the referenced Endpoint study record on the Information tab below the Data entry window, as is done for any other record.
Remarks: When you paste a referenced Endpoint study record, you should enter a remark that clearly shows the purpose why the record is referenced or any other relevant remarks. See example in the screenshot below.Version: The date of last modification of the original record is displayed.
Also the following two new buttons appear just below the menu bar:
Update referenced endpoint study: Any changes made to the original record will only be adopted in the referenced record when you click this button. You can also do a general update for all referenced records as guided below.
Detach from original endpoint study: This command removes the link to the original Endpoint Study Record and the record is fully integrated in the dataset, i.e. it can be edited and the reference indicators and buttons disappear. See instructions in chapter D.4.7.11 Detaching a reference to another Substance dataset.
To update referenced Endpoint study record(s) either
Select the desired record in the section tree pane.
Click the Update referenced endpoint study button below the grey menu bar.
Close the clipboard manager when copy & paste operations are finished.
or
Click the Update references command in the Section tree menu, i.e. the little arrow next to the Find or Filter pane
.In the dialogue box displayed, all referenced endpoint studies are displayed for which an update is possible. You can deselect / select as desired.
Click the Update now button.
Caution
If you delete the original Endpoint study record, the referenced
copy will be marked "Deleted" in field Reference and
the command Update references will not be
active anymore. However, you can click the Detach
from original endpoint study command.
The following screenshot shows an example of a referenced Endpoint Study Record and the features described above:
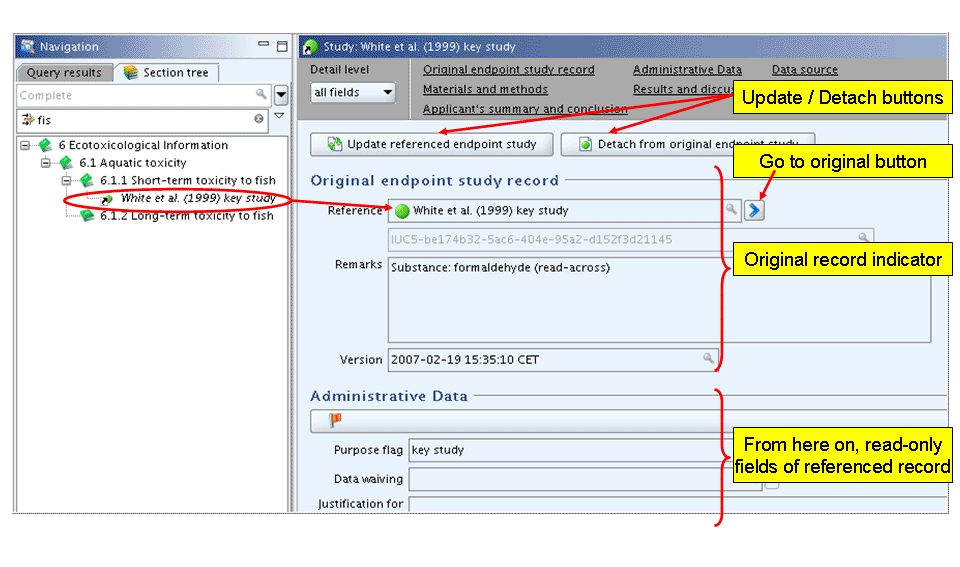
If you copied a reference to an Endpoint study record of another dataset, as described in the preceding chapter D.4.7.10 Referencing Endpoint study records to another Substance dataset, you can detach, i.e. remove this reference any time in order to fully integrate the record in the dataset. This feature is useful if the reference to the original record has become obsolete and you wish to handle that record like any other record in the dataset.
To detach the reference to the original Endpoint study record
Select the record you wish detach in the section tree pane.
Click the Detach from original endpoint study button below the grey menu bar.
The reference indicators and buttons disappear and you can edit the record. It has become a new record now with no link to the original anymore.
Important
If you copied a reference to an Endpoint study record originating from a Dossier, the Detach from original endpoint study button is not available. Detaching is not possible because records from Dossiers are set to "sealed" as indicated in the Information Tab. See also chapter D.8.3 Copying Dossier data.
The Annotations feature, which is available from the Annotations Tab of the Information window, provides a means for making annotations on any record in the Substance dataset. It is primarily designed for the use by regulatory authorities, e.g. the European Chemicals Agency or Competent Authorities of the Member States, when evaluating the data submitted by the registrant. However, it may also be used by the Legal entity compiling a Substance dataset, for example, in the context of the internal review process.
For detailed guidance on how to annotate Endpoint study records, see chapter D.4.9.6 Tab "Annotations".
The Print command can be executed from two menu types, i.e.
Print command available from the menu displayed by right-clicking an Endpoint record in the section tree pane (sections 4 to 13 only)
Print command available from the File menu on the menu bar
A sample of a print-out is presented at the end of this chapter.
Caution
The print feature may not be self-intuitive on first sight for the novice user. As a rule of the thumb, you can keep in mind:
If you select the Print command by right-clicking a record contained in one of the sections 4 to 13, this single record will be printed.
If a record is open and resides in either one of sections 4 to 13, the Print command from the File menu prints only the displayed record.
If a record is open and resides in either one of sections 0 to 3, only the Print command from the File menu is available, which allows to select several or all records for one print job.
In the first step dialogue of the Print assistant, a Substance tab is shown if the print job includes the entire Substance dataset (see the following screenshot). It is absent if only a single record is affected.
Printing a single endpoint study record
To print an Endpoint study record
In the section tree pane, right-click the record you wish to print.
The Print assistant comes up and guides you through a seven-step Print dialogue: Verify or change the default properties, for which the record shall be printed, specify output path, file name and other print options, and click the Finish button.
Tip
Normally you will execute the Print command because you wish to print a given record. In this case, just click the Select all buttons in the dialogue box of step 1 and skip steps 2 to 4, where all properties are already checked by default. You can also skip step 5, unless you wish to limit the fields to be printed to basic fields or exclude confidential test material information.
The following screenshots illustrate the print dialogues of the Print assistant:
Step 1: Click both Select all buttons to select all Confidentiality and Regulatory purpose flags or clear checkboxes for properties for which the record shall not be printed.
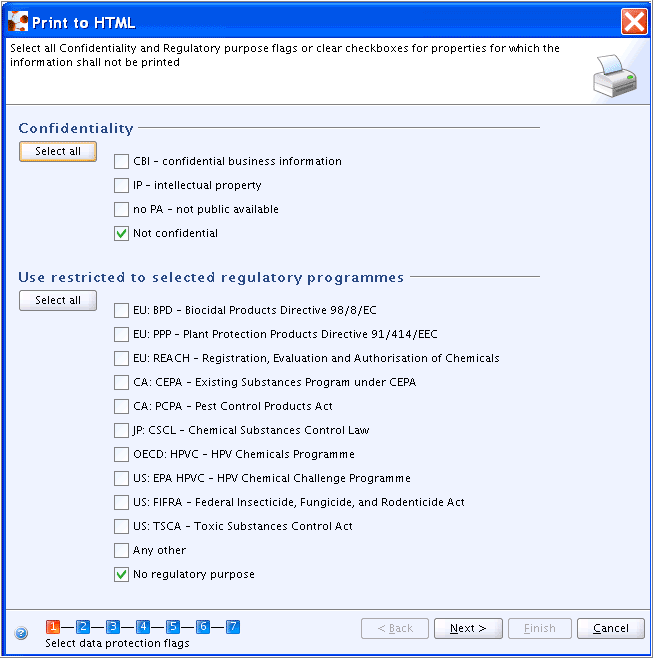
Step 2: Click the Next button if default settings apply (i.e. all checkboxes selected) or clear the checkboxes for properties for which the record shall not be printed.
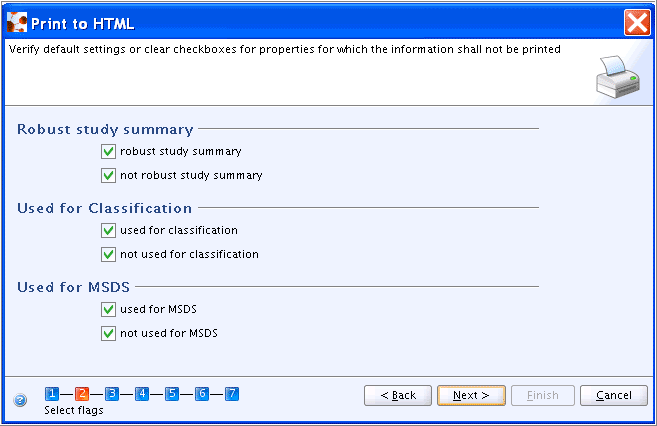
Step 3: Click the Next button if default settings apply (i.e. all checkboxes selected) or clear the checkboxes for properties for which the record shall not be printed.
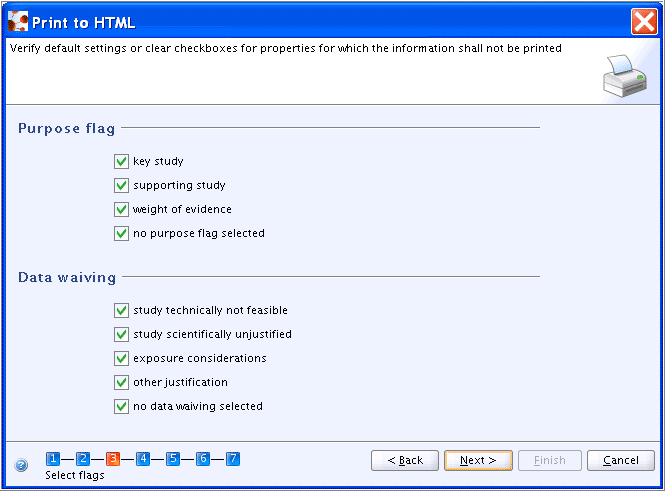
Step 4: Click the Next button if default settings apply (i.e. all checkboxes selected) or clear the checkboxes for properties for which the record shall not be printed.
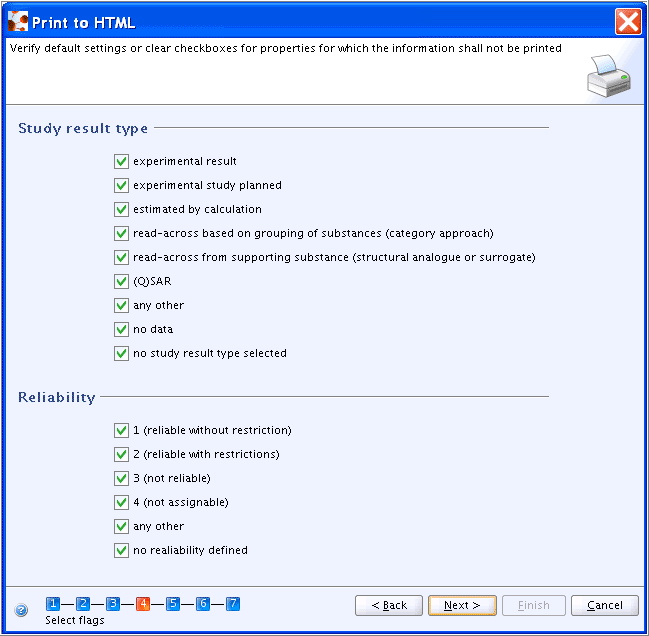
Step 5: Click the Next button if default settings apply (i.e. "All fields - including confidential test material information" selected) or select other checkbox in order to specify the detail level to be included in the print-out.
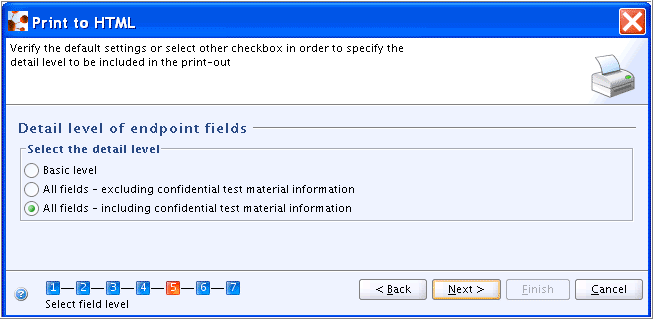
Step 6: Verify if the record selected is correct. If yes, click the Next button. If no, click the Cancel button and re-start the Print command for the correct record.
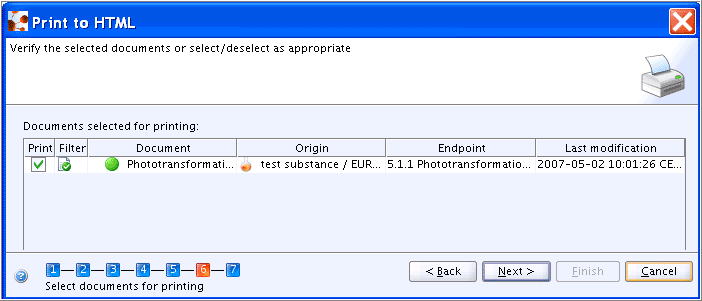
Step 7: Specify the output path, file name and print options (i.e. whether annotations, empty fields and/or banner page shall be included and whether the print-out shall be opened by the viewer, i.e. browser) and click the Finish button.

Printing several or all Endpoint study records of a section or dataset
To print several or all Endpoint study records of a section or dataset
Double-click any record in sections 0 to 3. Make sure one of the subsections is displayed in the data entry window, e.g. section 1.1 Identification.
Select the Print command from the File menu.
The Print assistant comes up and guides you through a nine-step Print dialogue: Verify or change the default properties, for which the records shall be printed, specify output path, file name and other print options, and click the Finish button.
The steps provided are the same as for printing a single record as illustrated above, except for following additional steps:
Step 1: Unless you wish to print all Endpoint sections (i.e. type "Complete"), select the Dossier template type that shall be used, as shown in the following screenshot.
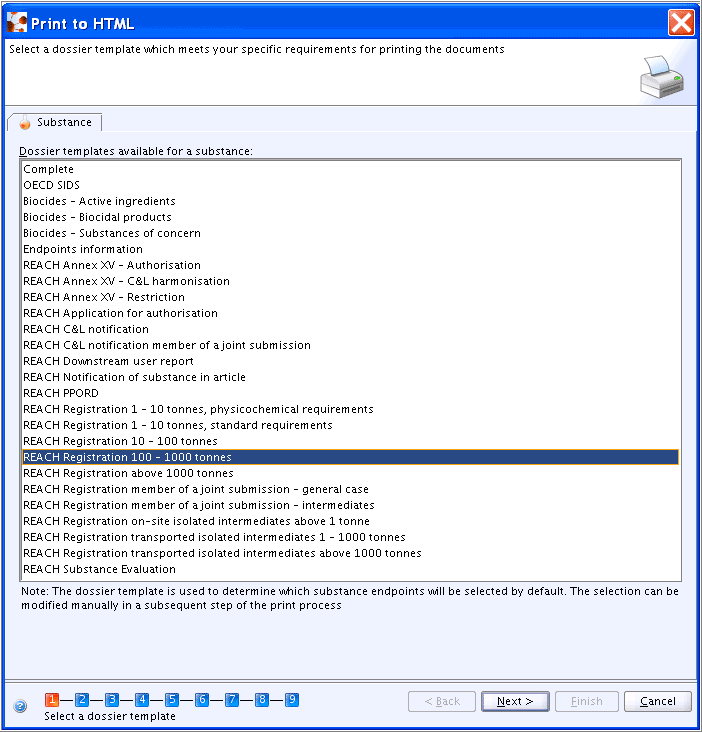
Step 7: Verify the selected parts of sections 1 to 3 or deselect as appropriate. For example, you can clear all checkboxes in this dialogue box if you wish to print Endpoint records only.
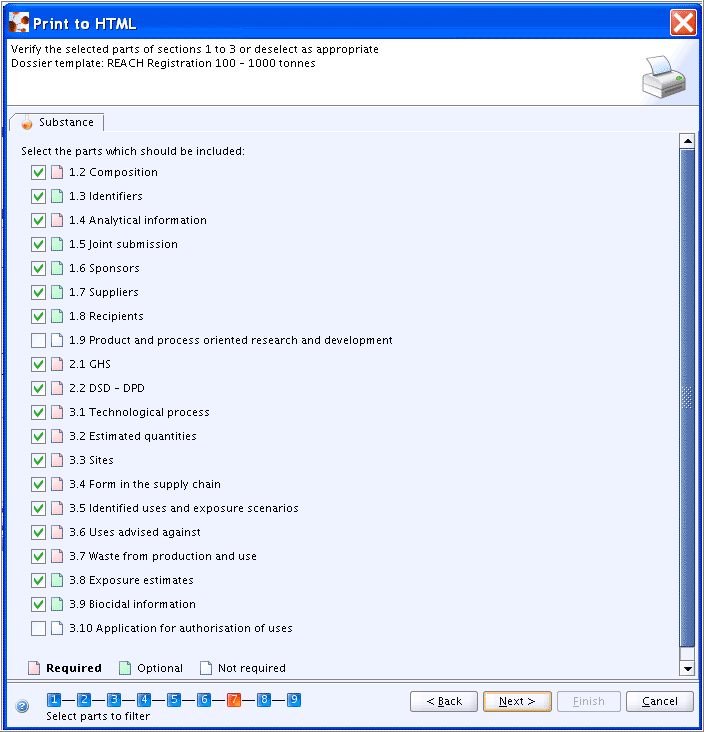
Step 8: Verify the selected Endpoint records or deselect as appropriate. You cannot deselect the Legal entity (indicated by building symbol in column "Document") or Reference substance (indicated by the yellow flask symbol).
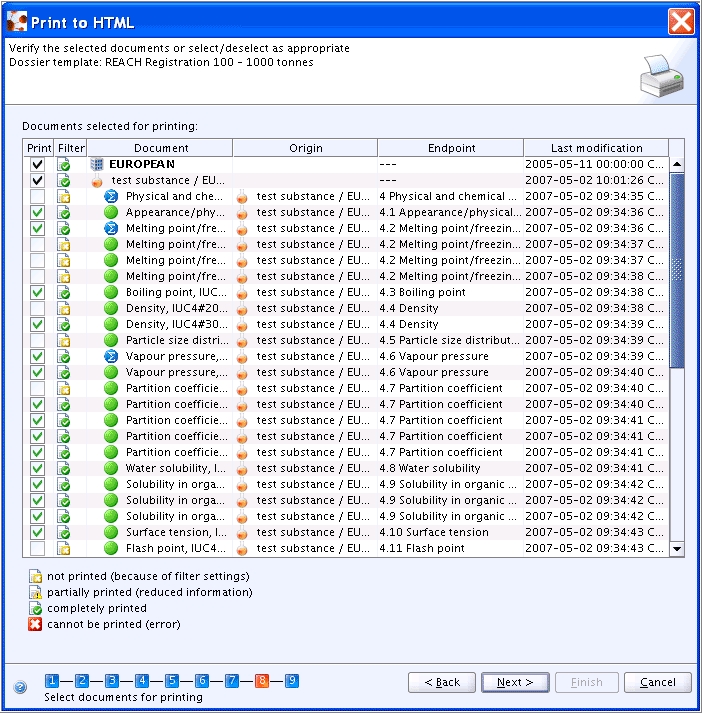
Sample of print-out
The following screenshots show the print-out of a sample Endpoint study record:
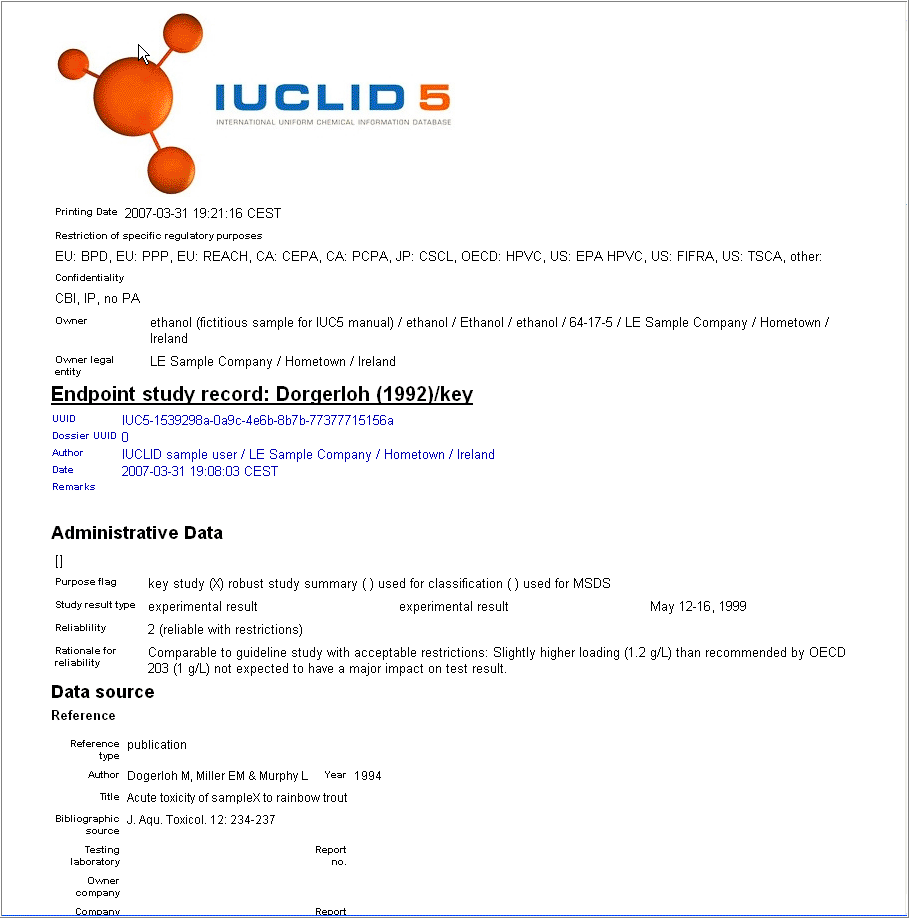
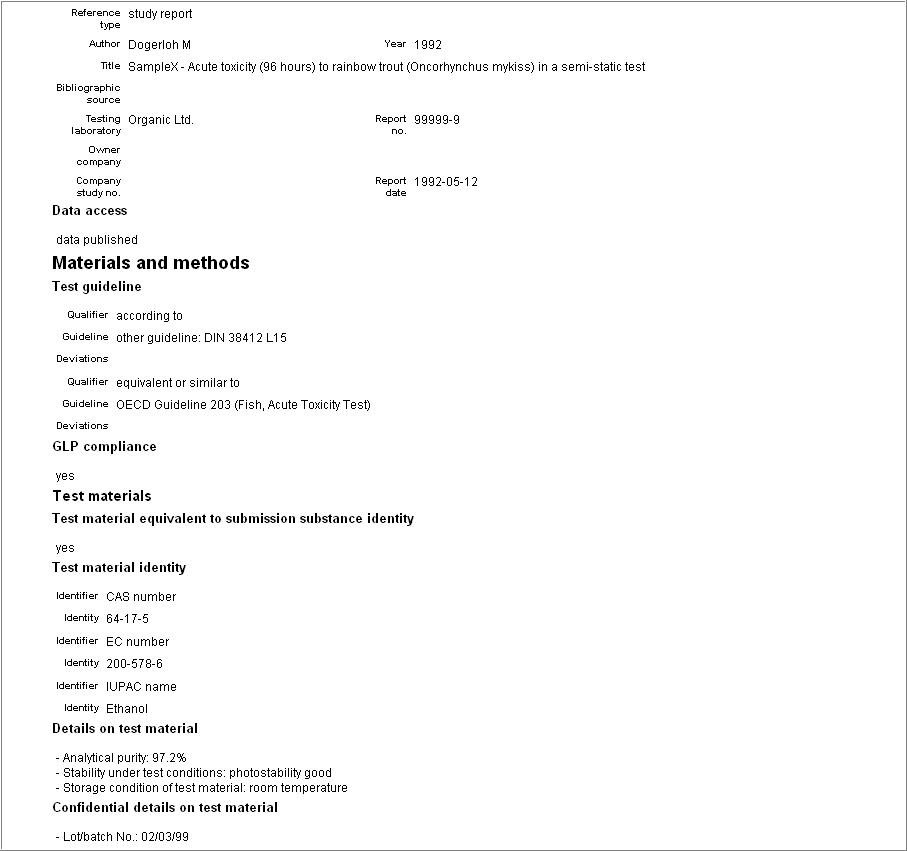
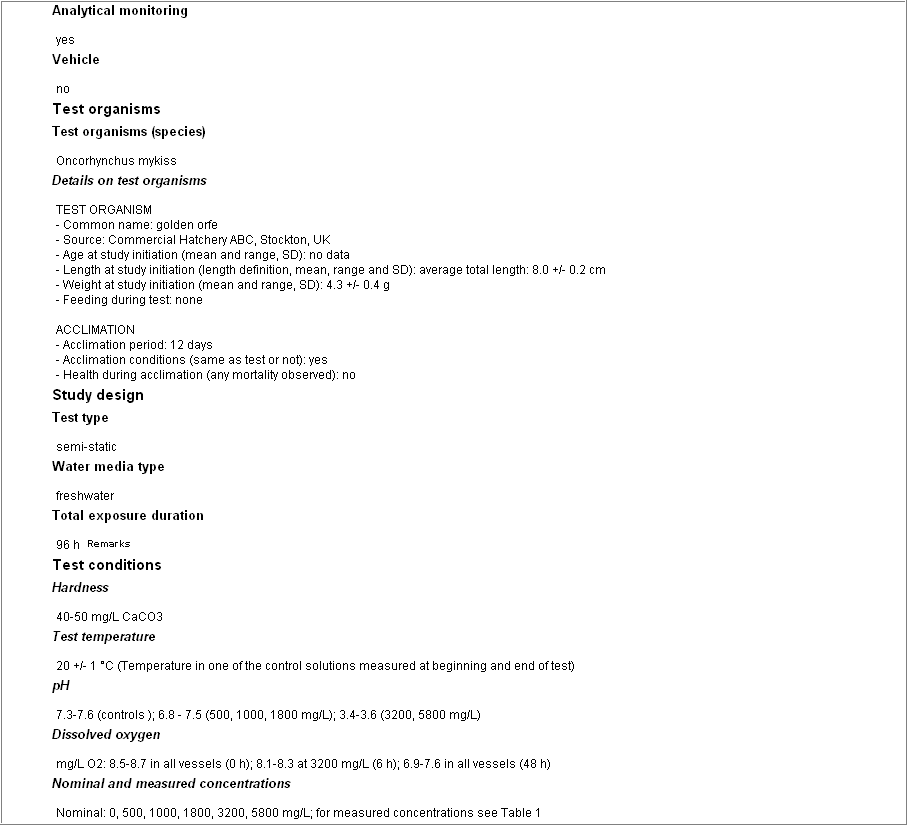
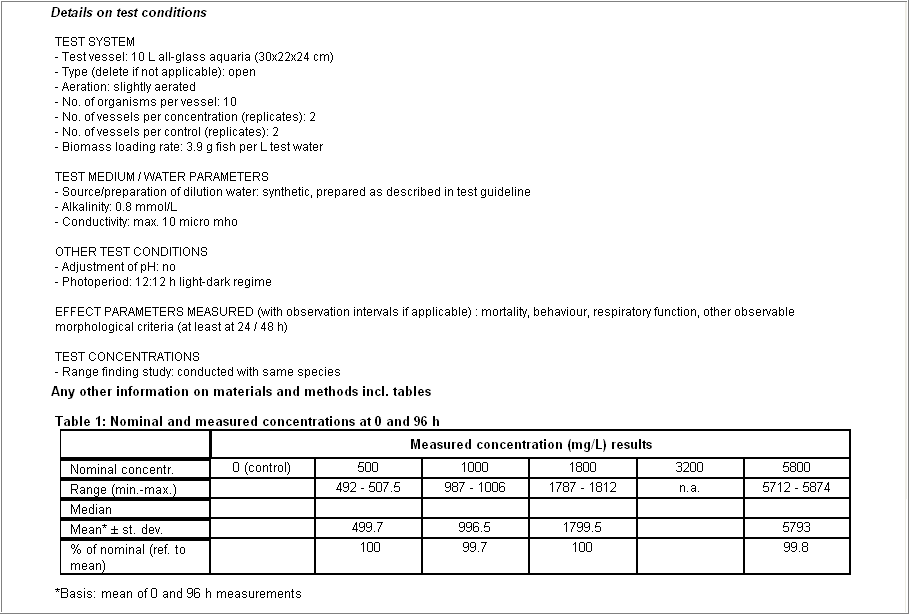
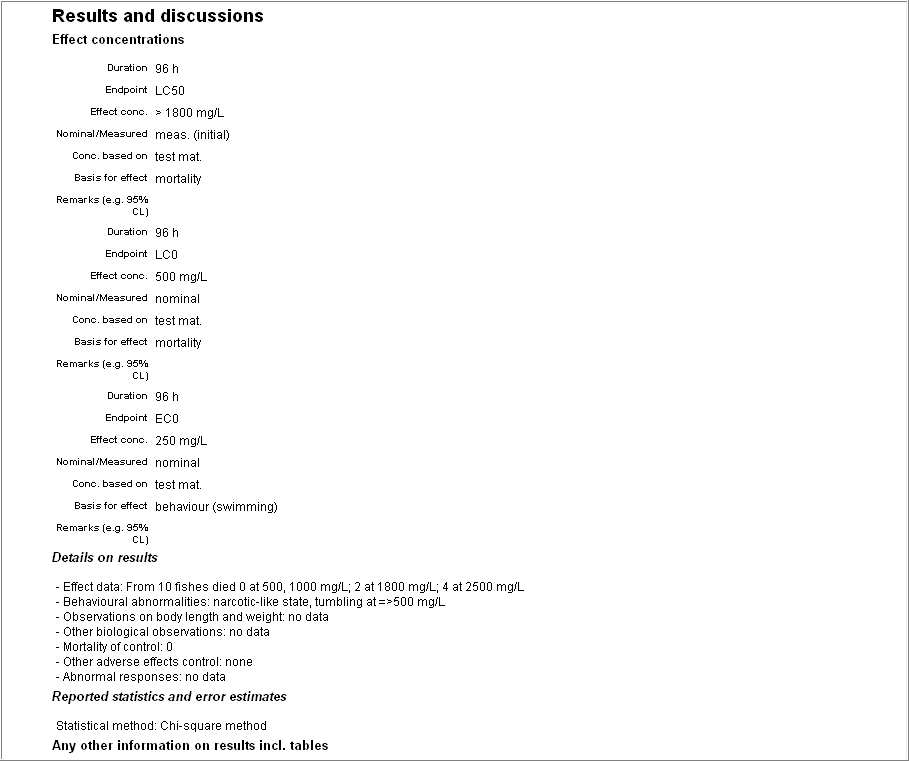
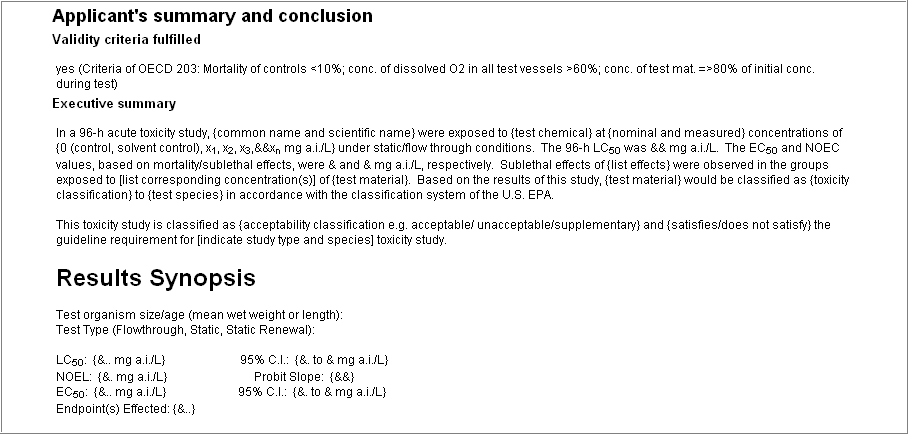
The Export command can be executed from two menu types, i.e.
Export command available from the menu displayed by right-clicking an Endpoint record in the section tree pane (sections 4 to 13 only)
Export command available from the File menu on the menu bar
Caution
The export feature may not be self-intuitive at first sight for the novice user. As a rule of the thumb, you can keep in mind:
If you select the Export command by right-clicking a record contained in one of the sections 4 to 13, this single record will be exported.
If a record is open and resides in either one of sections 4 to 13, any Export command exports only one record, i.e. the one displayed.
If a record is open and resides in either one of sections 0 to 3, only the Export command from the File menu is available, which allows to select several or all records for one export job.
In the first step dialogue of the Export assistant, a Substance tab is shown if the export job includes the entire Substance dataset. It is absent if only a single record is affected.
Exporting a single Endpoint Study Record
To export an Endpoint study record
In the section tree pane, right-click the record you wish to print.
The Export assistant comes up and guides you through a seven-step Export dialogue: Verify or change the default properties, for which the record shall be exported, specify the path and name of the export file, set Ownership protection options, and click the Finish button.
Tip
Normally you will execute the Export command because you wish to export a given record. In this case, just click the Select all buttons in the dialogue box of step 1 and skip steps 2 to 4, where all properties are already checked by default. You can also skip step 5, unless you wish to limit the fields to be exported to basic fields or exclude confidential test material information.
The following screenshots illustrate steps 6 and 7 of the Export assistant (Note: The dialogues for steps 1 to 5 are the same as those for the Print feature; see chapter D.4.7.13 Printing Endpoint study records):
Step 6: In the table displayed, the following document types are listed:
The actual Endpoint study record selected (indicated by the green bullet in column "Document")
The assigned legal entity (indicated by building symbol in column "Document")
The assigned Reference substance (indicated by the yellow flask symbol in column "Document")
All attached background documents (indicated by the page symbol)
All attached full study reports (indicated by the page symbol)
Verify the selected documents or deselect as appropriate. For example, you may wish to exclude all attached background documents or any attached full study report from the export. You cannot deselect the legal entity or Reference substance.
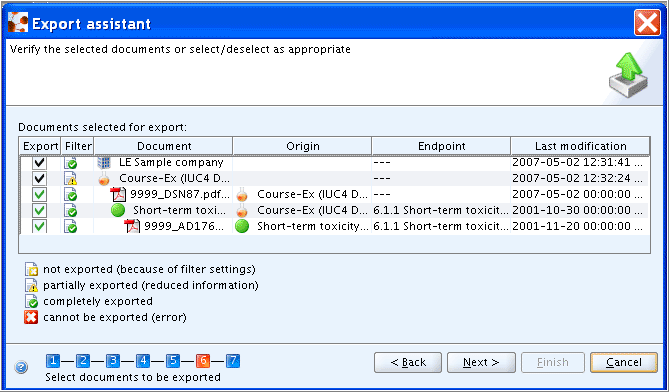
Step 7: Select the folder and specify the name of the export file. As appropriate, select the checkboxes for Copy-protect and/or Seal if the Endpoint study record, after being imported by the recipient, shall be copy-protected and/or write-protected, respectively. You can also include remarks which will appear on the Import dialogue later on. For example, you may justify why you set copy- or write-protection or you can include a short comment to the recipient. When all settings are done, click the Finish button.

Exporting several or all Endpoint study records of a section or dataset
To export several or all Endpoint study records of a section or dataset
Double-click any record in sections 0 to 3. Make sure one of the subsections is displayed in the data entry window, e.g. section 1.1 Identification.
Select the Export command from the File menu.
The Export assistant comes up and guides you through a nine-step Export dialogue: Verify or change the default properties, for which the records shall be exported, specify output path, file name and other options, and click the Finish button.
The steps provided are the same as for exporting a single record as illustrated above, except for the following additional steps:
Step 1: Unless you wish to export all Endpoint sections (i.e. type "Complete"), select the Dossier template type that shall be used, as shown in the following screenshot.
Step 7: Verify the selected parts of sections 1 to 3 or deselect as appropriate. For example, you can clear all checkboxes in this dialogue box if you wish to export Endpoint records only.
Step 8: In the table displayed, the following document types are listed:
Verify the selected Endpoint records and other documents or deselect as appropriate, e.g. deselect attached documents as shown in the screenshot below. Note that only endpoint data can be deselected in this list. Black ticks in the checkboxes for all other elements indicate that they cannot be excluded.All Endpoint study records selected in the preceding steps (indicated by the green bullet in column "Document")
The assigned legal entity (indicated by building symbol in column "Document")
The assigned Reference substance (indicated by the yellow flask symbol in column "Document")
All attached background documents (indicated by the page symbol)
All attached full study reports (indicated by the page symbol)
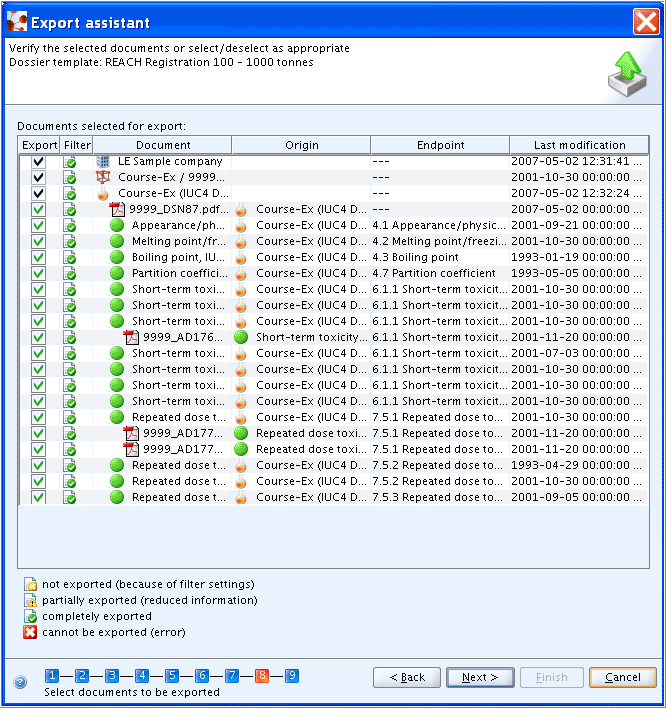
IUCLID provides two options for importing records into a dataset:
Import command for importing records into the clipboard: see chapter D.4.7.9 Copying Endpoint study records.
Import feature available from the Task panel: see chapter D.14 Import (import data from other IUCLID 5 systems).
There is only one Delete command available for deleting a single Endpoint study record. It is not possible to combine several records in one Delete operation.
To delete an Endpoint study record
Open the Endpoint record you wish to delete. Make sure it is displayed in the data entry window.
Right-click the record name in the section tree.
The Delete dialogue comes up with a warning message listing the Endpoint record and all associated documents, e.g. attached documents and annotations as shown in the screenshot below. Clicking the Delete button will delete all these documents irreversibly.
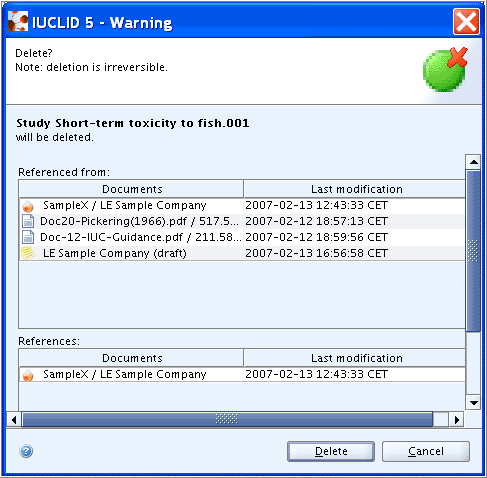
Caution
Do not use the Delete command that is available from the File menu in sections 0 to 3. If you do, the entire dataset will be deleted. A warning message would come up as shown in the screenshot below indicating that the Substance dataset will be deleted, although only the Endpoint records from sections 4 to 13 are listed.
