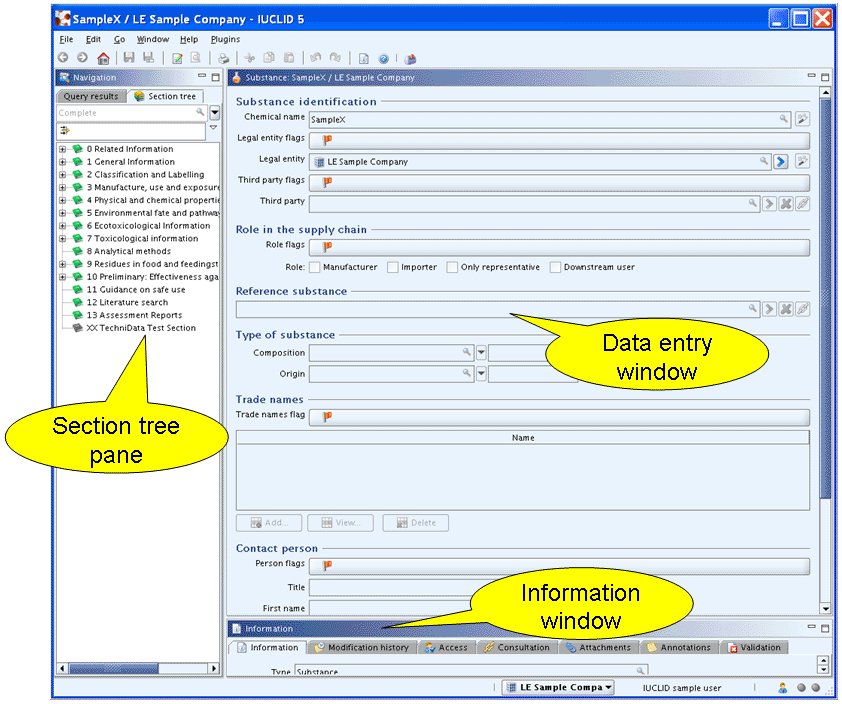
The Information window is a separate data entry area, which is provided just below the Data entry window of either of the following IUCLID elements:
Substance
Template
Mixture
Category
Dossier
Legal entity
Legal entity site
The following screenshot shows the Information window of a Substance:
Tip
You can minimise / maximise the Information window by clicking the
respective Minimise  or Maximise
 button in the upper right corner of the title bar
of this window.
button in the upper right corner of the title bar
of this window.
You can also open the Information window as pop-up window by selecting the Info command from the File menu. This can be useful if you do not wish to maximise the fixed Information window.
Each Information window consists of several tabs:
Information: General (technical) information concerning the current document, particularly the Universal Unique IDentifier (UUID)
Modification history: Displays who changed what and when.
Access: Shows which other users are working on the same document (relevant for network multi-user applications).
Consultation: Privides a tree structure which indicates if and how the elements of a dataset are related to each other.
Attachments: Displays all documents that have been attached to the record.
Annotations: Displays any annotations made by the European Chemicals Agency or Competent Authorities or others.
Validation: Shows errors which occurred while working with the programme.
Some of these tabs are inactive for some features. Detailed descriptions on how to use these tabs are given in the following subchapters.
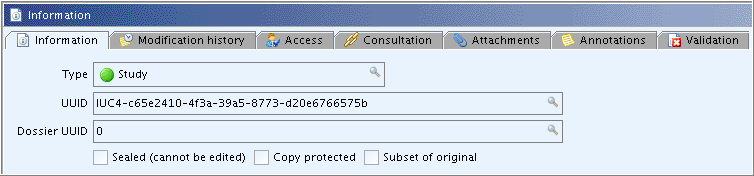
This tab provides the following general (technical) informations concerning the current document:
Type: Indicator specifying either one of following types of record: Substance: Denotes the Substance record which
comprises sections 0 to 3. All these sections and the subsumed
subsections are physically managed as one record. Hence, only one
and the same UUID is assigned.
Substance: Denotes the Substance record which
comprises sections 0 to 3. All these sections and the subsumed
subsections are physically managed as one record. Hence, only one
and the same UUID is assigned. Study: Denotes an Endpoint study record in
sections 4 to 10.
Study: Denotes an Endpoint study record in
sections 4 to 10. Study: Denotes an Endpoint summary record in
sections 4 to 10.
Study: Denotes an Endpoint summary record in
sections 4 to 10.- Additional information: Denotes a record in
sections 11 to 13.
UUID: This is the so-called Universal Unique IDentifier assigned to the record, which is a unique number across all IUCLID 5 instances. The UUID is a 128-bits number generated by a dedicated algorithm and is usually represented as a 32-characters string, like in "58f202ac-22cf-11d1-b12d-002035b29092". Other attributes can be added, such as "IUC4" indicating that the record originated from a IUCLID4 dataset (see the screenshot below). Such a number is allocated at the creation of each raw data element and cannot be modified: it will follow the object during all its life time and allows to trace records as they are exchanged or incorporated into dossiers.Dossier UUID: On the raw data level, "0" is displayed. If the record is part of a dossier, the UUID of that dossier is indicated.Sealed (cannot be edited): If this checkbox is selected, it means that the document cannot be changed anymore. This attribute is set by default for all Dossier elements. It can also be set optionally when creating an export file for raw data (see e.g. chapter D.4.7.14 Exporting Endpoint study records).Copy protected: If this checkbox is selected, it means that the document cannot be copied. This attribute can be set optionally when creating an export file for raw data (see e.g. chapter D.4.7.14 Exporting Endpoint study records) or a Dossier (see chapter D.8.2 Creating Dossiers).Subset of original: If this checkbox is selected, it means the record is just a part of the original one. This would be the case if data were filtered out (e.g. all additional fields) during preceding export operations.
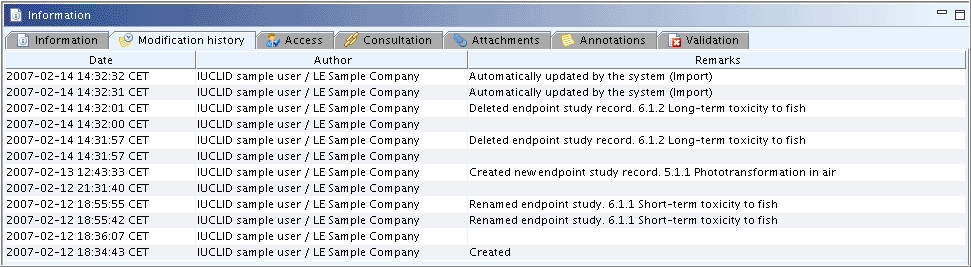
This tab shows the modification history of the current document. The following three columns are displayed:
Date: Indicates the date when the record was changed or created or when a document was attached or an attachment removed.
Author: Denotes the User which changed or created the record. The User is specified by the User account defined in the user settings (see chapter D.16 Manage Users, Role, Preferences etc.).
Remarks: Description of the change.
Tip
You can access the Remarks field and use it to enter any comment (e.g. indicating what was modified or a note) by selecting the Save with comment button from the File menu, which is also available as short-cut Ctrl+Shift+S. Be aware that this field cannot be edited or deleted after saving the document.
When updating and saving a record, the previous values for the data entry fields are not kept by the system. This means, there will be no automatic historic trail of the modifications performed on the object. Only the last modifier party and modification date are stored and if the record is updated again by the same legal entity, only the date in the first row of the table changes. An example is shown in the following screenshot:

In the Substance part (i.e. sections 0 to 3), the modification history for the entire Substance dataset is indicated as shown in the following screenshot:
This tab shows which Users are currently having access to the record as reader and/or writer. It is only relevant for network multi-user applications. The following three columns are displayed:
DocRefPK: Shows the UUID of the record.
Readers: Denotes the User having the record opened in read-only mode only. The User is specified by the User account defined in the user settings (see chapter D.16 Manage Users, Role, Preferences etc.).
Writers: Denotes the User having the record opened in edit mode.

This tab displays all relations between the record and other IUCLID elements. By clicking the Down arrow in the upper right corner of this window, a menu is diplayed from which you can select the following display modes (see the screenshot below):
Display circular references: Displays series of references where the last object references the first. This may happen in rare cases.
Display unresolvable references: Displays elements for which the original references got lost. This may happen in rare cases.
Display related documents: Displays all related documents. This is also the default setting.
An example of a relations tree is shown in the following screenshot:
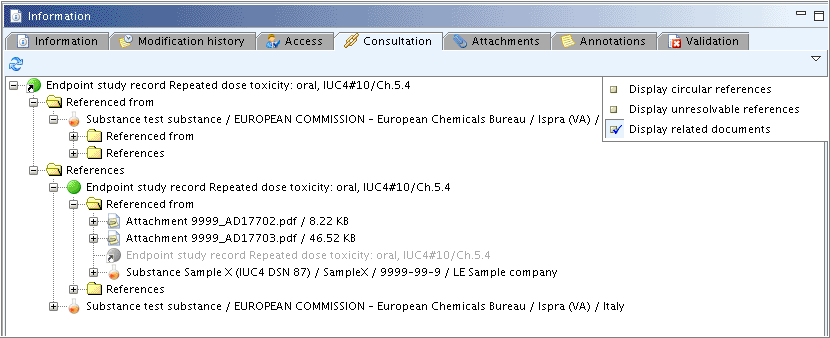
To expand all relations in this tab, either click the Plus symbol or double-click the element(s). When the Open command comes up after right-clicking an element, this object can be opened and viewed.
The Attached document feature allows to upload any file containing e.g. a PDF document, image or wordprocessing document, which is then attached to the record or dataset. This feature is available from:
Tab Attachments on the Information window
Fields
Attached background materialandAttached full study reportin Endpoint study records of sections 4 to 10.
Detailed guidance om how to use this feature is given in chapter D.4.5.6 Attached document features.
Caution
Although the Add command provided in the Tab Attachments can be used to attach a document to an
Endpoint study record of sections 4 to 10, it is highly recommended to use
the two special fields Attached background material and
Attached full study report for this purpose because of
the reasons given under the subheading "Attaching documents in sections 4
to 10" in chapter D.4.5.6
Attached document features. The Attachment tab provided for the Endpoint sections 4
to 10 should just be considered an indicator specifying all external
documents attached to a record.
The Annotations tab provides a means for making annotations on any record in the Substance dataset, namely the record for sections 0 to 3, any single Endpoint study record or any single Endpoint summary record in sections 4 to 13. The annotations feature is primarily designed for the use by regulatory authorities, e.g. the European Chemicals Agency or Competent Authorities of the Member States, when evaluating the data submitted by the registrant. However, it may also be used by the legal entity compiling a Substance dataset, for example, in the context of the internal review process.
A major advantage of using the annotations feature is that the regulatory authorities can specify the outcome of their evaluation directly related to the respective study or endpoint summary submitted. Or they can adopt the annotated submitter's version in any evaluation document, e.g. the technical dossier supporting a REACH-related Annex XV Dossier to be produced by the Agency and CAs. This so-called all-in-one approach aims at minimising the duplication work, as the regulatory authorities can adopt the records submitted and need to comment only on discrepancies and deficiencies.
Technically, annotation records are kept outside of a Substance dataset, but are directly linked to the record addressed. This means, that any annotations record has its own UUID and can be filtered out from any export, import, create Dossier or print process.
Annotation records can support the internal review and revision process particularly when several persons are involved in the preparation of a Substance dataset. Instead of making any changes in the Endpoint records, which will not be possible when a record is write-protected, comments are included in annotation records related to the Endpoint records. Any annotation record has its own UUID, which is associated to one specific Endpoint record which in turn has also a UUID. It is therefore possible to export and import only annotation records. They will be linked to the corresponding Endpoint records, provided that they contain the correct UUIDs. This means that any commenter must be provided with the Endpoint records from the master dataset.
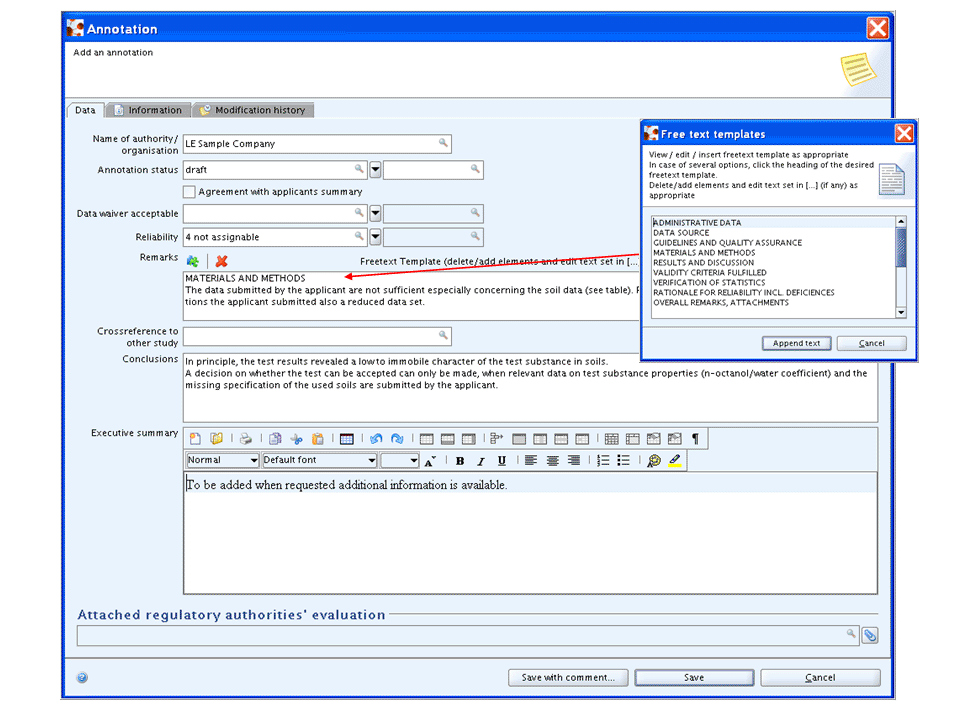
The following screenshot shows an example of an annotation record for an endpoint study summary.
Note
For Endpoint summary records or the section 0 - 3 record a simplified annotation template is provided, which does not contain endpoint-related fields.
An annotation record consists of the following three tabs:
Data: Constitutes the actual annotation entry screen described below.
Information: Contains general technical information (See also chapter D.4.9.1 Tab "Information and UUID"):
Record ID: Displays the UUID (Universal Unique IDentifier) assigned to the annotation record.
Linked record ID: Displays the UUID assigned to the record the annotation record refer to.
Linked record type: Displays the type of the linked record.
Linked record date: Displays the date of the linked record.
Modification: Shows the modification history of the current annotation document. See also chapter D.4.9.2 Tab "Modification history".
In the following, the fields provided in tab Data are described.
Name of authority / organisation
This field is for identifying the regulatory authority or organisation evaluating or making comments on a submitter's record. By default, the identity of the current legal entity is entered automatically. This identity can bei edited, e.g. by adding more details (e.g. name of department) or completely overwriting it with another name.
For each authority/organisation that intends to include an annotation on the study summary, a separate annotation record must be prepared.
Annotation status
This field is for indicating the status of annotation (i.e. normally
either "draft" or "final"; "other:" for special cases). The related text
field is only active, if the picklist item "other:" is selected. To provide
any further explanations on the other picklist items use the
Remarks field.
Agreement with applicant's summary
If the authority agrees in principle with the applicant's summary,
select this checkbox. Comments, particularly in case of disagreement, should
be included in the field Remarks.
Data waiver acceptable?
If the applicant claims a data waiver, indicate if the authority
agrees with applicant's request. Any supplementary remarks field have to be
included in the Remarks field. If applicable, indicate
what action will be required.
Reliability
The authority may agree with the applicant's summary, but change the reliability suggested by the applicant. Adopt submitter's proposal if you agree. Otherwise enter the reliability score as judged at your discretion based on the criteria described in the relevant guidance documents (1 = Reliable without restrictions; 2 = Reliable with restrictions; 3 = Not reliable; 4 = Not assignable). Leave the field empty if this indicator is not applicable, e.g. if a record does not include a study summary, but any other information. The "other:" option may be selected if this scoring system is not used.
Remarks
Enter any comments. As appropriate use the main headings of the Freetext template to structure your comments:
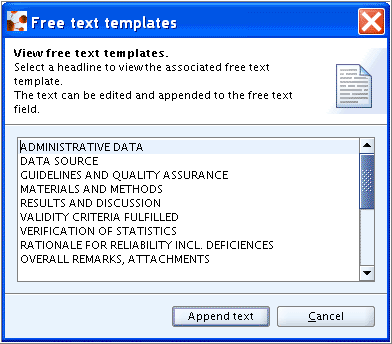
Delete the default headings for which no comments are made. Insert new lines and/or subheadings or field names to further substructure your comments as appropriate.
The following items are only relevant for some Endpoint study records in section 6 Ecotoxicological Information:
VALIDITY CRITERIA FULFILLED: If such a field is provided in the corresponding endpoint template, indicate whether validity criteria given by the test guideline have been fulfilled or not. Use supplementary remarks field for indicating the criteria and entering remarks. Clearly indicate if the criteria used are not consistent with those given by the test guideline. If so, give justification in field
Rationale for reliability incl. deficienciesas to why this study summary is considered reliable.VERIFICATION OF STATISTICS: If applicable, report the statistical methods used by the reviewer to verify the applicant"s results.
RATIONALE FOR RELIABILITY INCL. DEFICIENCIES: Adopt submitter's proposal if you agree. Otherwise describe rationale for reliability score chosen considering the possible impact of deficiencies and/or implications on test results. The term reliability defines the inherent quality of a test report or publication.
Give reasons if necessary, e.g. if a study is considered acceptable despite a poor reliability indicator. Discuss the relevance of deficiencies and indicate if repeat of study is necessary. Give reasons as to why submitter's version of the study summary is considered unacceptable or indicate if amendments have been made by authority.
Indicate if another (more up-to-date) guideline was used as compared to the one indicated by the applicant to evaluate this study summary.
Cross-reference to other study
Adopt submitter's proposal if you agree. Otherwise delete or amend reference to another study or other studies that are relevant in the interpretation of test results, e.g. for supporting any conclusions. Amend the explanatory text as appropriate.
Note
In Endpoint study records, a cross-reference to another study or other studies can be included, e.g. for supporting the conclusion that an effect observed was not substance-related. Such cross-references may be useful if it is considered relevant to discuss other results at the summary level of a single study. It should be noted that the overall appraisal of results from different studies is normally done in the hazard or risk assessment. However, Endpoint summary records may be used for this purpose. See also chapter D.4.7.7.6 Applicant's summary and conclusions.
Conclusions
Adopt the submitter's proposal if you agree or revise as appropriate. This field may be obsolete, if the conclusions are given in the executive summary.
Executive summary
Adopt the submitter's proposal if you agree or revise as appropriate.
Note
In Endpoint study records, a field Executive summary is provided for briefly summarising the relevant aspects of the study including the conclusions reached. For most endpoints, predefined templates are provided for uploading into this rich text field. See also chapter D.4.7.7.6 Applicant's summary and conclusions.
Attached regulatory authorities' evaluation
The Attached regulatory authorities' evaluation feature allows to upload any document containing an evaluation made by the regulatory authorities, if such a document is necessary in addition to the annotations included in the distinct fields of the annotation record. In principle, any file can be attached, e.g. a PDF or wordprocessing document.
In this chapter, instructions are given on how to manage annotation records.
Although sections 0 to 3 are technically handled as one record in IUCLID (see chapter D.4.6.1 Differences between sections 0 - 3 and sections 4 - 13), the annotation feature is provided for each subsection.
To add annotations related to a specific subsection
Open the respective subsection. Make sure it is displayed in the Data entry window and not only marked in the section tree.
Click the Add button
 on the Annotations toolbar.
In the Annotation template appearing, complete the appropriate fields.
Optionally, attach an evaluation document in field
Attached regulatory authorities' evaluation.Click the Save or Save with comment button if you wish to add any comment, which will appear in the modification history only.
To edit annotations
Click the annotations you wish to edit in the Annotations table.
Click the Edit button
 on the Annotations toolbar and edit any field(s)
as desired.
on the Annotations toolbar and edit any field(s)
as desired.Click the Save or Save with comment button if you wish to add any comment, which will appear in the modification history only.
By repeatedly executing the Add command several annotations can be added, e.g. for including comments from different regulatory authorities. Each set of annotations is displayed as one row in the annotations table as shown in the screenshot below.
To re-sort annotation instances in the annotations table you can use the clickable headers of the table:
Click in the header of the column by which you wish to sort the table. A sort triangle appears.
Click in the header repeatedly to change the sorting direction (i.e. alphabetically upwards or downwards) until the rows are sorted as expected.

Apart from the Add and Edit commands, the following additional functions are available for managing annotations either from the Annotations toolbar and/or on right-clicking in the table, which opens following menu:
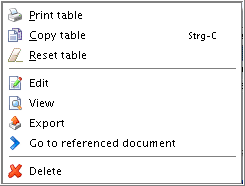
Print table
 command on right-click: To print the table
directly to the printer selected.
command on right-click: To print the table
directly to the printer selected.Copy table
 command on right-click: To copy the table into
the clipboard of your operating system (e.g. MS Windows), from which you
can paste it (Ctrl+V) into another application, e.g. a wordprocessing
document. Note that it is not possible to copy a table to another
Endpoint study record.
command on right-click: To copy the table into
the clipboard of your operating system (e.g. MS Windows), from which you
can paste it (Ctrl+V) into another application, e.g. a wordprocessing
document. Note that it is not possible to copy a table to another
Endpoint study record.Reset table
 command on right-click: To reset the original
sort order of the annotations. Only relevant if they were resorted by
clicking into any of the column headings.
command on right-click: To reset the original
sort order of the annotations. Only relevant if they were resorted by
clicking into any of the column headings.View
 command on right-click or from toolbar: To view
the annotations.
command on right-click or from toolbar: To view
the annotations.Export
 command on right-click or from toolbar: To export
the annotation(s) marked in the table. To highlight several annotations,
if any, hold down the Ctrl or Shift key and click in the corresponding
annotations row.
command on right-click or from toolbar: To export
the annotation(s) marked in the table. To highlight several annotations,
if any, hold down the Ctrl or Shift key and click in the corresponding
annotations row.Delete
 command on right-click or from toolbar: To delete
an annotation.
command on right-click or from toolbar: To delete
an annotation.Refresh
 command from toolbar: To refresh an annotations
table. This is relevant if you work with a network multi-user
application.
command from toolbar: To refresh an annotations
table. This is relevant if you work with a network multi-user
application.
The following commands are only active in the Dossier layer (see chapter D.8.4 Annotating a Dossier), but not in the Substance dataset layer:
Show/Hide associated annotations
 command from toolbar: To display or hide all
annotations made in the raw data layer, i.e. in the Substance dataset
used to create the Dossier. By default associated annotations are
hidden.
command from toolbar: To display or hide all
annotations made in the raw data layer, i.e. in the Substance dataset
used to create the Dossier. By default associated annotations are
hidden.In annotation tables of a Dossier, referenced annotations appear green, while annotations added on the Dossier layer are in white.
Go to referenced document
 command on right-click or from toolbar: To
navigate to the associated annotation and hence, the record in the
Substance dataset.
command on right-click or from toolbar: To
navigate to the associated annotation and hence, the record in the
Substance dataset.Note
The term "referenced document" here means a record in the raw data layer to which it is referred to in a Dossier. It should not be mistaken with "referenced record" (see chapter D.4.7.10 Referencing Endpoint study records to another Substance dataset).
In sections 4 to 13, annotations can be created for each endpoint study or summary record.
To add annotations related to a specific record
Open the respective record. Make sure it is displayed in the Data entry window.
Click the Add button
on the Annotations toolbar.In the Annotation template appearing, complete the appropriate fields.
Optionally, attach an evaluation document in field
Attached regulatory authorities' evaluation.Click the Save or Save with comment button if you wish to add any comment, which will appear in the modification history only.
To edit annotations
Open the respective subsection. Make sure it is displayed in the Data entry window.
Click the annotations you wish to edit in the Annotations table.
Click the Edit button
on the Annotations toolbar and edit any field(s)
as desired.Click the Save or Save with comment button if you wish to add any comment, which will appear in the modification history only.
By repeatedly executing the Add command several annotations can be added, e.g. for including comments from different regulatory authorities. Each set of annotations is displayed as one row in the annotations table as shown in the screenshot below.
To re-sort annotation instances in the annotations table you can use the clickable headers of the table:
Click in the header of the column by which you wish to sort the table. A sort triangle appears.
Click in the header repeatedly to change the sorting direction (i.e. alphabetically upwards or downwards) until the rows are sorted as expected.

Note
For guidance on the fields provided in the Annotation template see chapter D.4.9.6.1 Principles of annotation records.
Apart from the Add and Edit commands, the following additional functions are available for managing annotations either from the Annotations toolbar and/or on right-clicking in the table, which opens following menu:
Print table
command on right-click: To print the table
directly to the printer selected.Copy table
command on right-click: To copy the table into
the clipboard of your operating system (e.g. MS Windows), from which you
can paste it (Ctrl+V) into another application, e.g. a wordprocessing
document. Note that it is not possible to copy a table to another
Endpoint study record.Reset table
command on right-click: To reset the original
sort order of the annotations. Only relevant if they were resorted by
clicking into any of the column headings.View
command on right-click or from toolbar: To view
the annotations.Export
command on right-click or from toolbar: To export
the annotation(s) marked in the table. To highlight several annotations,
if any, hold down the Ctrl or Shift key and click in the corresponding
annotations row.Delete
command on right-click or from toolbar: To delete
an annotation.Refresh
command from toolbar: To refresh an annotations
table. This is relevant if you work with a network multi-user
application.
The following commands are only active in the Dossier layer (see chapter D.8.4 Annotating a Dossier), but not in the Substance dataset layer:
Show/Hide associated annotations
command from toolbar: To display or hide all
annotations made in the raw data layer, i.e. in the Substance dataset
used to create the Dossier. By default associated annotations are
hidden.In annotation tables of a Dossier, referenced annotations appear green, while annotations added on the Dossier layer are in white.
Go to referenced document
command on right-click or from toolbar: To
navigate to the associated annotation and hence, the record in the
Substance dataset.Note
The term "referenced document" here means a record in the raw data layer to which it is referred to in a Dossier. It should not be mistaken with "referenced record" (see chapter D.4.7.10 Referencing Endpoint study records to another Substance dataset).
The Go to referenced document
command is inactive in the Substance dataset layer.
In the dossier layer, any annotations are either related to dossier
information or to a record containing the raw data. This command would
navigate to the raw data record for which the annotations were originally
made. See also chapters D.4.9.6.2.1 Creating /
editing annotation records in sections 0 - 3 and D.4.9.6.2.2 Creating / editing annotation records in
sections 4 - 13.
In the same respect, the Show/Hide associated
annotations command also only applies for annotations in the
dossier layer, where it is used to show or hide annotations associated with
the raw data records.
The Copy table command, which is available on right-click, allows to
copy the annotations table into the clipboard of your operating system (e.g.
MS Windows), from which you can paste it (Ctrl+V) into another application,
e.g. a word processing document. Note that it is not possible to copy a
table to another Endpoint study record.
The Print table command, which is available on right-click, allows to
print the annotations table to the printer selected.
The Reset table command, which is available on right-click, allows to
reset the original sort order of the annotations. Only relevant if they were
resorted by clicking into any of the column headings.
In the Validation tab, any messages on invalid entries are displayed. For example, if a numeric range is erraneously entered in the numeric fields as shown in the following screenshot.

When you right-click the validation message, a Fix command comes up suggesting either a repair option or to delete all incorrect values.
Note
In the configurable sections 4 to 13, no repair option is suggested, because they are differently programmed compared to the static sections (see also chapter B.5.2 Architecture of the system: an overview).
Error messages can also appear as pop-up windows or on the bottom line.