Once you have created a Substance (see chapter D.4.2 Feature "Substance - New": How to create a Substance dataset), you can update or edit the dataset right away or open a Substance dataset from the Task panel.
To open a Substance dataset, follow these steps:
Go Home
 to the Task panel if you are not already
there.
to the Task panel if you are not already
there.Under Substance
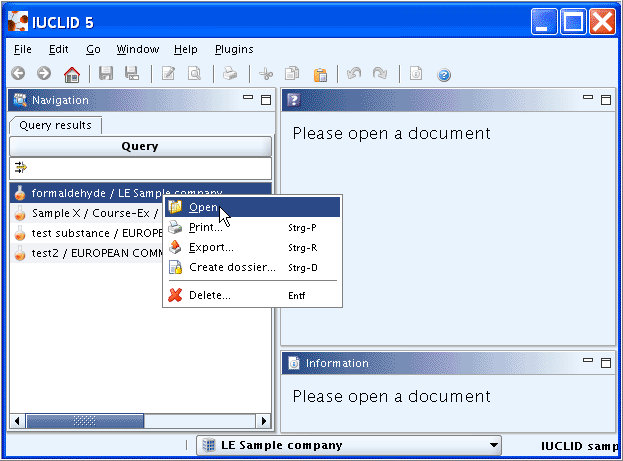
 , click Update. A screen comes up with empty windows on
the right side and a Query results pane
on the left (below the title bar Navigation) showing all substances available in
your local IUCLID installation or the network you are connected to. The
Substances are listed in alphabetical order (see the screenshot
below).
, click Update. A screen comes up with empty windows on
the right side and a Query results pane
on the left (below the title bar Navigation) showing all substances available in
your local IUCLID installation or the network you are connected to. The
Substances are listed in alphabetical order (see the screenshot
below).If you can easily find the desired Substance, just double-click it (left mouse button) to open the corresponding dataset.
If there is a large number of Substances listed, run a query as described in the following chapter D.4.3.2 Querying for a Substance in the Query results pane.
Tip
For each entry in the query results list a context menu can be opened (right mouse click) as shown in the screenshot above. The context menu offers the following commands:
Open
 for opening the Substance dataset (as an
alternative method to double-click)
for opening the Substance dataset (as an
alternative method to double-click)Print
 for printing the Substance dataset
Export
 for exporting the Substance dataset
Create dossier
 for creating a Dossier out of the Substance
dataset
for creating a Dossier out of the Substance
datasetDelete
 for deleting the Substance dataset
In the Query results pane, you can run a query as follows:
Click into the Find / Filter pane
 below the Query
title bar.
below the Query
title bar.Enter the Substance name or part of it to filter for the desired substance. For example, "sam" will filter out all Substances containing this search string either in their names or in the names of the Legal entity displayed after a slash (/). The more unequivocal the entered text is, the better the search for the desired Substance name can be narrowed down. For example, "SampleX" would exclude Substances containing the string "sam" only in the Legal entity name.
Tip
Do not use wildcards such as * for truncated queries. Just enter any string (even part of the name). Queries are not case-sensitive. You can also use the Query tool to search for Substance datasets by different search parameters. See chapter D.15 Query and Search.
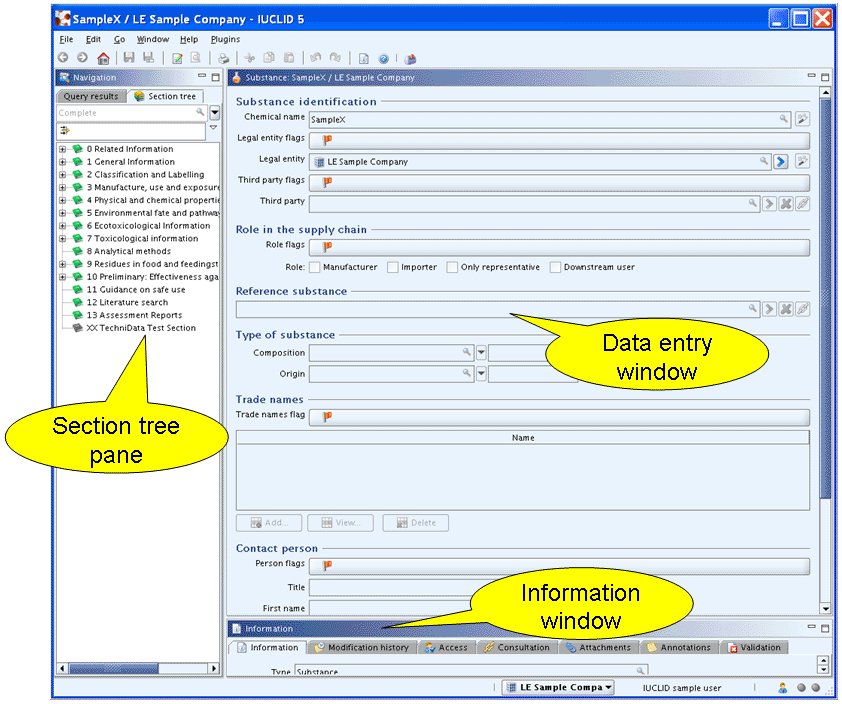
Once you have found the desired Substance, double-click it to open the corresponding dataset. The user interface changes slightly as the first IUCLID section is displayed in the Data entry window together with the Information pane.
When opening the Substance dataset a second tab Section tree appears next to the Query results tab. Click it to switch to the Section tree pane. The user interface appearing now is split into the following parts:
Section tree pane
Data entry window
Information window
Tip
You can minimise / maximise each of the three elements Section tree pane, Data
entry window and Information
window by clicking the respective Minimise  or Maximise
 button in the upper right corner of their title
bars.
button in the upper right corner of their title
bars.
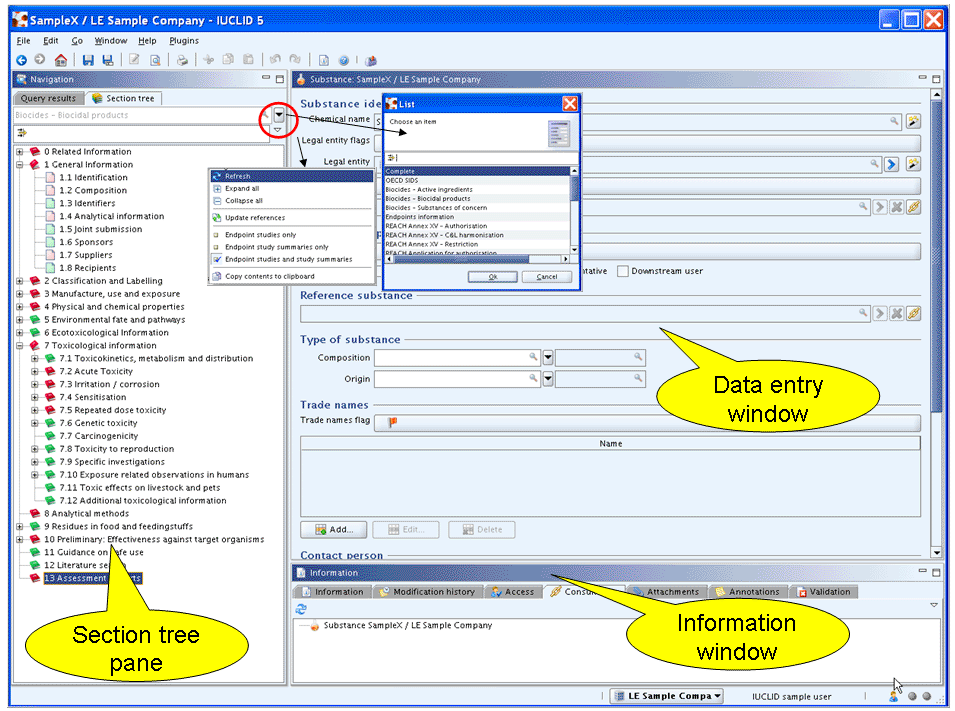
In the Section tree pane, there are two elements for customising the IUCLID sections being displayed as shown:
View mode selector: Click the arrow next to the view mode indicator (red circle in the screenshot below) to open a drop-down list box for selecting the view mode tailored to the relevant chemical programme (i.e. data requirements). By default, the view mode "Complete" is set. Select another mode as appropriate, e.g. "REACH Registration 1 - 10 tonnes, standard requirements". The section tree then changes in such a way that the book
 symbols in front of the sections required for
such a registration or submission are coloured red, while the symbol for
all optional sections remains green. Some sections, which do not apply
(i.e. biocides-related sections) are excluded.
symbols in front of the sections required for
such a registration or submission are coloured red, while the symbol for
all optional sections remains green. Some sections, which do not apply
(i.e. biocides-related sections) are excluded.Important
If you wish to enter endpoint data in sections that are excluded from the selected view mode (e.g. "REACH Registration 10 - 100 tonnes"), you can switch to another view mode (e.g. "Complete") any time.
Note
The meaning of the symbols preceding each section or subsection (if expanded) is as follows:
 is the symbol displayed for subsections
subsumed under sections 1 to 3 only indicating that these
subsections are handled as records per se
as opposed to sections 4 to 13 where records have to be created.
For further information see chapter D.4.6.1
Differences between sections 0 - 3 and sections 4 -
13.
is the symbol displayed for subsections
subsumed under sections 1 to 3 only indicating that these
subsections are handled as records per se
as opposed to sections 4 to 13 where records have to be created.
For further information see chapter D.4.6.1
Differences between sections 0 - 3 and sections 4 -
13. means that a section is closed on the
section tree, i.e. subsections can be expanded by clicking the
Plus symbol
means that a section is closed on the
section tree, i.e. subsections can be expanded by clicking the
Plus symbol  .
. means that a section is open on the section
tree, i.e. all subsections are expanded.
means that a section is open on the section
tree, i.e. all subsections are expanded.For the section titled 0 Related Information, where relations to Templates, Categories and Mixtures are indicated, the following symbols are displayed:
 denotes section 0.1
Templates.
denotes section 0.1
Templates. denotes section 0.2
Categories.
denotes section 0.2
Categories. denotes section 0.3
Mixtures.
denotes section 0.3
Mixtures.
In the Complete view mode, the symbols above (apart from those for section 0 Related Information) are all coloured green. When you select another view mode, you will notice differently coloured symbols. The colours have following meanings:
Green: optional data point, i.e. no formal data requirement, but information can be provided
Red: required data point
Section tree commands: Click the arrow next to the Find or Filter pane
(red circle in the screenshot below) to open a
drop-down list box with following options:Refresh
 : Updates the section tree with any changes
made after opening it. This is normally only relevant if you are
connected to a network multi-user application of IUCLID. In a single
server application, this feature might be useful, if you started to
import records into a dataset, but opened that dataset while the
data import was stilling running as background job. After the import
is finished, any imported records will only be displayed in the
expanded section tree when you click the Refresh button.
: Updates the section tree with any changes
made after opening it. This is normally only relevant if you are
connected to a network multi-user application of IUCLID. In a single
server application, this feature might be useful, if you started to
import records into a dataset, but opened that dataset while the
data import was stilling running as background job. After the import
is finished, any imported records will only be displayed in the
expanded section tree when you click the Refresh button.Expand all
 : Expands all sections and subsections and
displays all records available in the dataset. Short-cut command:
Ctrl+Plus symbol.
: Expands all sections and subsections and
displays all records available in the dataset. Short-cut command:
Ctrl+Plus symbol.Collapse all
 : Collapses the section tree, i.e. all
subsections and records are hidden.
: Collapses the section tree, i.e. all
subsections and records are hidden.Update references
 : Affects only referenced records, which are
updated with any changes made in the corresponding original records
(see also chapter D.4.7.10 Referencing
Endpoint study records to another Substance dataset).
: Affects only referenced records, which are
updated with any changes made in the corresponding original records
(see also chapter D.4.7.10 Referencing
Endpoint study records to another Substance dataset).Show endpoint studies only
 : Displays only Endpoint study records in the
section tree (provided that it has been expanded).
: Displays only Endpoint study records in the
section tree (provided that it has been expanded).Show endpoint study summaries only
: Displays only Endpoint summary records in
the section tree (provided that it has been expanded).Show endpoint studies and study summaries
 : Displays both Endpoint study records and
Endpoint summary records in the section tree (provided that it has
been expanded). This is also the default setting as indicated by the
tick in the icon.
: Displays both Endpoint study records and
Endpoint summary records in the section tree (provided that it has
been expanded). This is also the default setting as indicated by the
tick in the icon.Copy content to clipboard
 : Copies all record of the dataset to the
IUCLID clipboard, from which they can be pasted in another dataset
(see chapter D.4.10 Creating a copy of a
Substance dataset).
: Copies all record of the dataset to the
IUCLID clipboard, from which they can be pasted in another dataset
(see chapter D.4.10 Creating a copy of a
Substance dataset).
Note
How to use the Find or Filter pane to filter for records in the Section tree is
explained in chapter D.4.3.4.2 Selecting an Endpoint
section from the section tree.
The data entry window appearing after opening a Substance dataset consists of following elements:
Title bar indicating the name of the Substance and the assigned Legal entity
Data entry screen (i.e. user interface) consisting of data entry fields
For detailed guidance including How-to instructions, see following chapters:
D.4.5 What data types are available and how are they used?,
D.4.6 How to manage sections 0 - 3
D.4.7 How to manage Endpoint study records in sections 4 - 13.
The Information window consists of several tabs:
Information: General (technical) information concerning the current document, particularly the Universal Unique IDentifier (UUID)
Modification history: Displays who changed what and when.
Access: Shows which other users are working on the same document (relevant for network multi-user applications).
Consultation: Privides a tree structure which indicates if and how the elements of a dataset are related to each other.
Attachments: Displays all documents that have been attached to the record.
Annotations: Displays any annotations made by the European Chemicals Agency or Competent Authorities or others.
Validation: Shows errors which occurred while working with the programme.
For more detailed guidance on the panes above, see chapter D.4.9 How to use the Information window.
This chapter explains what IUCLID Endpoint sections are and how they are selected.
A IUCLID dataset contains all data for a Substance such as the Endpoint study records, information on the classification and labelling and the chemical identity including the substance composition. A dataset is structured into the following 13 main sections:
Section 0: Related information
Section 1: General substance information
Section 2: Classification and labelling
Section 3: Manufacture, use and exposure
Section 4: Physical and chemical properties
Section 5: Environmental fate and pathways
Section 6: Ecotoxicological information
Section 7: Toxicological information
Section 8: Analytical methods
Section 9: Residues in food and feedingstuffs
Section 10: Effectiveness against target organisms
Section 11: Guidance on safe use
Section 12: Literature search
Section 13: Assessment reports
Many of these sections are further broken down to subsections as exemplified in the following screenshot:
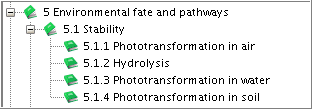
There is a striking difference as regards data entry between sections 0 - 3 and sections 4 -13 as follows:
Sections 0 - 3: Data are entered directly into the subsections and all sections 0 to 3 are physically managed as one record. Hence, all these sections have the same UUID. No further records can be created. An overview of all available subsections of this part is given in chapter D.4.6 How to manage sections 0 - 3.
Sections 4 -13: Data can only be entered into Endpoint study records or Endpoint summary records which first have to be created. An overview of all available subsections of this part is given in chapter D.4.7 How to manage sections 4 - 13.
See also chapter D.4.6.1 Differences between sections 0 - 3 and sections 4 - 13.
For specific guidance on the data entry fields provided in the different IUCLID (sub)sections see chapter E. Specific Guidance on Content of IUCLID Sections.
You can select a given subsection in following different ways:
Classical method: Click the Plus symbol(s)
in front of the hierarchical section titles until
the desired subsection is expanded. You can also expand all sections by
selecting the Section tree command Expand
all (see chapter D.4.3.3.1
Section tree pane).Filter method:
Click into the Find or Filter pane
below the title bar of the Section tree pane.Enter an appropriate part of the section title. For example, "alg" will filter out all (sub)sections containing this search string in their titles, namely "6.1.5 Toxicity to aquatic algae and cyanobacteria" and "6.1.6 Toxicity to aquatic plants other than algae". The more unequivocal the entered text, the better the search for the desired section title can be narrowed down. On the other hand, you can filter for all subsections subsumed under a main section. For example, searching for "ecotox" will show all subsections under section 6 Ecotoxicological Information.
Tip
Do not use wildcards such as * for truncated queries. Just enter any string (even part of the name). Queries are not case-sensitive.
Once you have found the desired section, you need to have a record in order to enter data. As indicated in chapter D.4.3.4.1 What is a IUCLID section?, there is the following difference as regards data entry between sections 0 - 3 and sections 4 -13:
Sections 0 - 3: Double-click the section title preceded by a green or red leaf symbol
. This will display the respective section and you
can enter data right away in the Data entry window. No further records
can be created.Sections 4 -13: Right-click the section title preceded by a green or red book symbol
or . A drop-down list appears in which you can select
"New Endpoint study record" or "New Endpoint summary record".
For detailed instructions on how to enter and edit data in the different IUCLID sections see chapters:
D.4.6 How to manage sections 0 - 3
D.4.7 How to manage Endpoint study records in sections 4 - 13
D.4.8 How to manage Endpoint summary records in sections 4 - 10